
Last weekend I took an excursion down to the National Gallery of Art to do some book shopping in their bookstore. I brought the Lomo Belair with me to play around a bit.
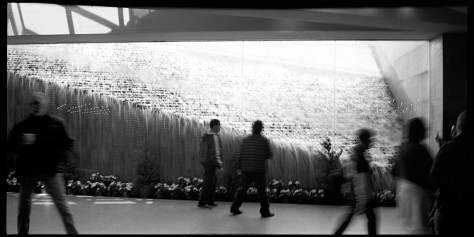
The cafeteria and bookstore for the NGA is below ground. There’s a great big window that looks out at a fountain that cascades from the plaza at street level above, and transforms what could otherwise be a dark and oppressively cavern-like space into something almost airy.
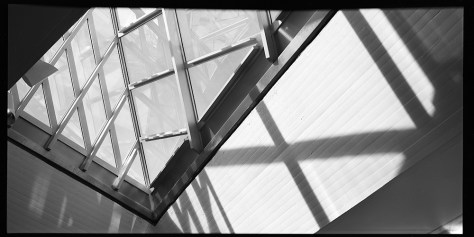
Also directly above the cafeteria and facing the waterfall are the glass pyramidal skylights. They’re not true pyramids, as they’re actually irregular tetrahedrons (four-faced geometric structures with each face being a triangle).
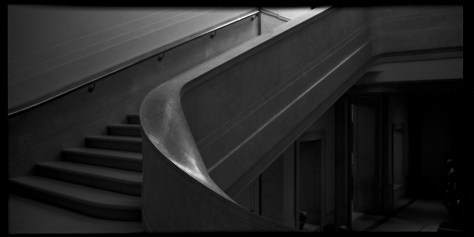
Contrasting to the brutal modern geometric structures of the cafeteria and the East Wing (itself a wedge-shaped structure designed by I.M. Pei and completed in the 1970s), the original gallery building is supremely neoclassical, designed by one of the late-19th/early 20th century’s greatest American architects, John Russell Pope. The marble staircase shown here has the sweeping grandeur and majesty of a European royal palace.
The images as you see them here are an interim step- my plan is to make platinum prints from all of them. The originals are shot on 2 1/4 inch roll film, so prints directly from the in-camera original film would be quite small – 2 1/4 x 4 1/4 inches. I want to make slightly bigger prints, and I want to try out making digitally enlarged negatives with another technique I recently came across for the digital negative process. I’ve been around and around with making digital negatives for a while and never been especially happy with my results. All the techniques I’ve seen and tried so far are rather labor-intensive and involve making several rounds of test prints just to develop the adjustment curve needed to make the negative print well in pt/pd.
I came across a video from Bostick & Sullivan that explains the process quite simply and clearly, and the website provides you with a downloadable pre-made curve for adjusting your negatives to make them suitable for pt/pd printing. I’ve made the appropriate digital files from these images, and the next step will be to print them over the weekend and try making my prints from them. I’ll post the results of the printing session as soon as I have them.
Here is the video from YouTube:
And the page to download the curves for Pt/Pd, Cyanotype, Kallitype, and Van Dyke:
