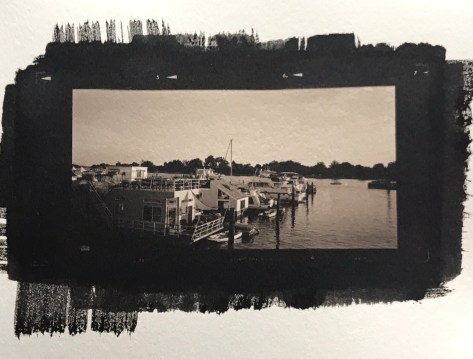
Today this is a marina for pleasure boats. In 1848 it was a working dock that admitted directly onto the Potomac River, and was the site of the largest non-violent slave escape attempt in US history, the “Pearl Incident”, when 77 individuals attempted to flee down the Potomac river and through the Chesapeake Bay with the intended destination of New Jersey, a free state. Their efforts were thwarted by contrary winds on the Potomac and betrayal by a fellow slave who did not join them.
These warehouses in Georgetown today house businesses, a tavern and boutiques, but at the time of the Pearl Incident were tobacco and grain warehouses owned by Mr. Dodge, the man who owned the leaders of the escapee contingent.
The net outcome of the Pearl Incident was the ending of the slave trade in Washington DC in 1850, but full abolition of slavery and legal emancipation would have to wait until 1862. Along the way, the captain and first mate of the Pearl spent four years in prison because they could not afford to pay the fines ($10,000 in 1848 currency, or about $250,000 in today’s currency).
Last weekend I took an excursion down to the National Gallery of Art to do some book shopping in their bookstore. I brought the Lomo Belair with me to play around a bit.
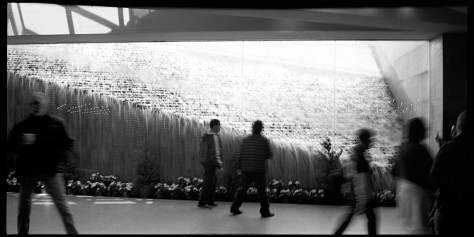
Waterfall, Cafeteria, National Gallery of Art
The cafeteria and bookstore for the NGA is below ground. There’s a great big window that looks out at a fountain that cascades from the plaza at street level above, and transforms what could otherwise be a dark and oppressively cavern-like space into something almost airy.
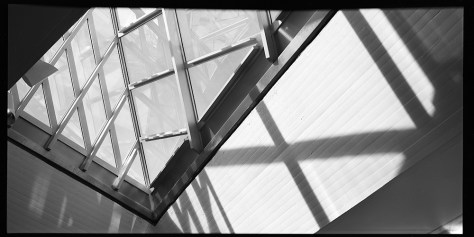
Skylight, Cafeteria, National Gallery
Also directly above the cafeteria and facing the waterfall are the glass pyramidal skylights. They’re not true pyramids, as they’re actually irregular tetrahedrons (four-faced geometric structures with each face being a triangle).
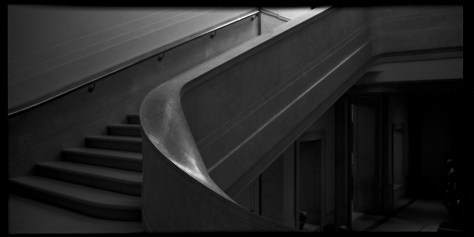
Stairs, West Wing, National Gallery of Art
Contrasting to the brutal modern geometric structures of the cafeteria and the East Wing (itself a wedge-shaped structure designed by I.M. Pei and completed in the 1970s), the original gallery building is supremely neoclassical, designed by one of the late-19th/early 20th century’s greatest American architects, John Russell Pope. The marble staircase shown here has the sweeping grandeur and majesty of a European royal palace.
The images as you see them here are an interim step- my plan is to make platinum prints from all of them. The originals are shot on 2 1/4 inch roll film, so prints directly from the in-camera original film would be quite small – 2 1/4 x 4 1/4 inches. I want to make slightly bigger prints, and I want to try out making digitally enlarged negatives with another technique I recently came across for the digital negative process. I’ve been around and around with making digital negatives for a while and never been especially happy with my results. All the techniques I’ve seen and tried so far are rather labor-intensive and involve making several rounds of test prints just to develop the adjustment curve needed to make the negative print well in pt/pd.
I came across a video from Bostick & Sullivan that explains the process quite simply and clearly, and the website provides you with a downloadable pre-made curve for adjusting your negatives to make them suitable for pt/pd printing. I’ve made the appropriate digital files from these images, and the next step will be to print them over the weekend and try making my prints from them. I’ll post the results of the printing session as soon as I have them.
Here is the video from YouTube:
And the page to download the curves for Pt/Pd, Cyanotype, Kallitype, and Van Dyke:
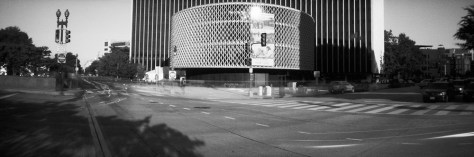
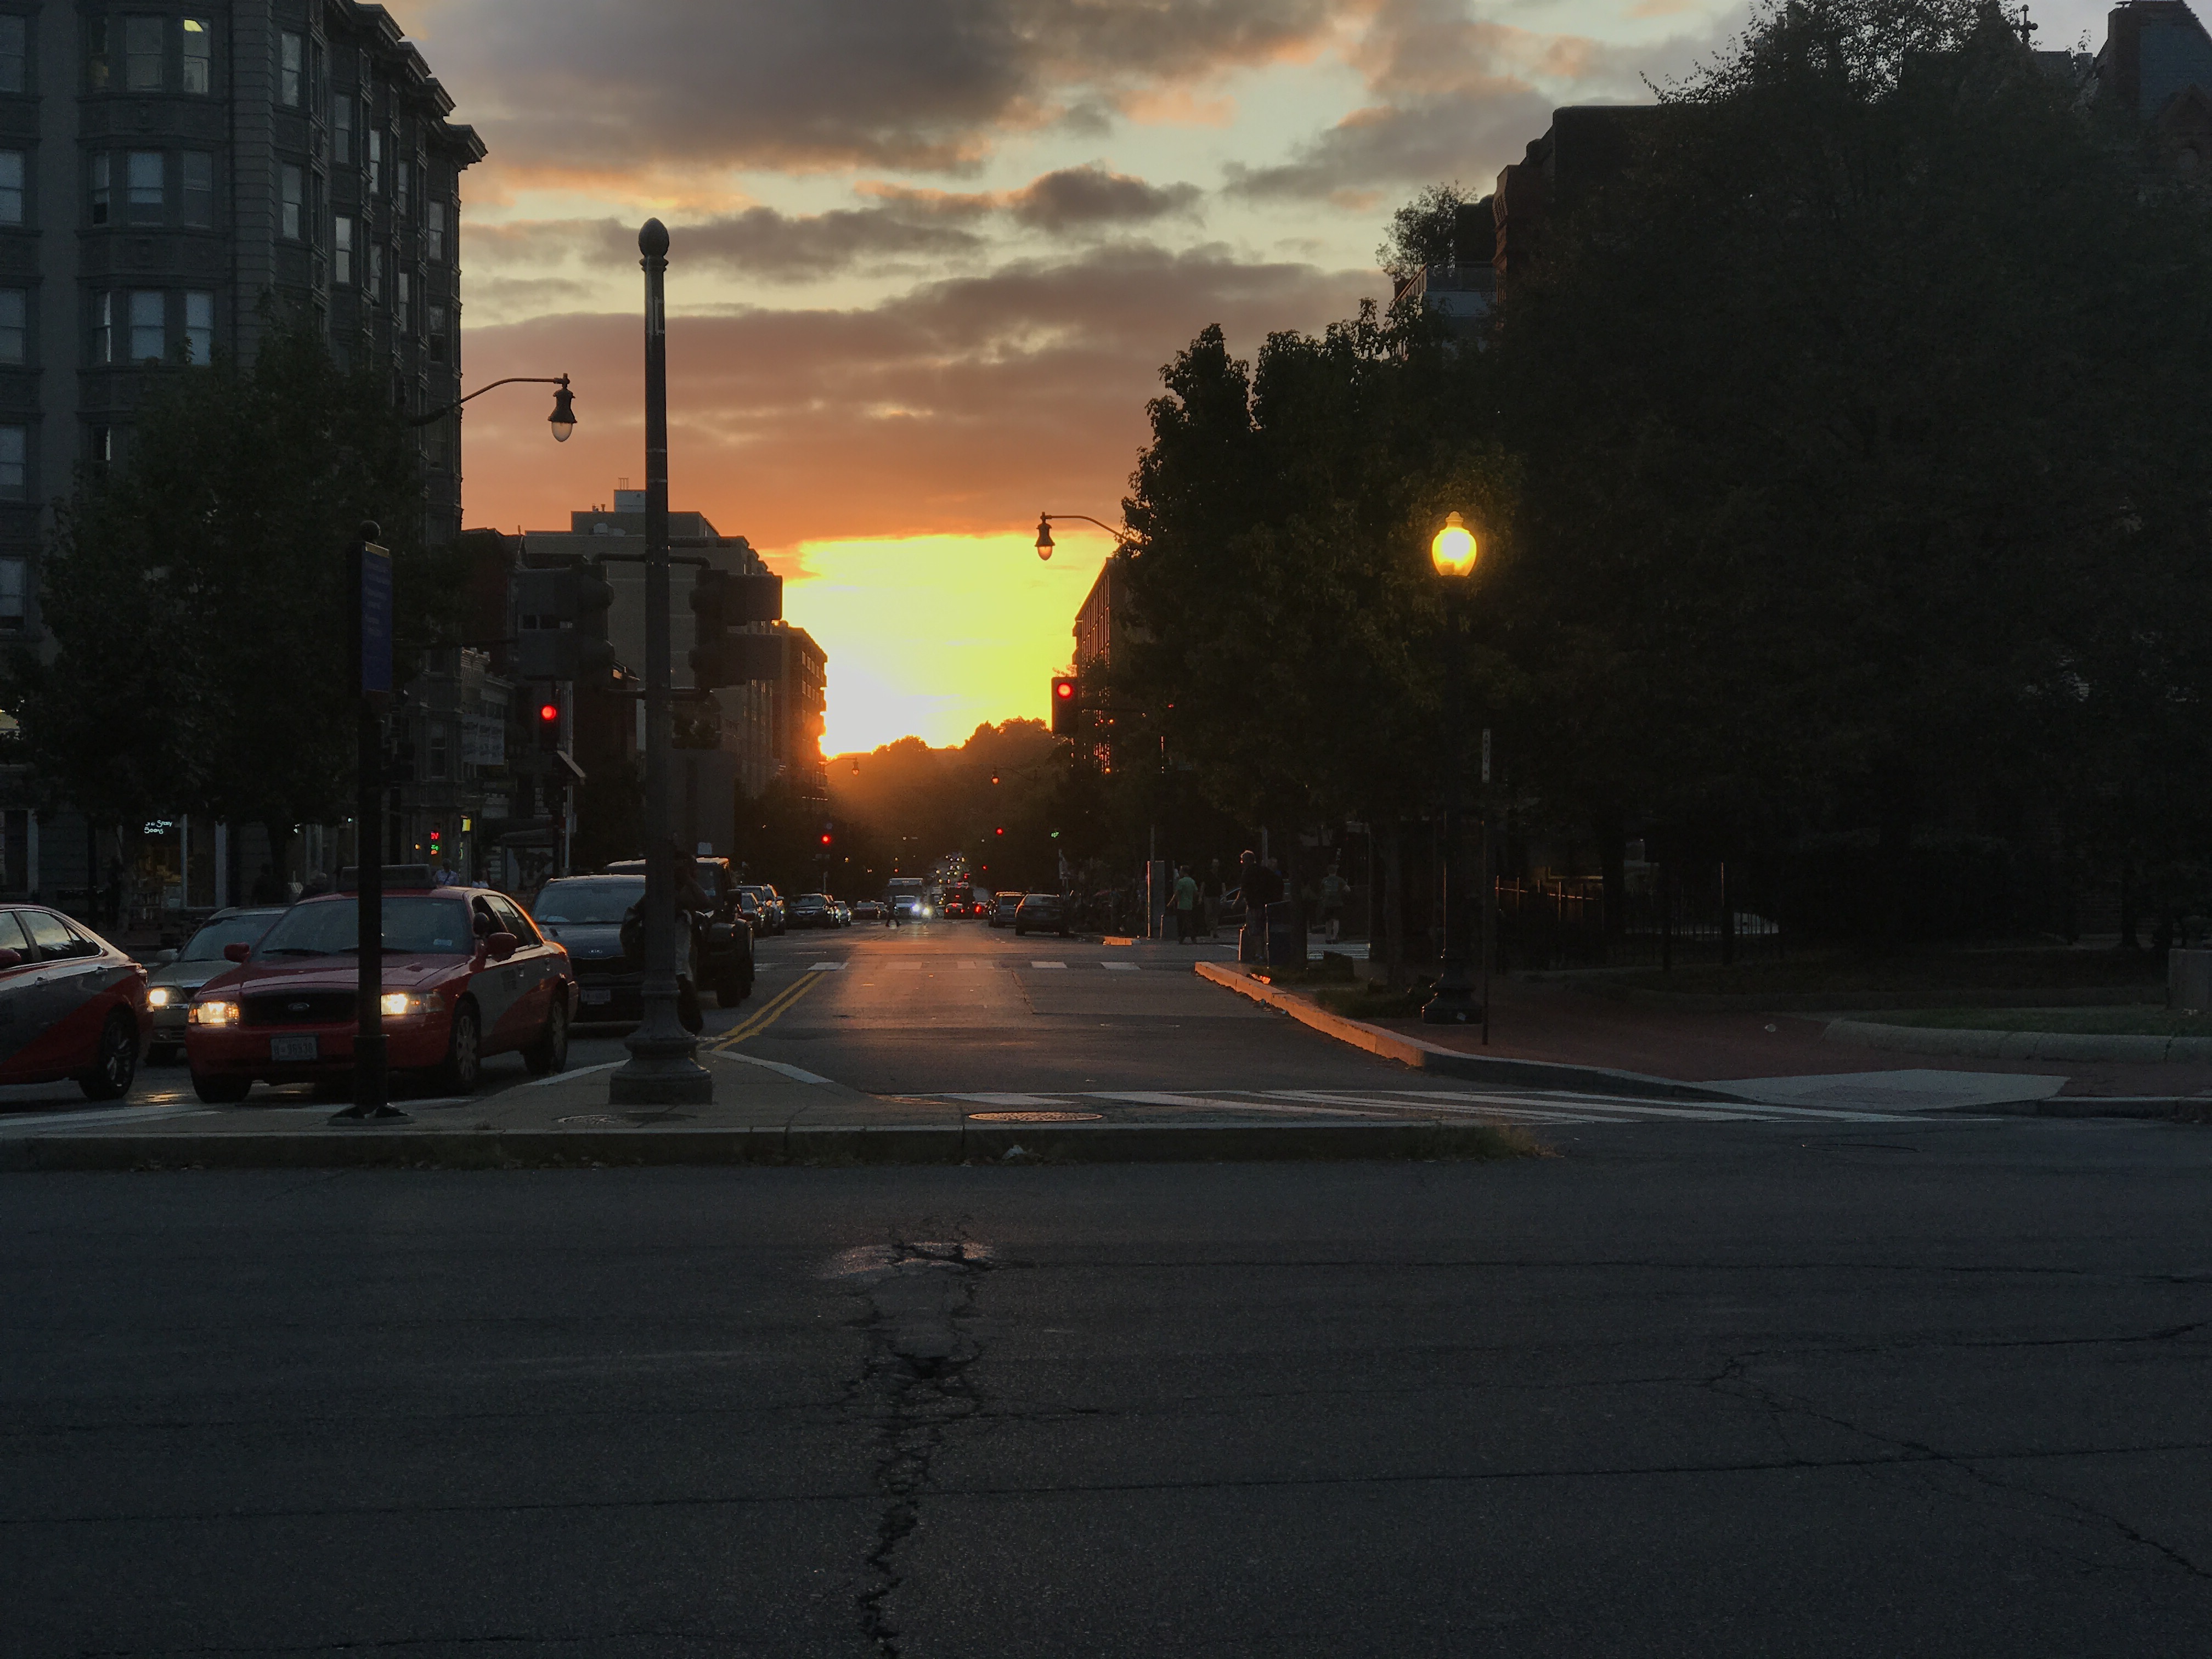
I keep shooting this building and the surrounding intersection because the architecture provides all kinds of graphical possibilities. Here, today, the drum in front of the tower looks almost like polished metal, whereas in reality, it’s coarse concrete. And a 25-second daylight exposure eliminates all but traces of traffic and the most immobile of pedestrians.
The 6×18 pinhole, when kept plumb, level and square, is virtually distortionless. I’m going to try shooting this scene again but from a low angle, pointing up, to see how curved it gets.
Now, with working with the pinhole, Kodak Tri-X has really turned into my go-to film because I really need the extra speed even in daylight. And the grain of Tri-X, in 120, and in contact prints/scans, really is a non-issue.
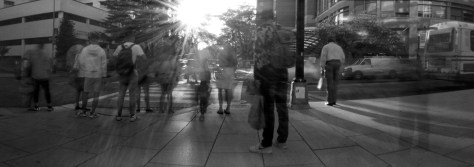
I’ve been out getting my exercise walking around Washington DC shooting 6×18 panoramic pinhole images. 6×18 is quite a large negative, and it’s not something easy to shoot because the composition is so wide.
I think of this image as being sort-of an “un-pinhole” because it captures a scene briefly enough that at first glance, it appears the action is frozen.
Look more carefully at the people in the scene, though, and you’ll see them blurred during the 25 second exposure. I also caught the sunset reflecting off the office building in the distant background. In a strange kind of way, it feels a little Crewdson-esque, like a not-quite-still from a motion picture.
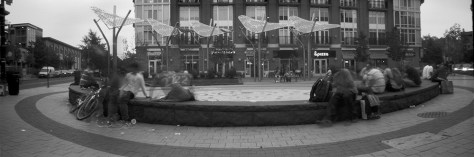
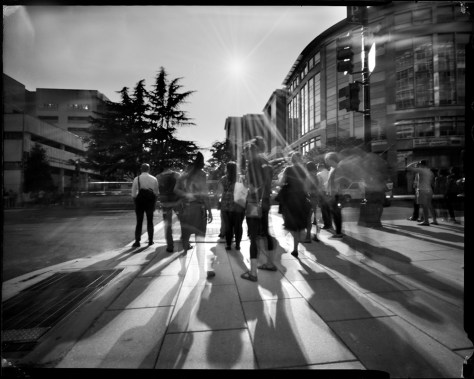
A different take on the “action pinhole” shot. This is the plaza at Park Road and 14th Street, NW in Washington DC. It’s a very popular place for people of all ages to hang out, day or night.
The sculptures at the back of the plaza are “light trees” that use solar panels to charge the lights built into the “branches”. Like the first image, there’s “action” happening here that’s been described in the span of 25 seconds or so, where some people are more static and perceptible than others.
The pinhole distorts perspective here. The plaza is round, but like in the next image, the curvature of the pinhole’s focal plane exaggerates the circular aspect. Here I’m playing with intentional distortion through tilting the curved film plane of the pinhole camera.
This is what you get when you point a curved film plane up, at something that is already curved to begin with.
I’m really getting into these sunburst effect shots from having the sun in the frame with a small aperture pinhole. It gives a whole different take on the notion of “flare”.
For comparison, I’ll include an earlier shot I did with the same effect.
Ok- now I’ve had a chance to put some film through the camera and give it a solid go. Here are some preliminary images from the camera.
This first one worked out amazingly well. I did something like this before with my 4×5 Travelwide pinhole.
Foggy Bottom Metro, Waiting
Different days, different cameras, different feels. I haven’t decided yet which I like better. The 4×5 is a sharper image, but the panoramic has a definite late-afternoon fall rush hour feel to it the other one doesn’t.
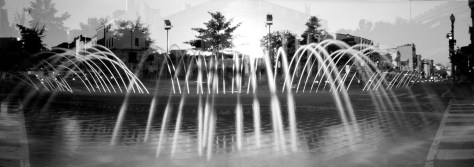
This was a happy accident – a double-exposure of two scenes in Georgetown, the historic and very scenic neighborhood in Washington DC home to the eponymous university and the Potomac River waterfront. The fountain that dominates the above exposure is a new water feature in the riverfront park built in the last few years to reclaim that space and make it appealing to people. The skyline you can see is the iconic intersection of Wisconsin and M Streets, with the famous bank building in the center.
I took this shot to test out how much linear distortion I would get from the pinhole’s curved film plane. As you can see, very little. The nearest pumpkins in the foreground were maybe a foot from the camera, and the ones in the background over a dozen feet away. Yet the shelf they’re sitting on which goes into the background remains sharp and rectilinear.
Here’s the comparison I suspect you’ve all been waiting for. The trial run iPhone panorama shot at top (which I’ve showed before), and the actual exposure from the Vermeer below. The Vermeer has a different aspect ratio ( 6×18 ) and as a result, the vertical field of view is compressed over that of the iPhone. The Vermeer is also using an effective f/300 aperture, so the exposure time for this shot was 25 MINUTES, whereas the iPhone shot was at most three to four seconds.
The iPhone, due to its swinging-lens equivalency, has obvious curvilinear distortion, whereas the Vermeer does not. I was actually honestly surprised at how little distortion it has. I was expecting verticals to remain true, but not the horizontals, because of the curved film plane.
My plan is to re-shoot the night shot with a different tripod. I had a lightweight tripod with me this outing, and it not only did not go high enough to include the entire dome of the Farmer’s Bank building, but it jiggled during the 25 minute exposure such that the non-moving subjects went soft.
As to the camera itself, I have a short list of criticism, both positive and negative.
Likes:
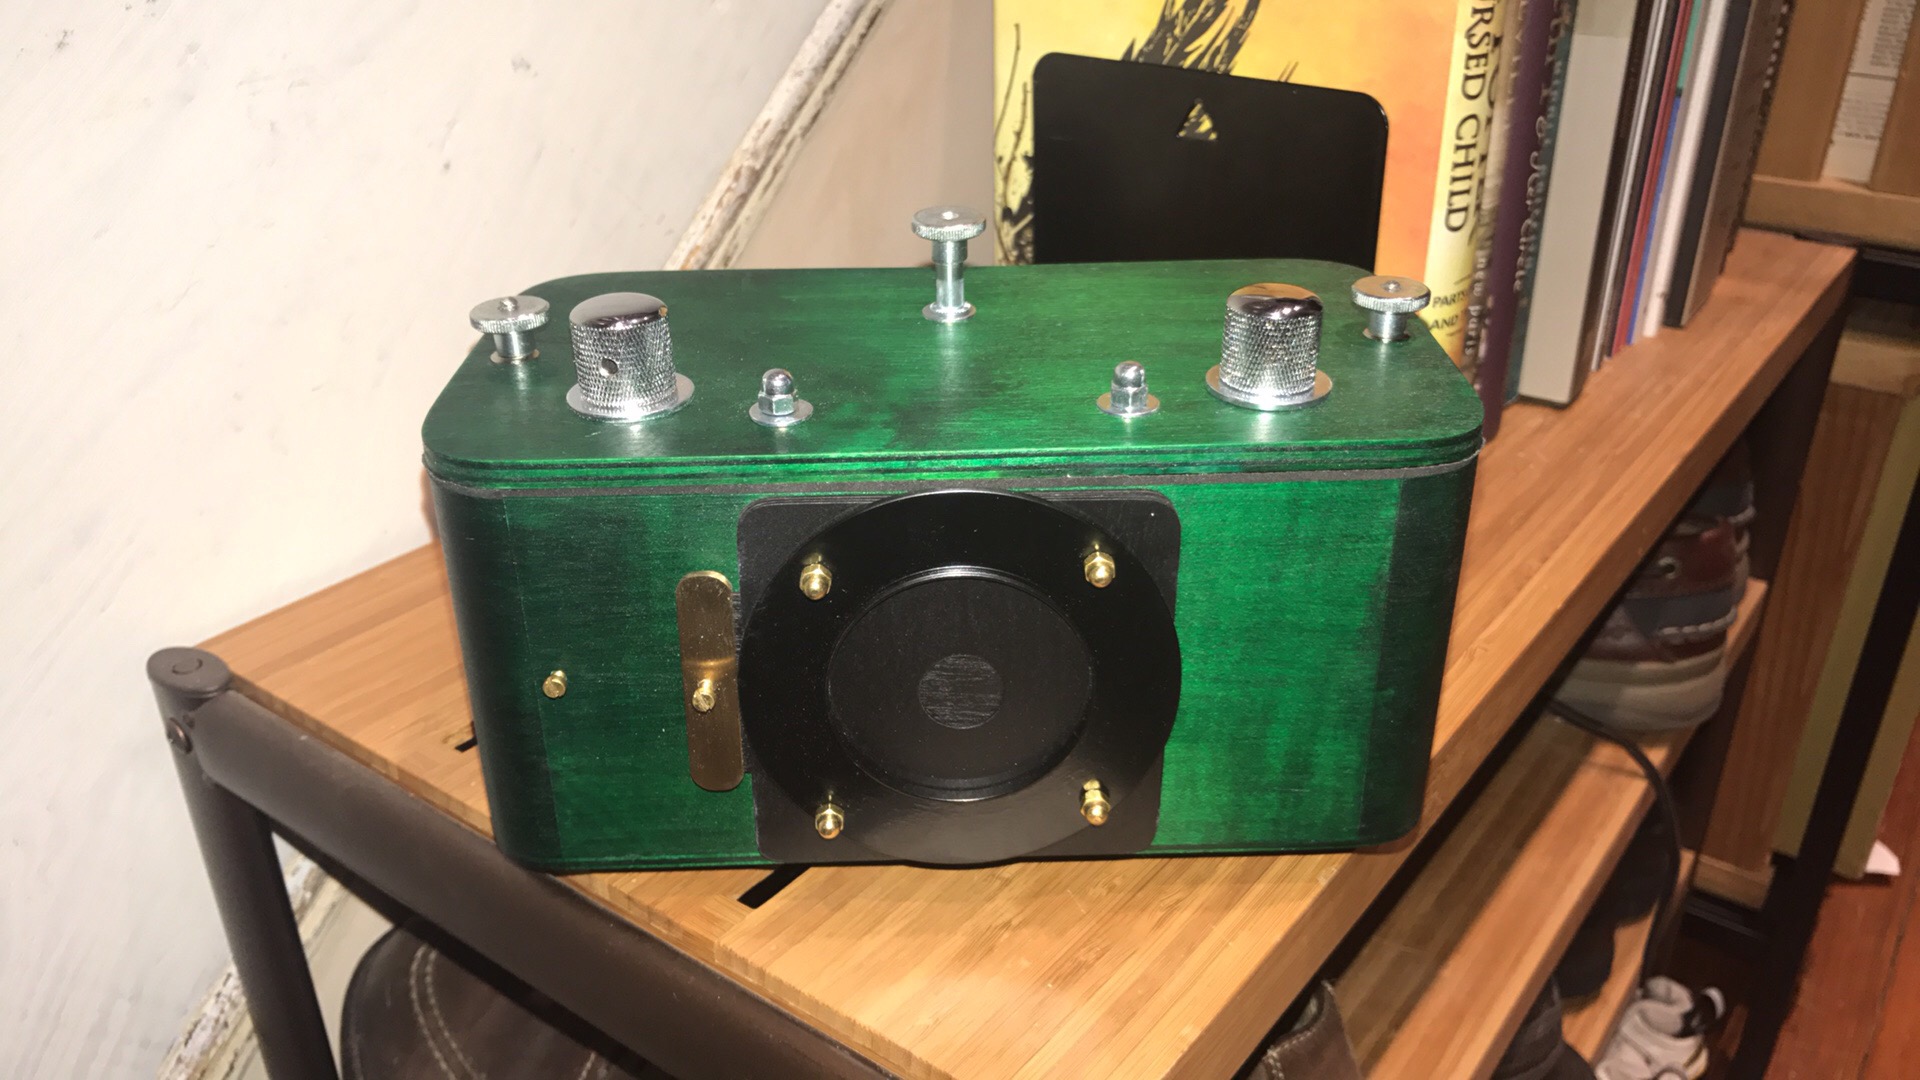
The camera is very nicely finished, with an obvious degree of high craftsmanship.
I very much like the shutter control on the camera, much better than the rubber lens cap-thing on my Travelwide that can easily get lost.
All the controls are easy to grip and operate, even if wearing gloves.
The film advance mechanism makes it easy to fully tension the film after advancing, especially if you over-advance a little and need to roll back.
It comes with a very nicely made cheat-sheet of instructions on how to load and advance the film, and how to calculate exposure. I used the chart exclusively and my exposures came out spot-on.
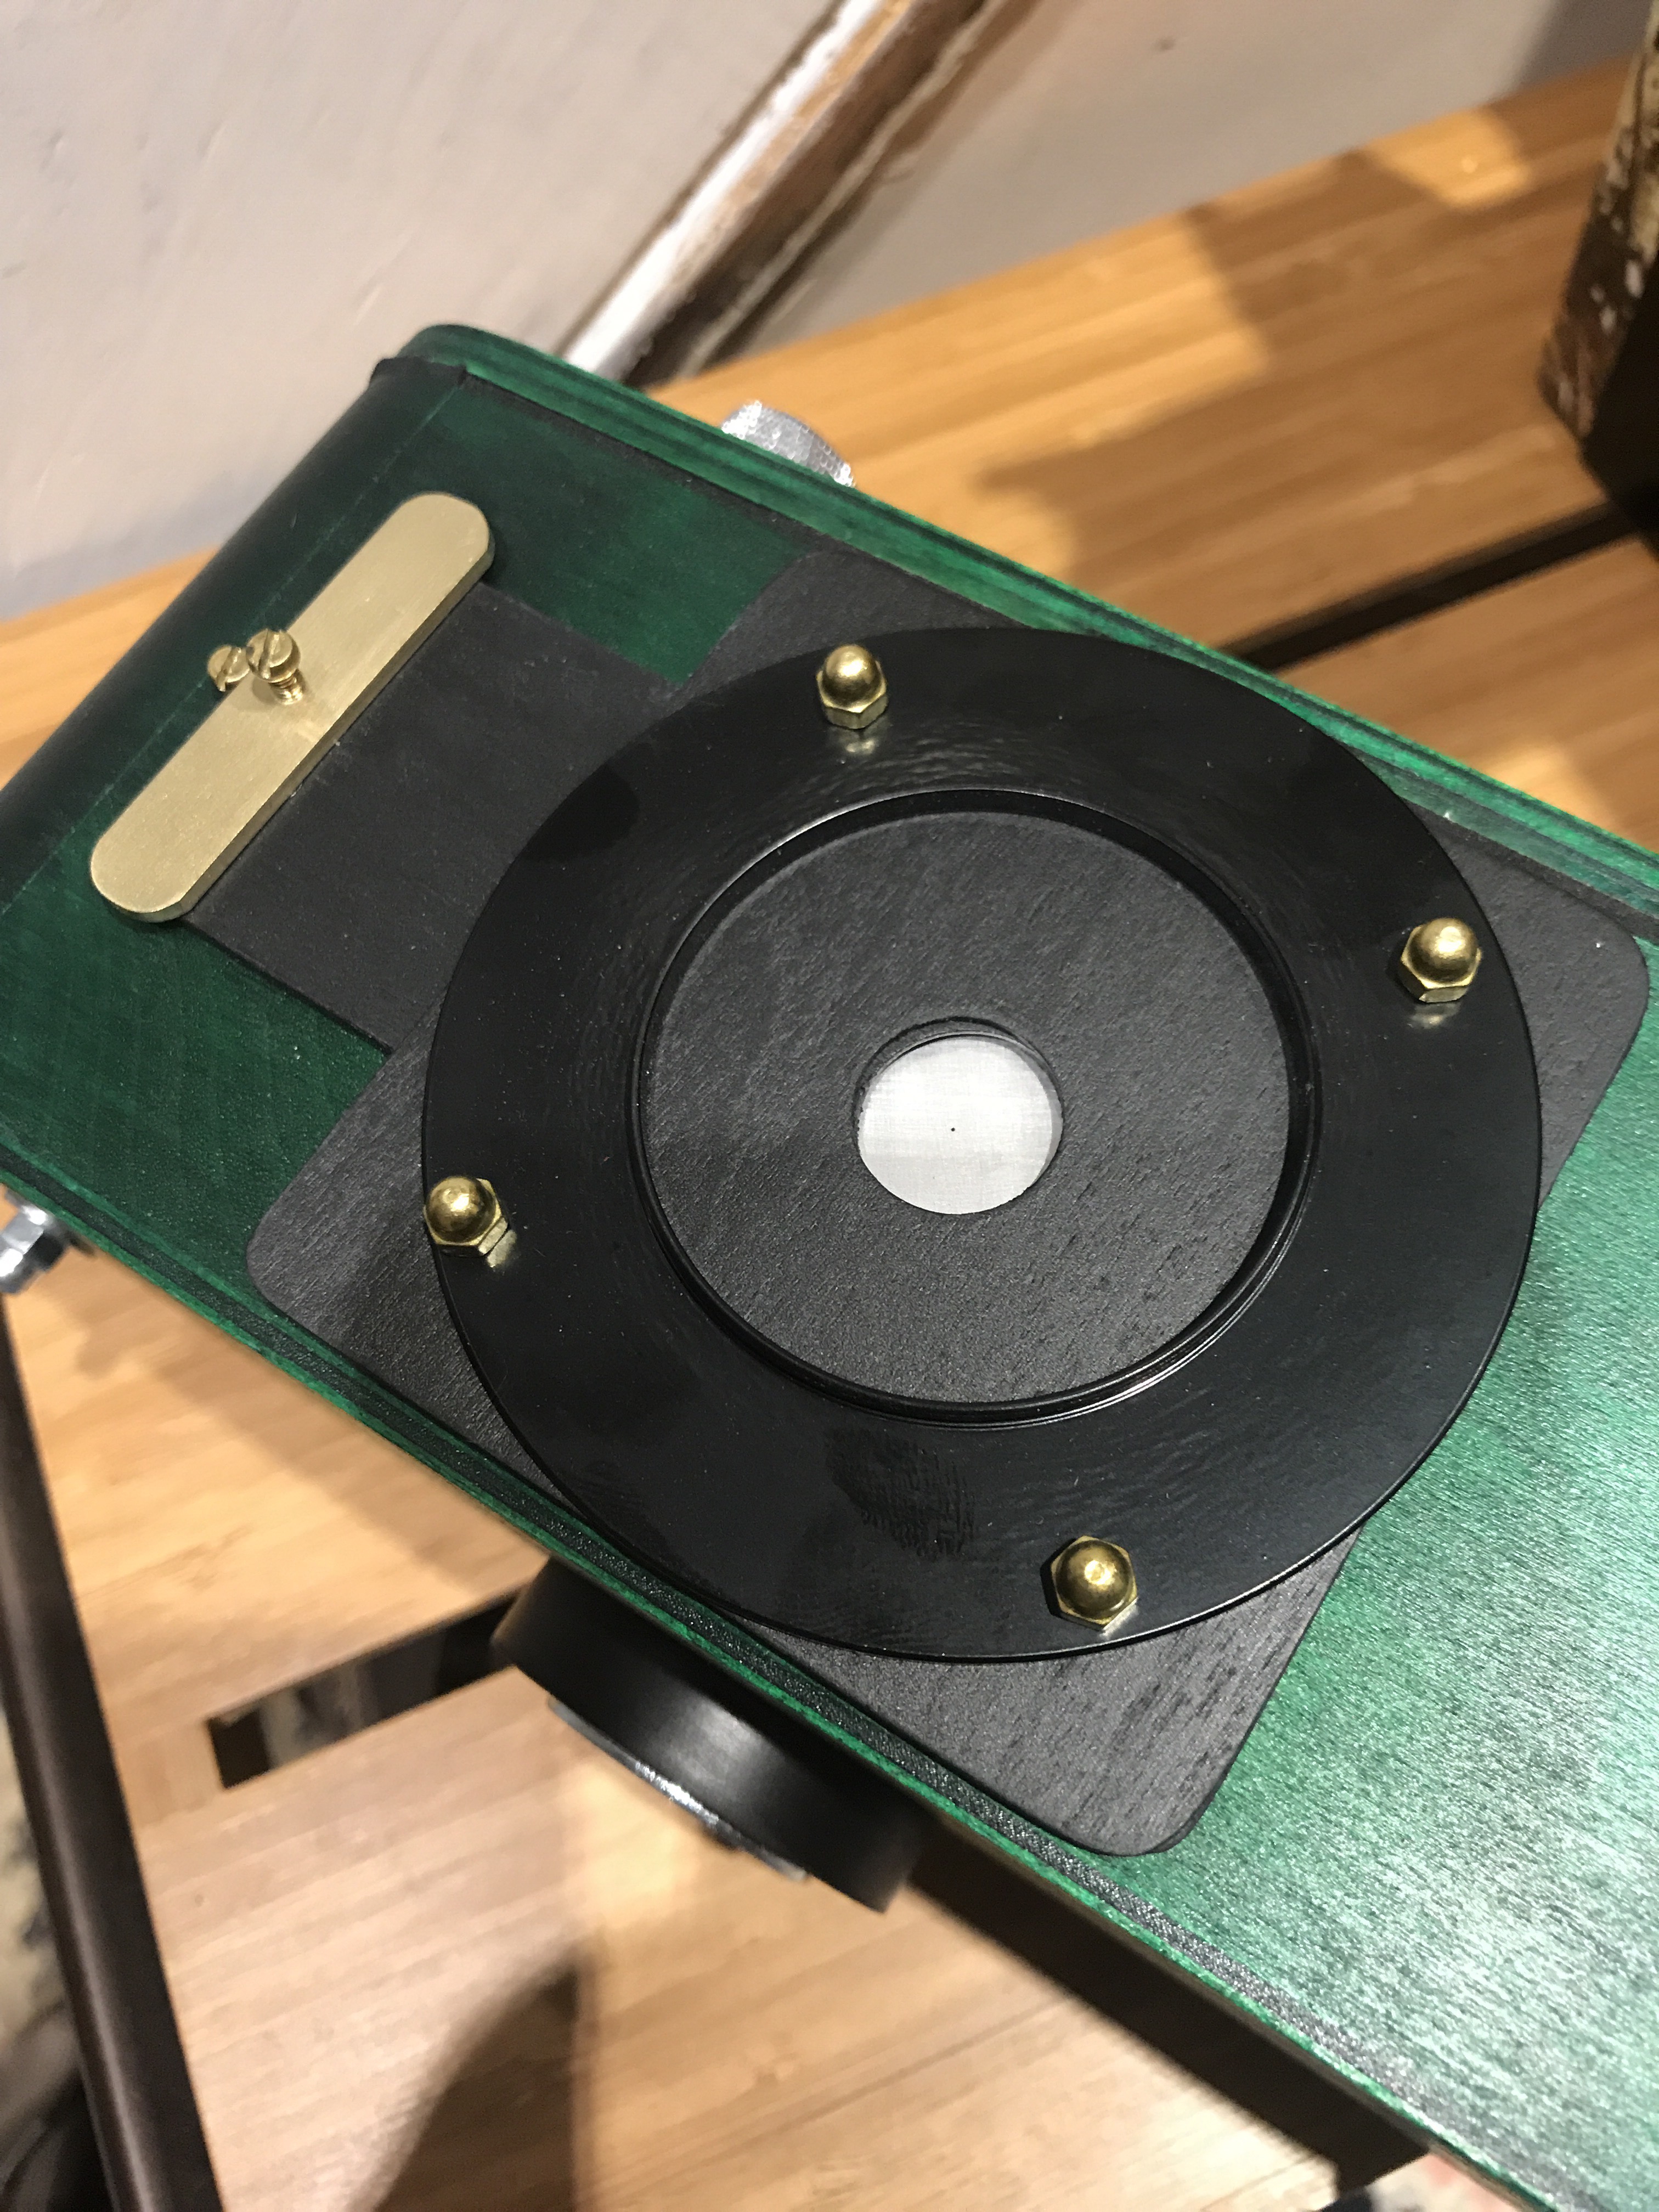
The camera comes with a 52mm filter adapter ring built in to the front, should you want or need to use contrast-boosting filters for black-and-white, Infrared filters, or neutral density if you enjoy sitting up all night making a single exposure.
Dislikes:
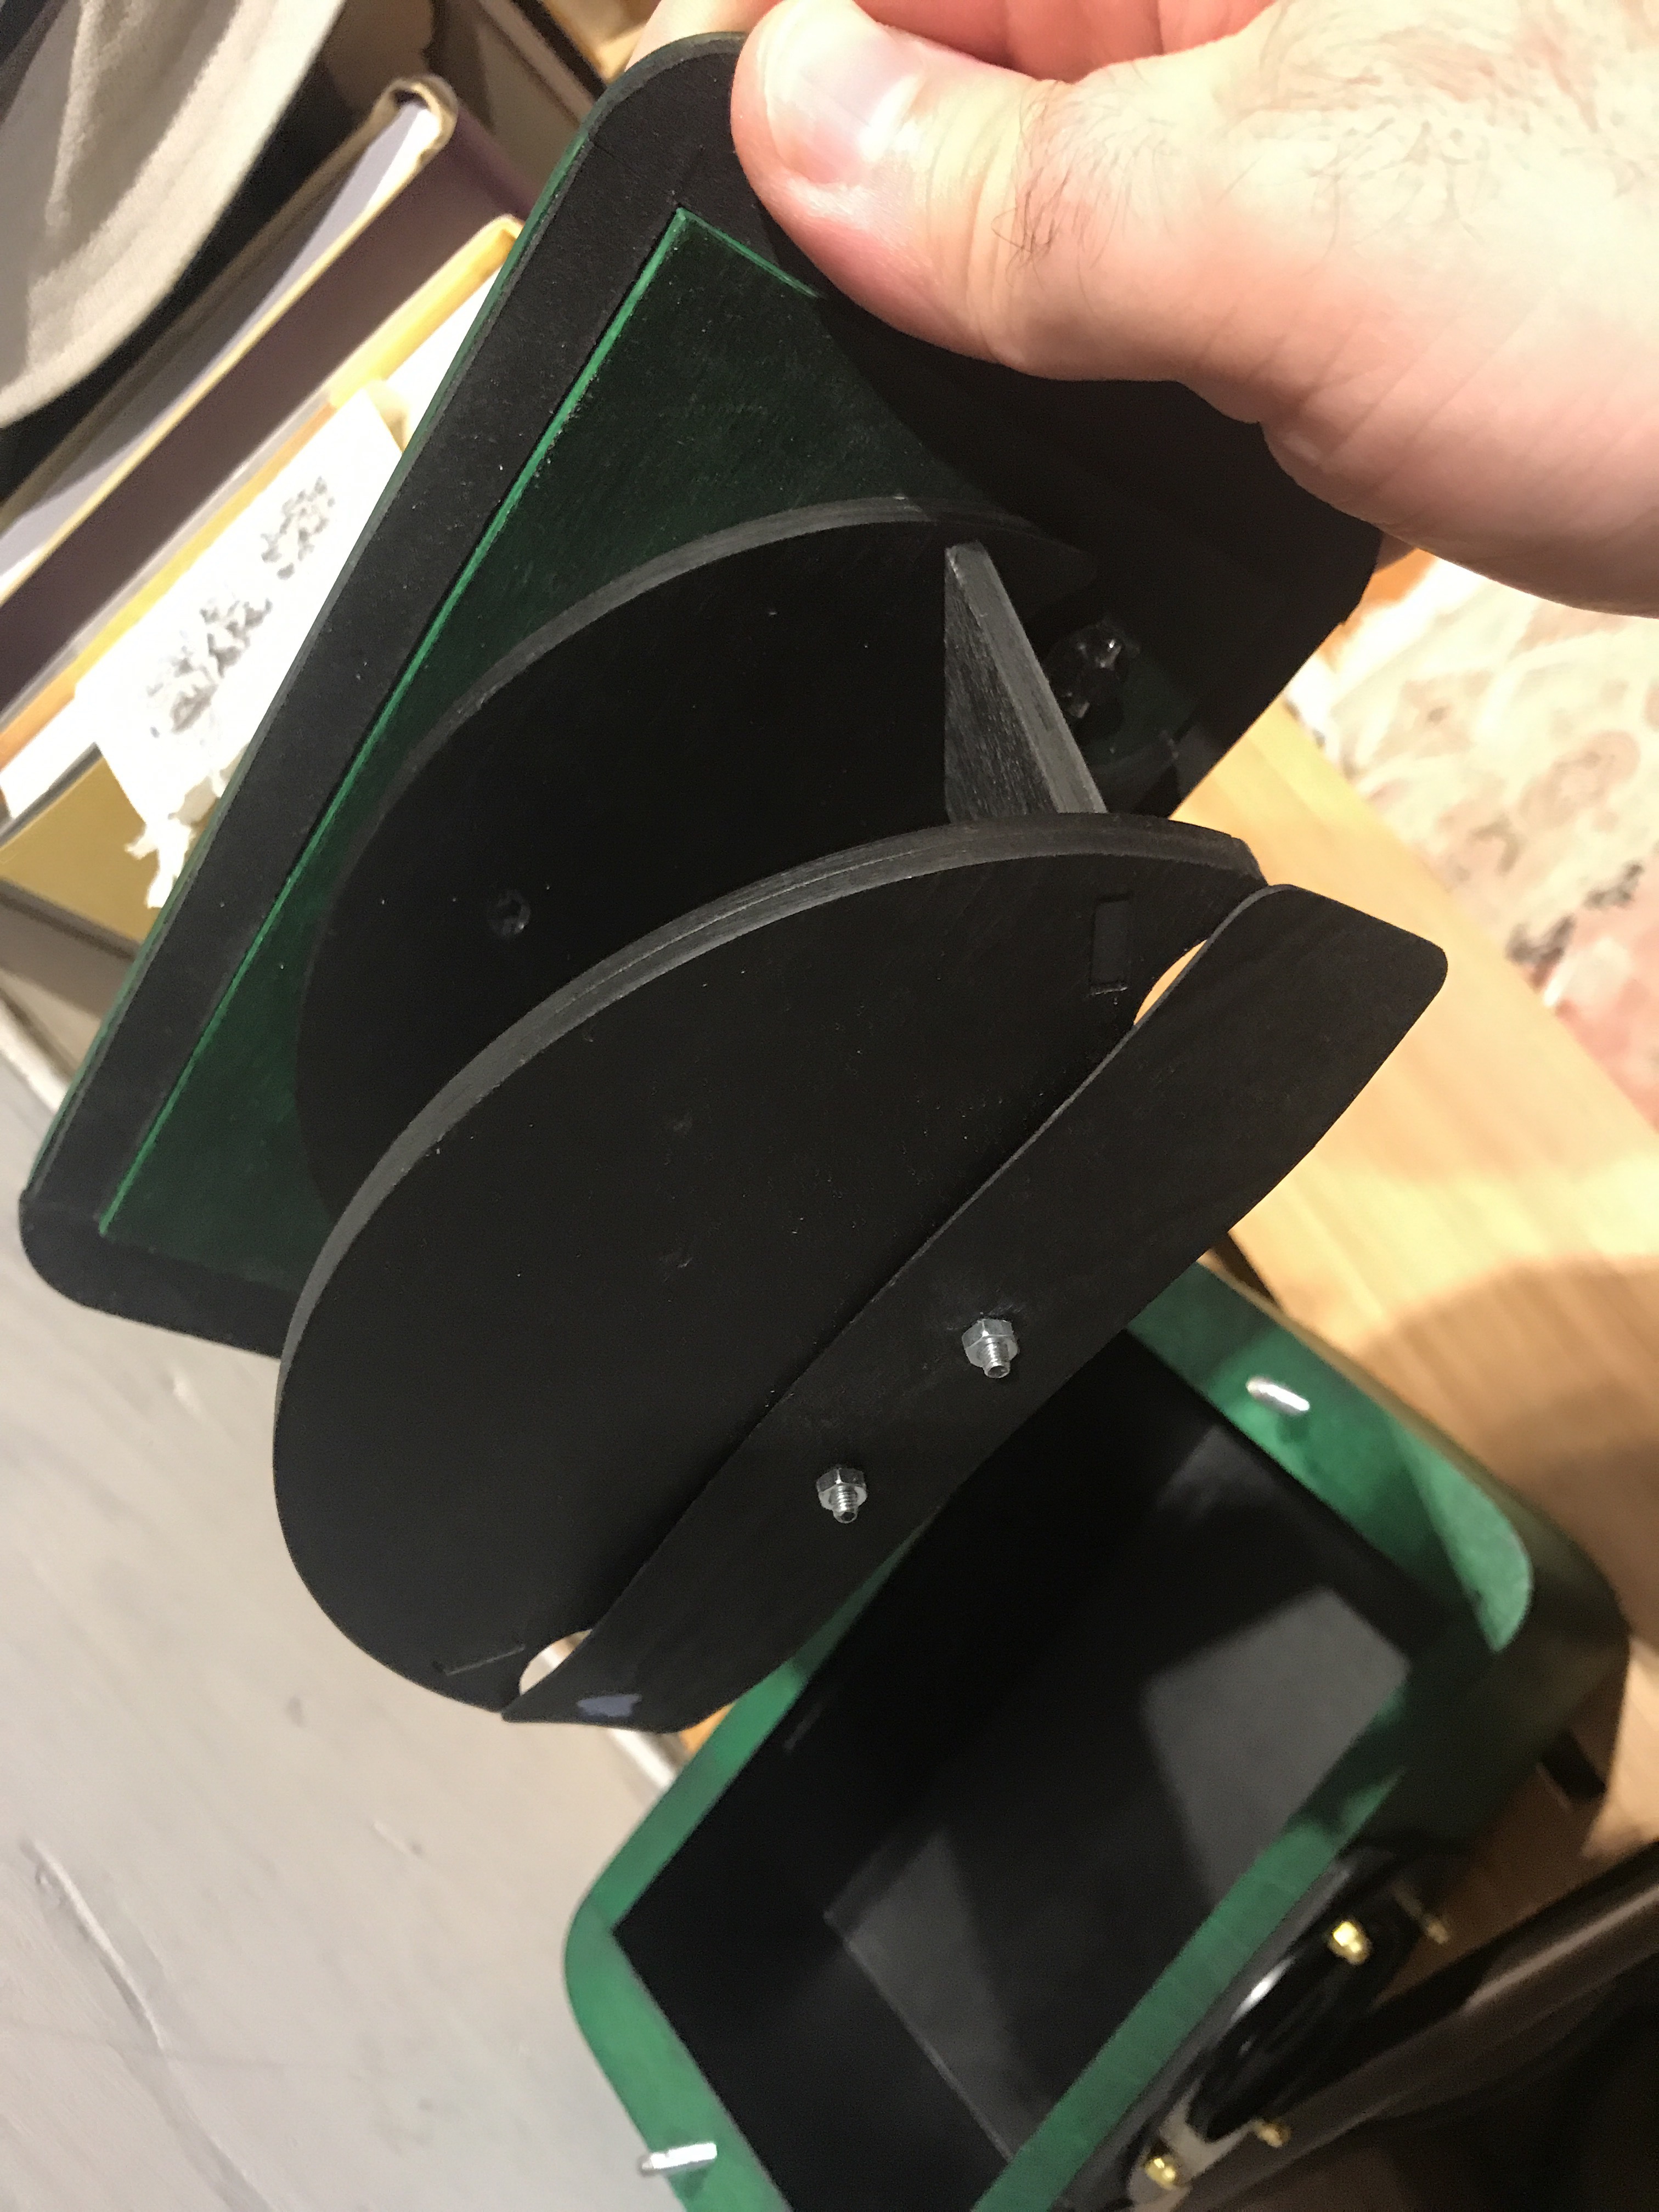
The closure mechanism (two thumb-screws to lock down the lid), while very secure when closed, is susceptible to loss- it would be very easy to drop one of the screws while changing film in the wild, and have it disappear in tall grass or down a storm drain. The camera would not be light-tight at that point.
There are no levels on the camera (a minor quibble, as they are inexpensive to obtain and install). When dealing with a panoramic camera, getting the horizon level is critical.
There are no markings on the camera to indicate the horizontal or vertical fields of view. I can understand how you might not have a horizontal field of view indicator, as the camera design is compact for the format due to the curved film plane, but a vertical field of view indicator would be extremely helpful when guessing compositions and deciding how high to set your tripod, or whether to tilt the camera up.
I’ve got some bubble levels on their way to me from Amazon, and I’ll be attaching them to the top deck when they arrive. That will solve one of my biggest immediate gripes about the camera. Now if I could only find a 6×17 viewfinder that has a similar equivalent focal length…
I took the Vermeer 6×17 pinhole out for a spin today after work. I tried to do some pre-visualization of what I'm going to get by swinging my iPhone in panorama mode. I'm posting examples of what I anticipate, plus views of the scene with the camera in action. I think I've mentioned this before, but in any case, the Vermeer 6×17 pinhole has a hemispheric film plane, which means no vignetting (light falloff toward the corners), and you can have a physically smaller camera given your frame size. But it does introduce curvilinear distortion- thus swinging the iPhone to mimic the effect.
I was a bit nervous taking the steps shot, as I was standing on private property for TWELVE MINUTES. It really felt like trespassing. Fortunately no residents of either house came in or out during that twelve minutes.
I don't have an "action" shot for this one, as I was in a hurry to wrap up this exposure to try and get over to P Street while the setting sun was still above the tree and roof line. It was casting some beautiful warm sunset light that I just HAD to photograph (I posted a shot to my Instagram feed (@DCPhotoArtist if you're interested in my instagramming. It's very much one end of the spectrum of the work I do- 99% iPhone photography, spur of the moment kind of stuff).
I’ll have results to show from this later this week. This camera has a hemispherical film plane, which does two things: it makes the entire negative area equidistant from the pinhole, so it doesn’t have vignetting or fall-off toward the edges, and it produces a particular form of curvilinear distortion.
The camera has an f/300 pinhole, which is quite a small aperture, requiring 186 times more light than f/22. So even full daylight exposures are quite long- 1/2 second. To control exposure, there is a built-in shutter that slides to the left. It also comes with a 52mm filter adapter, useful for things like shooting infrared or special effects filters.
The brand name on it is Vermeer, and the maker is in Poland. He has a shop on EBay for these, and makes them in a variety of sizes and configurations, including anamorphic cameras. My one item on the wish list for it would be either a cold shoe for mounting a bubble level, or just built-in levels on two axes.
The iPhone has had a major impact on personal photography. While it’s nowhere near as capable as my Fuji X-T1, it is both an exceptionally capable and flexible photographic implement, and the camera you always have with you. One of the very cool built-in features is the panorama function. On my way home from work today I was having fun playing with it, and testing out the low-light quality simultaneously.
As you can see, you achieve a panoramic image by swinging the camera from left to right (or in some cases top to bottom- This can also be reversed and swung the other way). You can do an up to 360-degree image. Because of the rotation of the camera, you get linear distortion.
When used carefully, This can make for some interesting images. The curves really highlight the shapes and the light in the scene. Used poorly, it can drag your eye (and hold it) in an ugly and/or uninteresting part of the image.
Another effect is if you have subjects moving through the scene, they can get stretched or compressed, depending on their speed of motion and direction, relative to the camera’s rotation. You can see that very clearly in this image.
Nighttime exposures present some challenges to image quality, especially when combined with the swinging of the camera to stitch together the exposure.
For those curious what the heck I’ve been talking about when I mention my Lomo Belair X/6-12, and the Russian glass lens for it, here you go. The Belair is an odd little beast – collapsible folding strut camera, takes 6×6, 6×9 or 6×12 centimeter negatives depending on which insert you use, is manual focus, scale focusing (you guess the distance and set it on the lens, and compose through an un-coupled viewfinder), has only two aperture options – f/8 or f/16, has manual film advance via red window, yet has an automatic shutter over which the only control you have is changing the ISO dial. Bulb exposures are an option.
The camera out of the box comes with some plastic fantastic lenses (a 90mm and a 58mm). The 90 has perceptible but not egregious distortion, reasonable contrast, and acceptable sharpness. The 58 is, well, not so good. The viewfinder for the 58 has less distortion than the lens does! After the Belair had been out for maybe 6 months or a year, they introduced a limited run of Russian-made all-glass optics for it – a 90mm and a 114mm. I got into the Belair game too late to be able to buy the glass lenses from Lomography, as they were sold out. The lenses were also quite expensive from Lomography, the Belair vendor. I believe they were something on the order of $300 apiece.
The Belair with the 114mm lens
After having used the Belair with the plastic lens for a while, I got the itch to try and find the glass lenses. That’s when I discovered that they had all been sold, and nobody had any old stock sitting around. They didn’t show up with any frequency on Ebay either. I had particularly wanted to find the 90mm, but no dice. Then along came someone selling their 114mm. The price was good, so I jumped on it rather than take a chance on missing out.
Front view, the Belair with the 114mm lens
In addition to the primary reason for getting the glass lens – the glass in the lens with its exceptional sharpness and flare resistance – the ability to precisely control focus is another benefit. The plastic lenses have four distances marked on the barrel – infinity, 3 meters, 1.5 meters and 1 meter (infinity, 9 feet, 4.5 feet and 3 feet for the metrically challenged). If you wanted to focus in between, you had to guess at the distance and hope the depth of field would carry the day. The Zenit-made 114mm and 90mm lenses have many intermediate distances marked on the focusing ring, which is silky smooth without being loose. The ability to much more precisely place your focus means that you can intentionally place objects in or out of focus. This is a major artistic control and a very welcome addition.
The Zenit Belairgon 114mm, and its controls
I’m including this scan of a negative made by the 114 so you can see the sharpness and particularly the flare resistance – I’ve had more flare on my Rolleiflex with the lens hood attached with the sun NOT in the picture. While Russian camera bodies may have been shall we say quality-control challenged (particularly in the Soviet era), their optics are truly outstanding. This should be proof enough to put doubt to rest that Russian lenses are up to par with their German and Japanese peers.
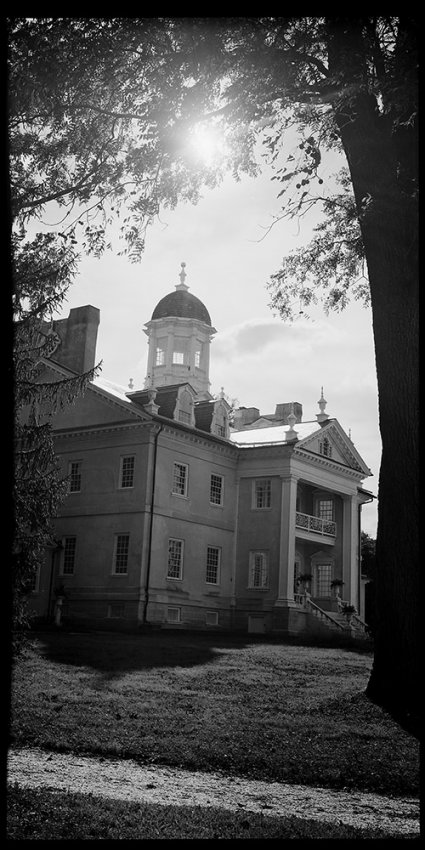
Hampton House, Towson, Maryland
The image was shot on ten year out of date Ilford FP4+, and developed in Pyrocat HD.
Here are the first two from my visit to Hampton National Historic Site, in Towson, Maryland (just north of Baltimore). More will be forthcoming, but I wanted to get these two posted right away. Hampton was at its peak, a several thousand acre estate. It was built as the country home for the Ridgely family, who made their early wealth through ironworks. One Ridgely would be governor of Maryland. The house itself was famous for being a centerpiece of entertainment and gracious living, having greenhouses and a subterranean icehouse on the property, providing the Ridgelys and their guests with seasonal fruits, ice water and chilled beverages year-round, an extreme rarity in 1790 when the house was built. The main house has thirteen bedrooms on three floors, a sitting room, great hall, dining room, parlor, library/music room, kitchen and laundry.
House Slave Quarters
This octagonal garden, roughly 8 feet on a side, is built inside the foundations of the house slave quarters. It was a two-story structure, and some three families of house servants shared it. While the US Park Service guides (who give outstanding tours of the property) tell you explicitly about the structure and its purpose, no marker in the garden indicates its history.
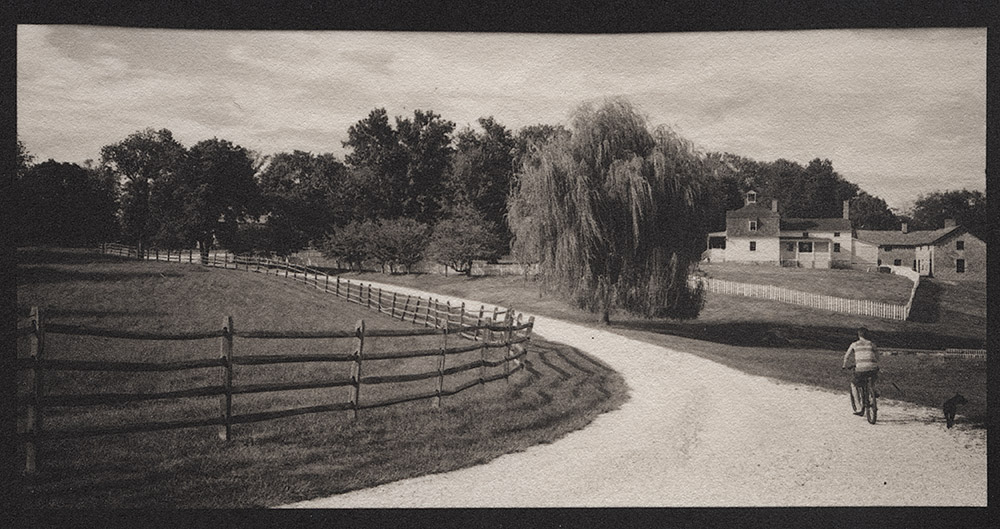
Park Road, Hampton
Today, Hampton Lane divides the Hampton historical site. What is remarkable about the property is that so many of the farm structures remain – the dairy with its spring-water-fed cold water bath for the milk and butter, the horse stables (the Ridgelys were big horse racing fans, and kept the stables within eyesight of the mansion, another unusual feature, as well as a no-longer-surviving racetrack of their own), the overseer’s house and slave quarters for the skilled labor (stable hands, dairy workers, etc).
You can see the overseer’s house inside the white picket fence to the right of the scene. Hampton is open as a public park, and many people come there to ride their bikes and exercise their dogs. Today it is a beautifully maintained pastoral landscape in suburban Baltimore. While again, the Park Service does yeoman’s work in interpreting the space, and has provided outstanding documentation on the website for Hampton, the interpretation of the site requires you to actually go inside the structures and talk to the park service guides. It is possible to visit, and if you don’t engage, be completely oblivious to the fact that the parkland you are walking through exists by and for slave labor.