Category Archives: Cameras

First Session of Intro to Platinum/Palladium Printing a success

I finished up my first session of my Intro to Platinum/Palladium Printing class today. I had eight students, all highly motivated and enthusiastic, and it was a big help in making the class succeed. I was a bit nervous as this was my first time running the class, and it was sold out. There was a very diverse audience – about half and half male and female, and age ranges from early 20’s to late 60s (maybe older than that, but it’s not a very polite thing to ask). I was really thrilled that everything went smoothly – on day one, we all talked about the process, shared work and little bios of our artistic backgrounds, and then went out in Glen Echo Park to walk around and shoot some images. We made 10 negatives all told, enough for everyone in the class to own one, with a couple spares. Since platinum/palladium is a contact printing process, we shot all the film with my 5×7. Most of the students had never used a view camera before, so it was an additional learning experience for them. I took the film home with me and developed it that night, so that students would have real live working negatives, properly developed, for the class, and to keep a sample to see what a good negative looks like.

Today, we got in to the darkroom early, set up and went through the process, end to end. I began with a coating demonstration, then exposed the print, developed, cleared, washed and dried it. Then I cut my students loose and let them coat and print away.

Students Coating and Printing

We used a combination of artificial UV light source and natural daylight – it was a cloudy overcast day, so actually not a bad day for doing pt/pd prints, but exposure times were LONG outdoors – with some negatives, up to 25 minutes. For a quick-and-dirty portable UV light source, I used a 16-socket PhotoDiox lamp house with black-light compact fluorescent tubes. It worked out great for exposing, if a little slow (the average exposure with it was 12 minutes), but we could only do one at a time with it. We still managed to get two prints done for each student, which is not bad for a single day printing session with so many people trying to use a small facility.

Exposing a Print
Exposing a Print

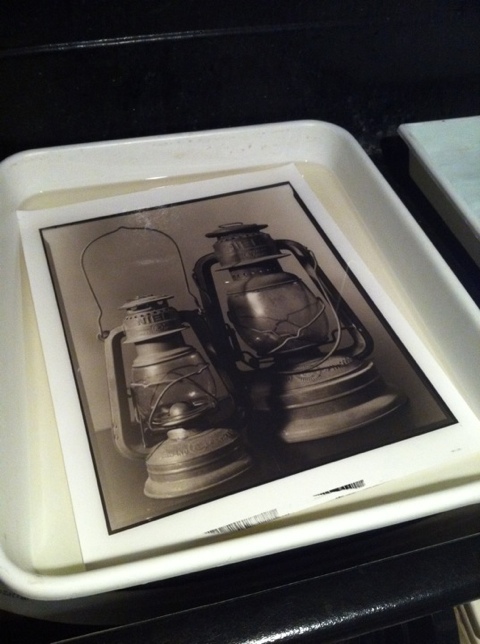
We got the chance to try both traditional develop-out palladium prints and printing-out Ziatypes (a variation on the theme but the image if fully formed during exposure and requires only a water wash step instead of development. Here are my students posing with their prints –

Class Photo - May 5-6 Intro To Platinum/Palladium Printing, Photoworks
Class Photo – May 5-6 Intro To Platinum/Palladium Printing, Photoworks

And here’s a finished print of one of the student images. The print is still wet, and the crappy Olympus digital P&S I was using didn’t white balance well, so my apologies in advance if the shot looks a little yellow –

Stairs, Glen Echo
Stairs, Glen Echo

Fun with Night Color

I’ve been having so much fun with my night photography. I’m really digging the results I get with my RB67 and Kodak Portra 160.

Studio Theater, from 14th Street
Barrel House Liquors
Studio Theater, from P Street
Pearl Dive Oyster Palace, Vespa, 14th Street
Neon, Glen Echo Park
14th & Rhode Island Avenue, Moon

And last but not least, two of these things are not like the others. One is a daytime image I shot of one of the older, more original, and most brightly colored food trucks here in DC – Fojol Brothers. They have three different trucks each catering a different ethnic cuisine – Benethiopia (Ethiopian), Merlindia (Indian) and Volathai (Thai). The bright colors and shiny metal, plus the repetition of the circles and semi-circles just cried out for an abstract treatment, so here it is…

Abstract, Fojol Brothers truck, Merlindia

And last but not least, the happy accident: I was a dingbat and triple-exposed the same frame. But it turned out really neat in the end!

Pearl Dive, Multiple Exposure

Busy photo weekend ahead

Well, I just got finished loading up film holders in preparation for the next few days’ shooting. I have one shoot scheduled for tomorrow evening after work, and another for Saturday evening. I may well be certifiably crazy for the amount of darkroom work this will have me doing – I’ve got 10 sheets of 14×17, 20 sheets of whole plate (6.5×8.5 inch), and 16 sheets of 5×12 loaded and ready to shoot. I may be even more insane for even considering the jumps between formats. I’ll risk it though because I have so many ideas – I want to try and shoot my three-panel “folding screen” idea on the 14×17 with at least one of my models, I’ve got some more ideas for the “human commodities” series, and I also have ideas for the body panoramas. I’ve got to remember to bring some of my costume pieces from my RenFest outfit tomorrow as well as the shopping bags for the Human Commodities bit. See what I mean about crazy? At least this is a GOOD crazy.

San Francisco Sojourn Part 3

Even MORE of my San Francisco images.

Windows, Jin Wang Boutique
Hotel Triton, Grant Street

All of these were shot with my 240mm Voigtlander Heliar f4.5 lens. It is fast becoming one of my favorite lenses for its rendition of out-of-focus areas. I  knew it was a legendary lens for black-and-white shooting, but was unsure how it would render color. As you can see here, it does a beautiful job with color, despite being uncoated. It does give a slightly vintage look to the color palette, but some of that might also be the film I’m using – Kodak Portra 160 NC.

A few shots from Sunday

I went out on Sunday evening with a friend of mine to do some shooting over at the old mill ruins at Rileys Lock along the C&O Canal. The ruins are buried in the woods, and a popular hangout for teenagers looking to paint some graffiti or smoke or sit silently next to each other playing on their cellphones. You know, usual teenager stuff.

Climb Me
Climb Me

I loved the accidental humor of the vine following the instructions on the graffiti here.

I was still playing around with my new-to-me Canon 135 F2 L lens, and here are some examples of what it can do. The first shot is the canal house at the Riley’s Lock viaduct. I was intrigued by the play of shadows from the nearby tree on the stone wall. After getting home and downloading the shot onto my Mac, I looked at it and thought, “there’s some better, more interesting shots within this” so I made a couple crops, which I’ll show below. Comments and thoughts greatly appreciated.

Canal House Windows
Canal House Windows

Here’s the full-frame original shot.
Canal House Window, Left

Canal House Window, Right

And last but not least, the brownstone rail end with a dedication chiseled into it.

Viaduct railing end pillar

Results from the Canon 135 L f2 lens

Here are some shots from my new toy, the Canon 135 L f2 lens. I put it to use in my studio last night, doing some portraits of a friend of mine. As you can see, it’s wickedly sharp, but even at f10, it still has pretty shallow depth-of-field. In examining the original camera-RAW file in Photoshop, I swear I could count every hair on his back, and every pore on his face, until the depth-of-field dropped off and then it blends away to creamy-smooth very quickly. You can see in the shot of my cat Chub-Chub (long story behind the name, but when I first got him, he ate like a pig, started gaining weight and would waddle down the steps, belly a-swinging) that at f2, the depth-of-field is whisker-thin. I’m going to love this lens.

Naughty boy!

I was a very naughty boy yesterday – I gave in to gear-itis and snapped up a like-new-in-box Canon L-series 135mm F2 lens for on my Canon 5D. As you can tell from reading this blog, I’ve been an absolute junkie for all things big, old, and film-based. That doesn’t mean I reject the 21st century, however; I have been jonesing for this lens for my Canon though for a while as its quality as a portrait lens is super-famous (I’d say infamous but that would imply something negative about the reputation, which could not be further from the truth). So I’m now the proud owner of a 135 L f2. I was playing around last night photographing the cats last night for lack of a better moving subject. I did use it to record the new acquisitions in the antique image collection – it worked wonderfully for that. I’ll be using the 5D as an ersatz Polaroid tonight in the studio as I have a portrait commission to do tonight. It will make a handy lighting check, and it will be useful to have some portraits of something other than Frosty and Chub-Chub (my furry little pudd’ns).

First print from the still-life shoot

Here’s the first print in the wash from the 14×17 still-life shoot I did a week ago. Looking at the negative I was worried it would be too thin to print well in palladium. My fears as you can see were totally unfounded. This was a straight palladium print with 33 drops of Pd, 33 drops of Ferric Oxalate (FeOx), and 2 drops of NA2 (sodium platinum) as a contrast agent. The paper is Bergger COT 320.

20110821-081601.jpg

A night at the circle…

Well, I finally got off my keyster and went out shooting tonight. I loaded up ten sheets of 5×12 in the Canham and went over to Dupont Circle to burn some long exposures onto film. This process always takes a lot longer than you think it should because inevitably setting up with a 5×12 (or any view camera for that matter) invites dozens of total strangers to approach you and ask questions. I always view it as an opportunity to educate people about the ongoing viability of film photography, and so I’m always happy to chat, even if the light is changing (fortunately after dark there’s no worry about the light changing – you only need to take one meter reading and stick with it for the rest of the shoot).

I’ve had this idea for a shot for a long time, and never quite got around to trying it until tonight. I did two versions of it – here’s hoping at least one works. The idea was a shot of a city bus pulling up to the bus stop, and loading/unloading passengers. Ideally it would be a 30-second or so exposure. I played a bit fast and loose with this one because the traffic pattern at the bus stop I was using resulted in a lot of stop-and-go and made it hard to get the shot in just 30 seconds. I’m going to develop the film tomorrow and we’ll see what came of it. If it worked as planned, I’ll have light trails leading up to the bus at the curb, and a fairly clear bus at the stop, along with the passengers and the interior. I did one version with my 240mm Apo-Germinar, which wasn’t wide enough to get the whole bus in at the bus stop. I switched to the 159 Wollensak Extreme Wide-Angle for the second shot, and stopped the lens down further to allow for the longer exposure time needed. I’m pretty sure I’ll get most if not all the bus in at the bus stop (I don’t mind if the roof gets a little cut off), but it’s hard to tell without watching the scene through the lens, and at that hour of the night it would mean waiting another half hour for the next bus to come around, and maybe nobody would be waiting to get on or wanting to get off at that stop, and I’d miss the shot. If this first try doesn’t work out, I’ve got other locations I can give a whirl that might work better.

Getting back into the studio again…

Yesterday, in a fit of activity, I got in to the studio and shot a few still-life photos. I’m participating in a print exchange through the Large Format Photography Forum (www.largeformatphotography.info/forum) and I needed to shoot some images for the exchange. The final images will be platinum prints. I decided to use a lead crystal cut glass decanter I have as a subject – I wanted something challenging to photograph and that would create some striking images. I got the inspiration seeing the decanter on my coffee table with the sunlight coming through it and casting a shadow. I brought it over to the studio and set it up on a sweep of white seamless paper, and lit it with just one light, as it would be in the real world (there is only one sun!). It casts a beautiful shadow on the seamless, especially the way the crystal is cut with these random little scallops out of the body. I used the Century Master portrait camera, which after having been hauled around a bunch is starting to get a bit loose. As always, the lens on it is my Seneca Portrait f5. I put the whole plate back on the camera for these shots, as it’s about my favorite format. I indulged in my film choice and used some of my remaining stock of Arista.EDU Ultra 200 (aka Fomapan 200). Arista.EDU Ultra is Freestyle Photo‘s house-label film, made for them by Foma in the Czech Republic. Foma discontinued the 200 a year or two ago when their source for one of the critical components dried up, and just started re-making it but only in roll film. It’s one of my all-time favorite films, not only because it was dirt cheap (1/3 the price of Ilford), but because it produced beautiful results – it has this old-time feel to the image quality from a reduced red sensitivity. Here’s a couple of shots of the setup (pardon the poor quality- they’re taken with my iPhone which is not the best in low light). I’ll post some scans later of the finished prints.

Studio setup #1

Studio setup #2