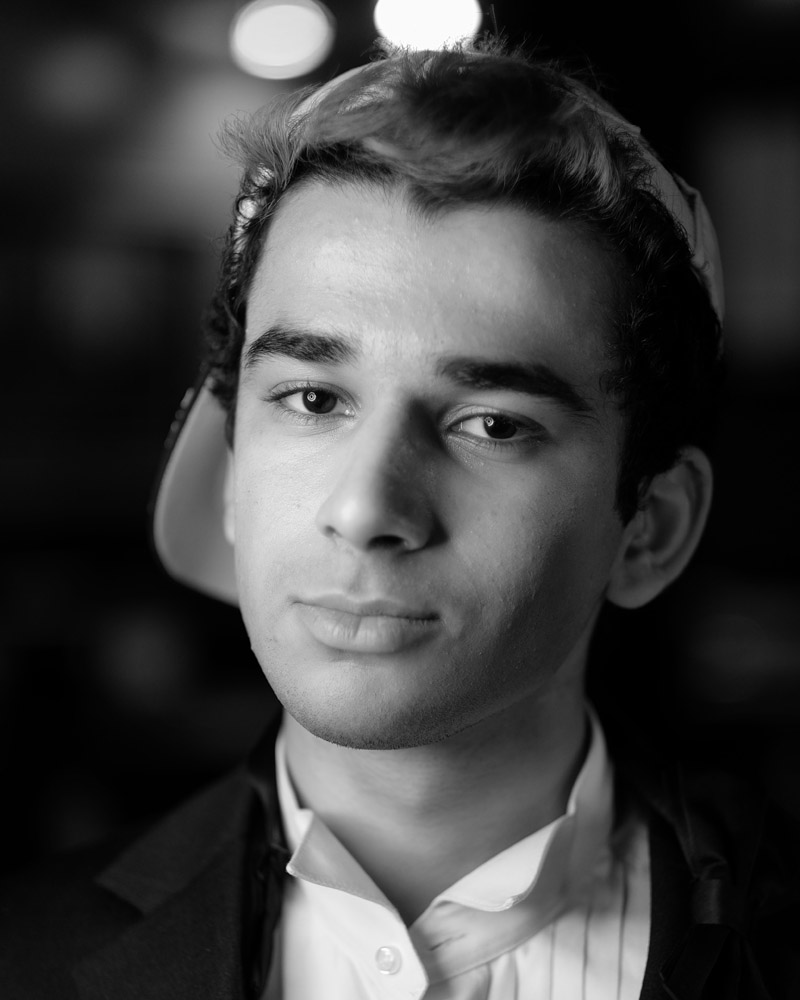
In this set I’m including some black-and-white shots along with the color ones to show what the Fuji can do. I used the b/w+R setting (the equivalent of using a red filter when shooting black and white film). I don’t know that this is as extreme as actually shooting black-and-white film with a red filter in terms of the contrast and look, but I like it.
MustafaMustafa
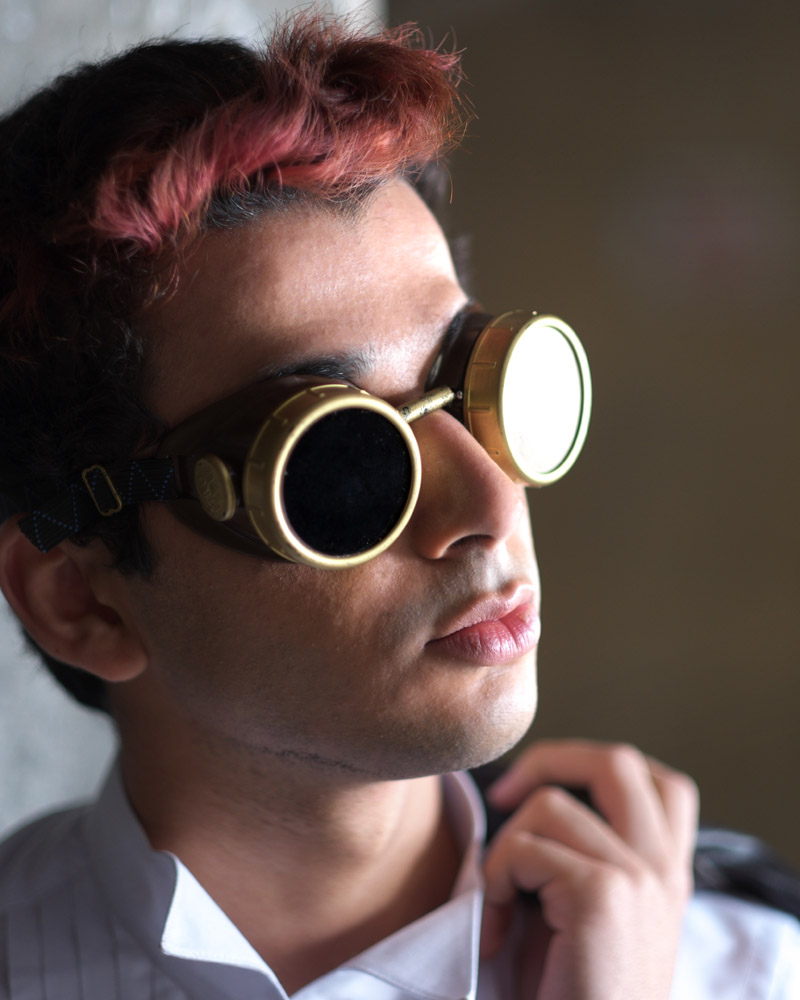
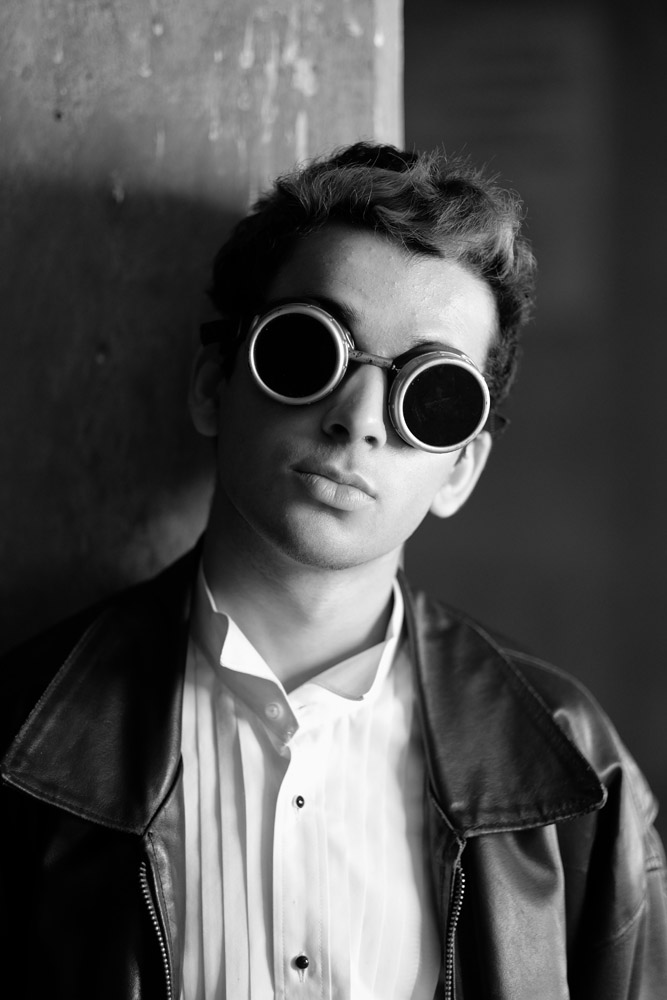
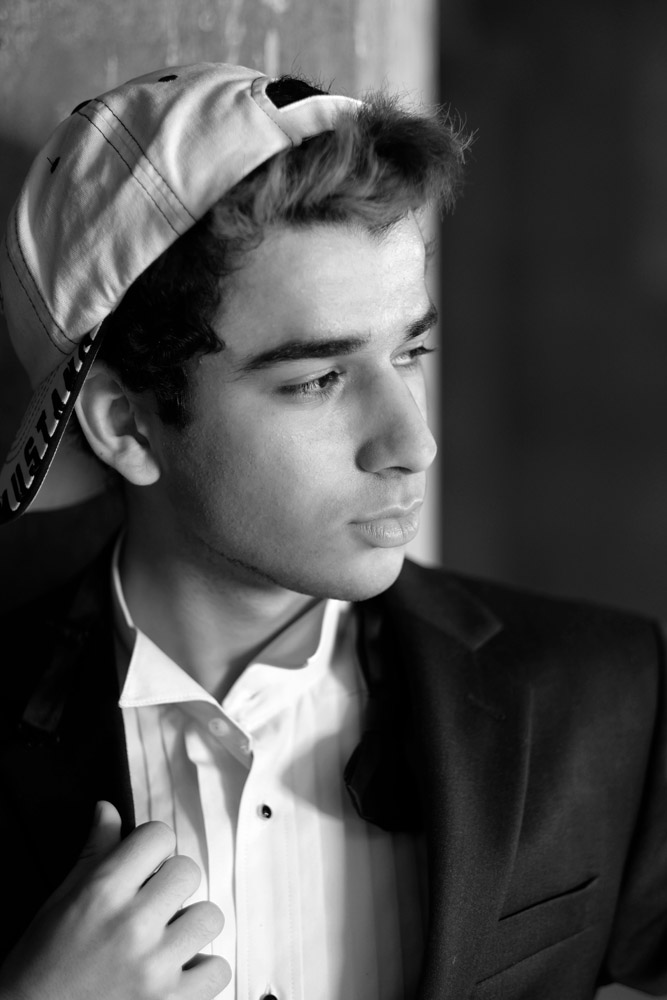
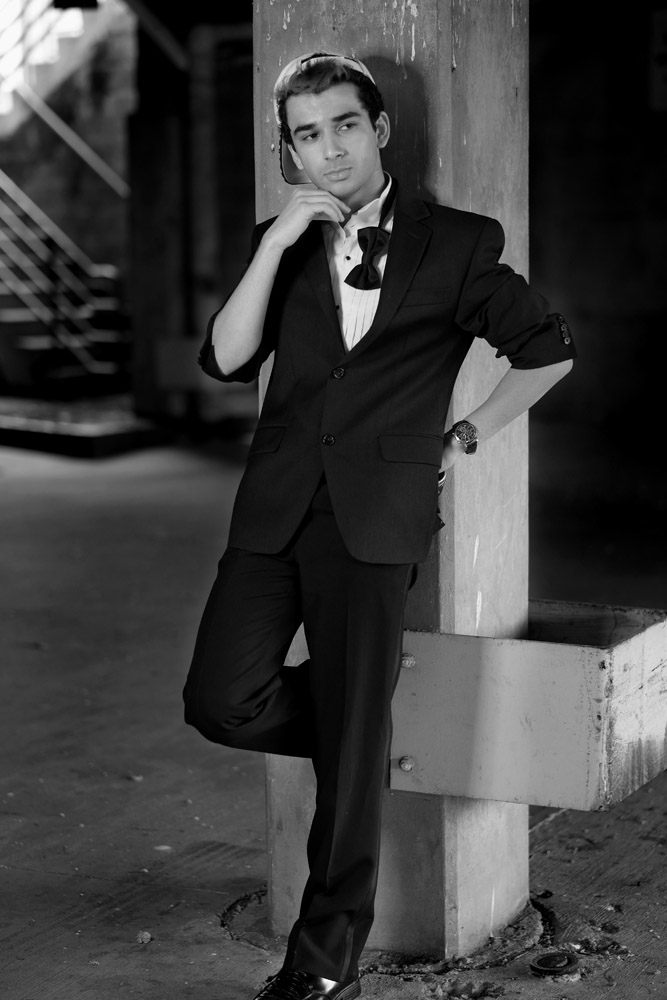
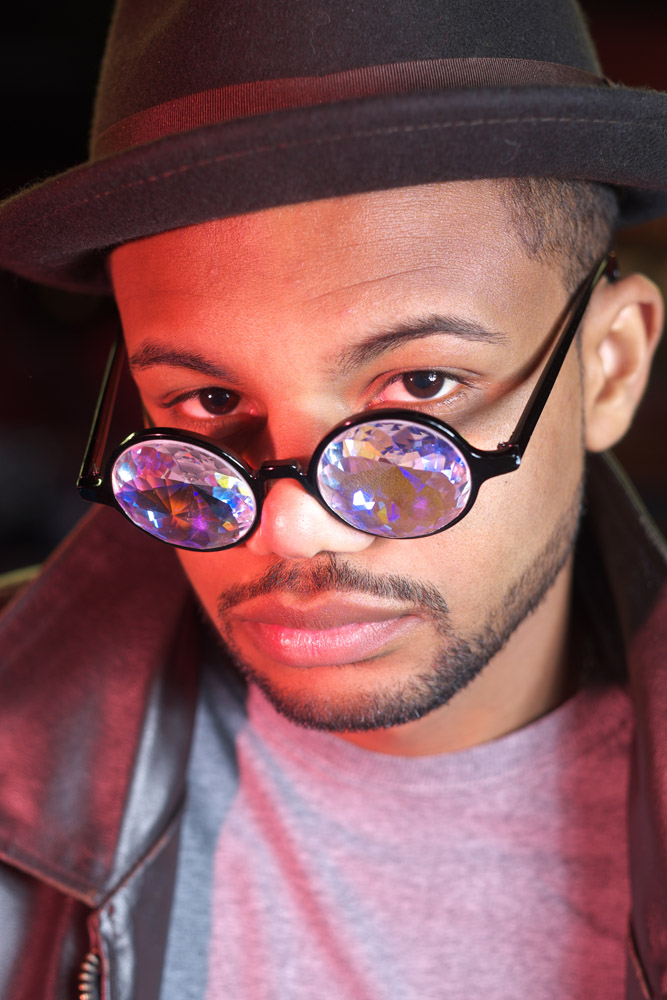
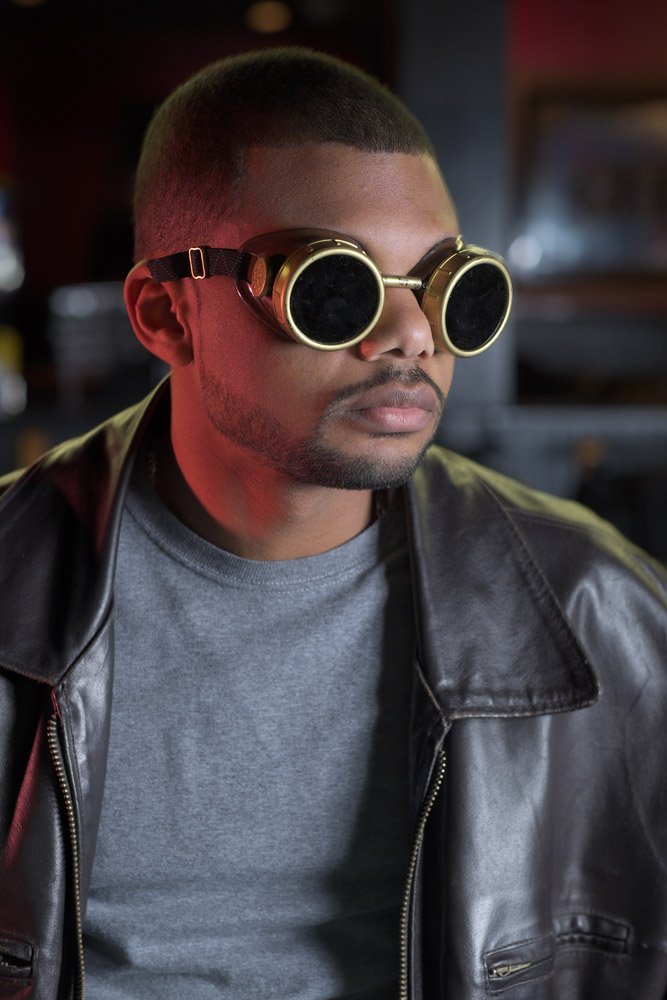
Mustafa showed up to the shoot in a tux, which is hard to work around if that’s not what you’re aiming for. It’s a good look, and a very elegant one, but not necessarily fitting a pool hall. I tried to shake things up a bit with the kaleidoscope glasses, the steampunk welder’s goggles and my own vintage leather jacket. Tip to models – unless you are told wardrobe will be provided, always bring at least two different looks to a test shoot with you so you don’t get stuck looking out-of-place on the shoot.
MustafaMustafa
Mustafa has a great face – he looks good from lots of angles. When posing a model or a portrait subject, you want to make sure that you’re not doing anything un-flattering. If you’re turning the head away from front-on, you want the nose to either obviously stand back from or break the contour of the cheek so you don’t inadvertently flatten it by having it by having the tip of the nose meet the outline of the cheek. At the same time, pay attention to the eyes – you want to see whites on both sides of the iris. If you turn someone’s head in part profile and then have them look back at the camera with their eyes, the irises in the corner of the eye make them look like a psycho-killer. In these shots it works because he’s looking the same direction with his eyes as his face is pointing.
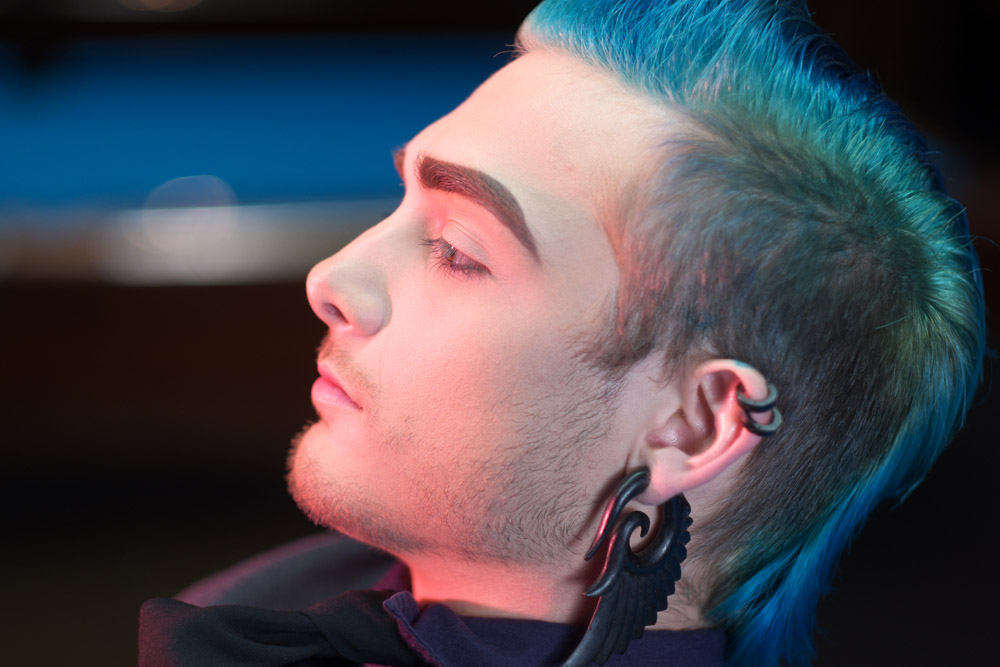
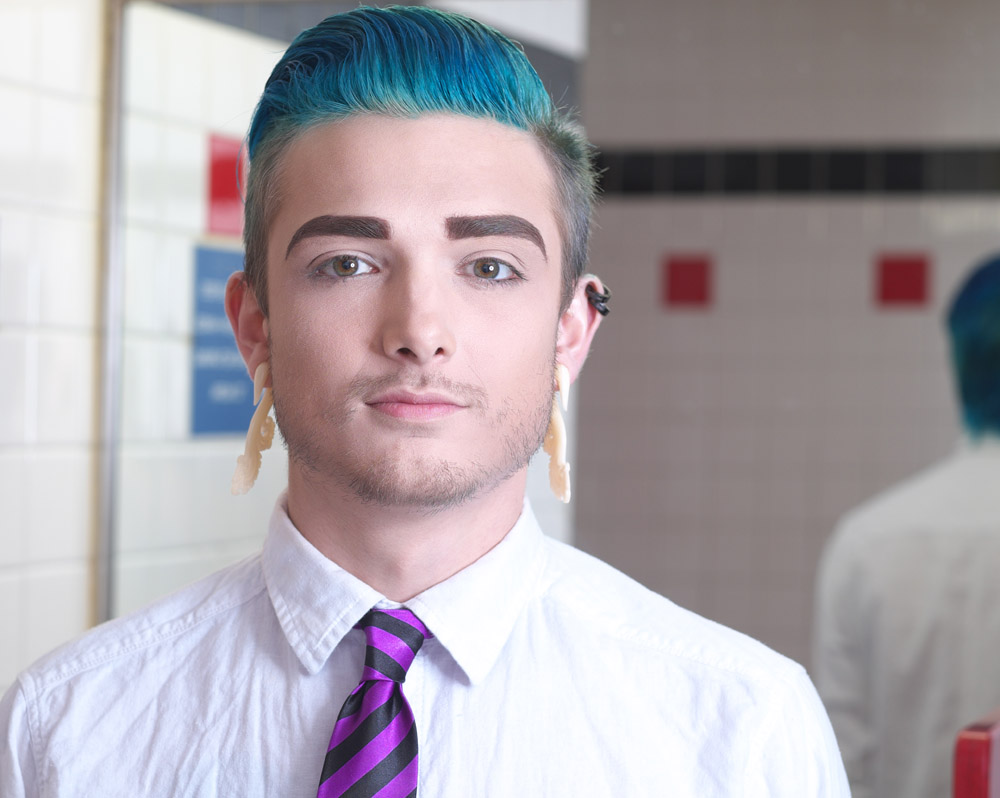
Here’s the set I did with Jayy Ruger (his professional name). While it definitely pays to add the colored gel to the fill light to add a touch of drama and character to a scene, it also pays to give it a light touch. In this first profile shot, if his face had gone totally red, it would have looked freakish or just poorly exposed/lit. Instead, the red on his cheek gives the image depth, and makes his otherwise flat makeup look more alive. Compare to the second image which was lit entirely with the overhead fluorescent light above the pool table where he looks almost corpse-like (entirely appropriate if you’re going Goth but maybe not the best look if you’re doing a family portrait).
Jayy RugerJayy Ruger
Late last year I went on a lighting binge, and one of the light modifiers I bought was a beauty dish. I had this specialized one from Bowens I really wanted to try out because the dish has a hybrid diffuser with a center grid. In the bathroom interior shots, it was the only light source I brought to the scene. The rest of the light is from the existing bathroom lights and the fill created by the white walls acting as reflectors.
Jayy RugerJayy Ruger
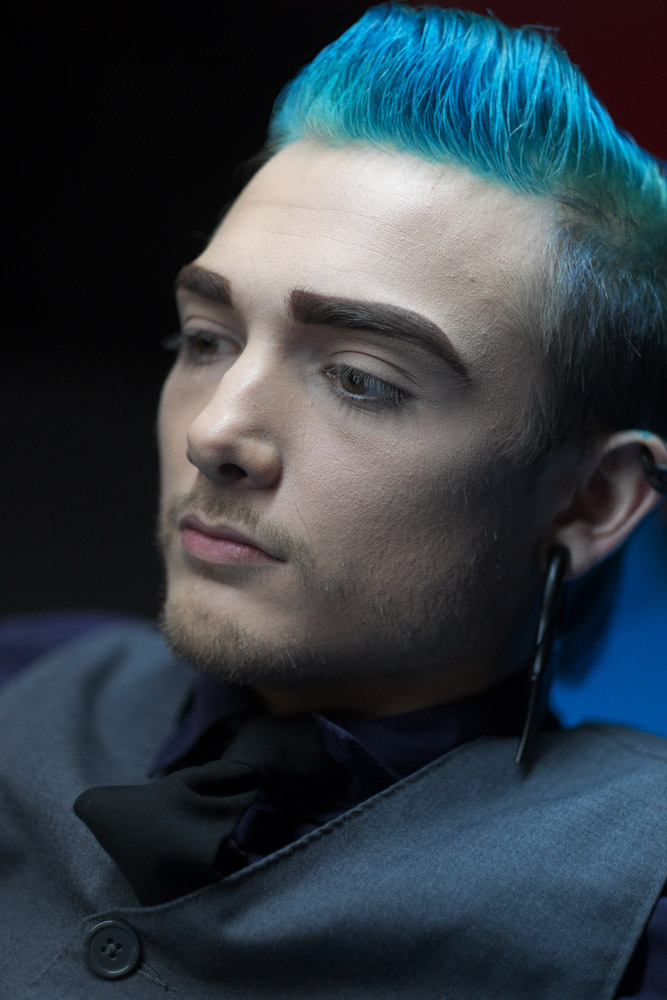
One of the great strengths of the Fuji (and one of the reasons I bought it) is its incredibly good handling of mixed color temperature lighting. You can see the color of light in the next several shots does vary, but regardless of what I threw at it, the Fuji did a terrific job of keeping skin tones natural and not shifting fabrics off in some wild direction in response to a mix of light sources.
Jayy RugerJayy Ruger
Back to using a red gel again – it adds a bit of a sinister note to the shot, which creates an interesting tension between that look and the suggestive pose.
Jayy Ruger
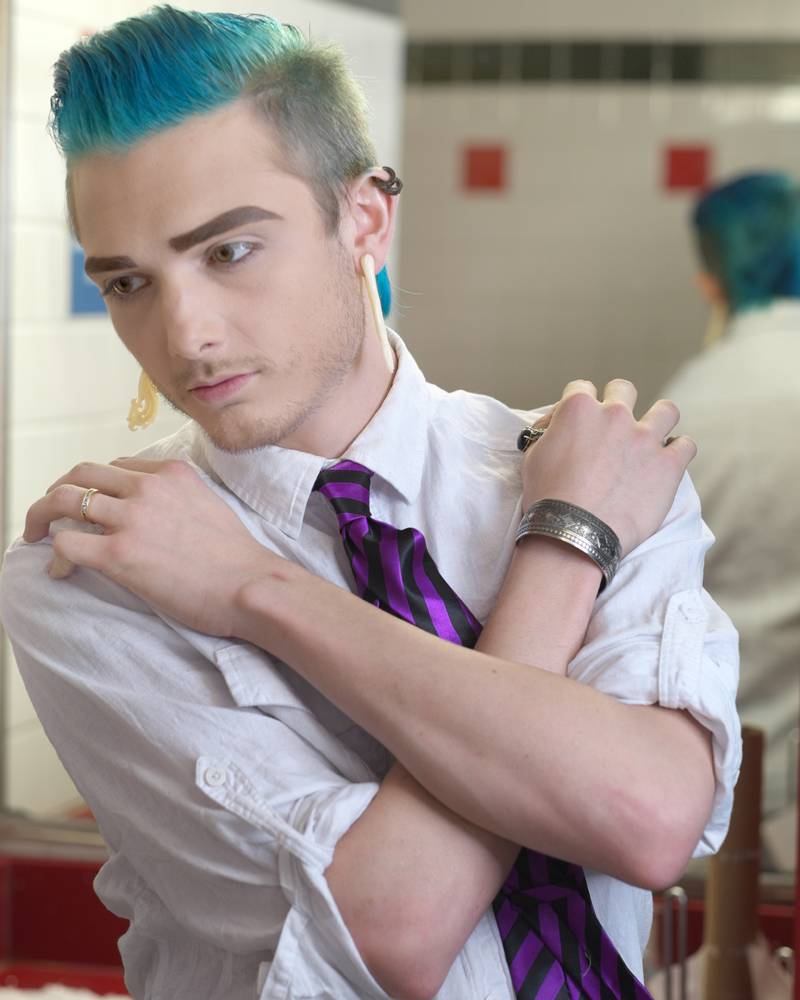
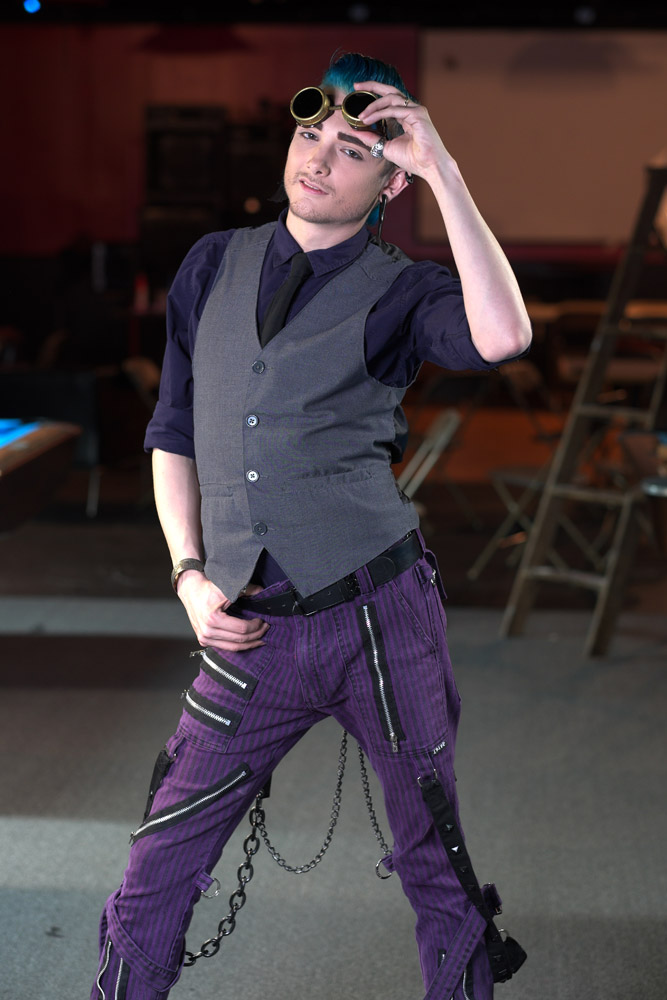
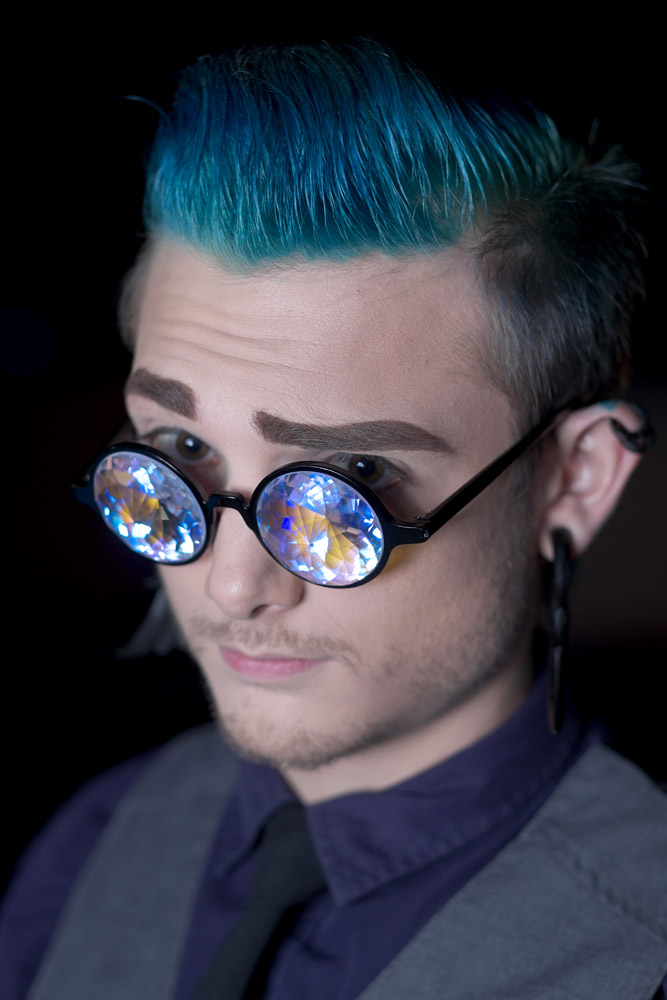
And we’ll close on a fun note – Jayy was being a great model and got into the whole steampunk thing with the goggles (he was already halfway there with his outfit!)
Jayy Ruger
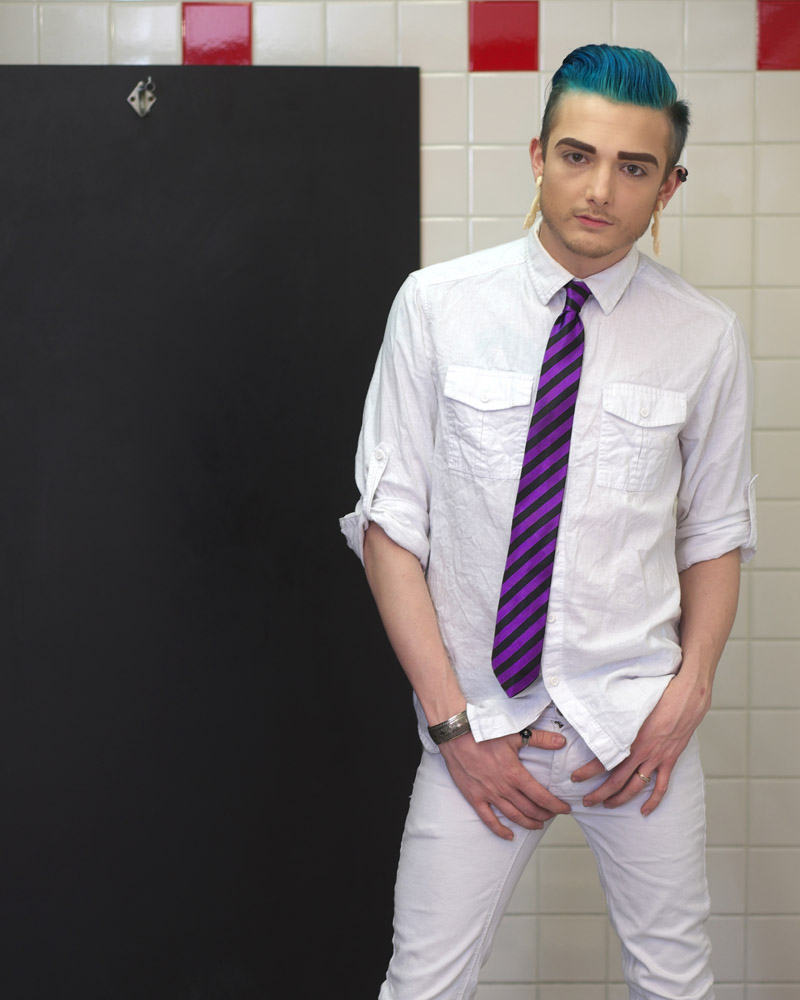
These are the same kaleidoscope glasses you saw in the previous model set with Alex. This shot was lit solely with an umbrella softbox. It’s like an umbrella, but more of a tight parabolic shape instead of the broad surface umbrella you normally think of. There’s a slit in the side of the fabric that allows the flash unit to sit inside the umbrella’s body, and then you can close it inside entirely with the diffuser (if you remember to bring it!). I wanted to focus your attention on Jayy in this shot so I moved in super tight and used a relatively fast shutter speed to let the background go completely dark. In the full length shot immediately previous to this one, I dragged the shutter to give a lot of background light, allowing you to sense the quality of the space behind him.
Yesterday I had a model shoot with three aspiring models who needed to build their portfolios. We went to a billiards parlor for the afternoon and I put them and the Fuji through its paces. It was also the first test in the field for my new 400 w/s bare-bulb strobes. The new strobes are battery-powered via external rechargeable batteries. They can be configured to sit on-camera and be triggered via hot shoe, take a wireless remote trigger like a PocketWizard, be triggered via sync cord, or be triggered by a proprietary wireless trigger system that also allows you to remotely adjust the power level from the camera position. The first one I bought was a Calumet-labeled version. When Calumet was still in business in the US, these were quite expensive – a single head unit plus the required but not included battery pack would have set you back a cool $1000. Nowadays, they’re on clearance on Amazon for $300 or so. They are also now being sold with the NEEWER, Flashpoint and Godox labels, at a much more reasonable price – I got a NEEWER version with the external rechargeable battery pack for $400 as a second unit for doing fill flash or background lighting.
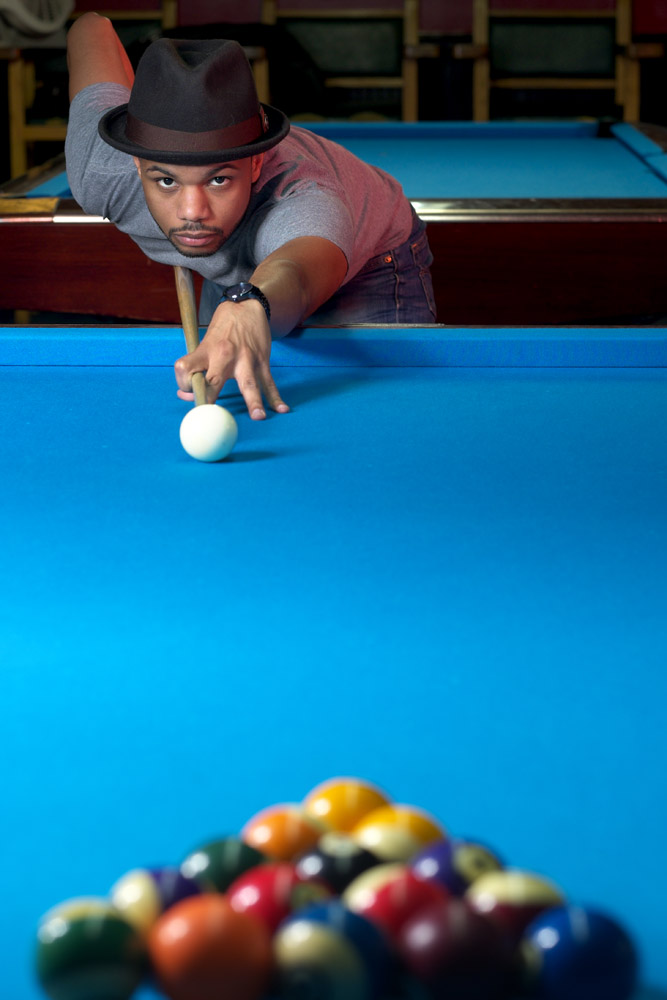
These first two shots were taken with Alex shooting pool. In the first shot, I set him up taking the break shot. Don’t let the fact that he’s a model fool you- he’s also a pool shark – right after this shot, his break dropped three balls. I wouldn’t bet against him. This was taken with the Fuji 56 f1.2. My main light was the Calumet Genesis in an umbrella softbox, and the fill was the NEEWER with a gridded reflector and a red gel in it. Having the ability to both color gel and grid the fill is really handy, as the color adds a touch of drama to the scene, and the grid keeps it from spraying all over the place and coloring things you don’t want it to, like the table felt.
Alex
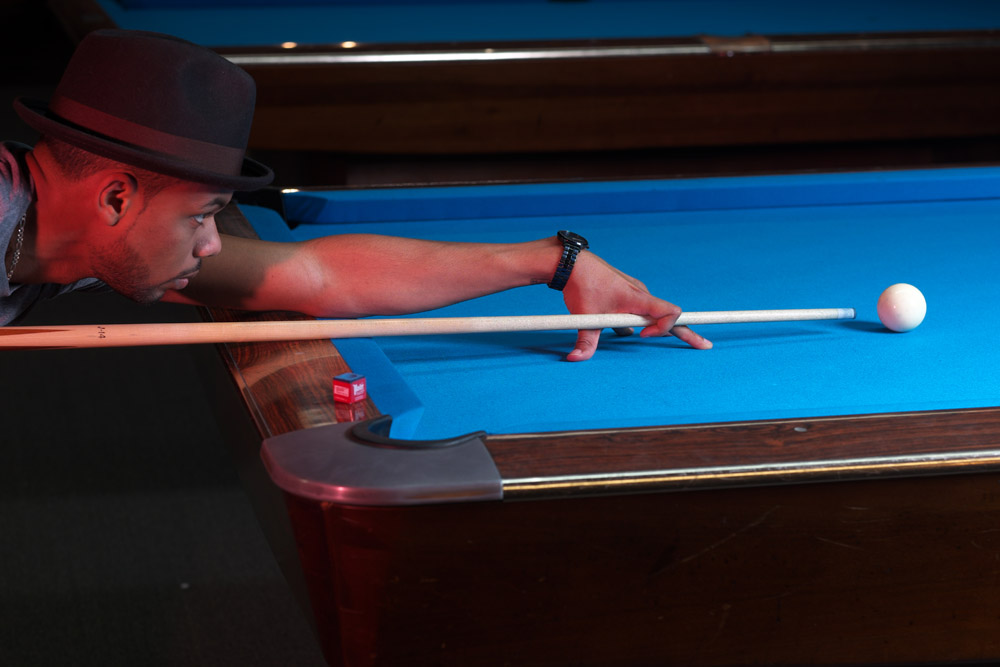
For this shot, I kept the lights the same but switched to the 23mm f1.4 so I could get in close and still get the extension of his shoulder, arm, cue, and the ball on the table, as this table was in the middle of the room with other tables behind me, and I only had about four or five feet to work in. The red gel adds a touch of drama and energy to the shot without overwhelming, and is a good way to deal with the very mixed light in a pool hall where you can have fluorescent (the over-the-table lights), halogen/tungsten (lights in the bar area and on the walls) and LED (accent lights like rope lights around partition walls and the like, or under the bar) all in the same area.
Alex
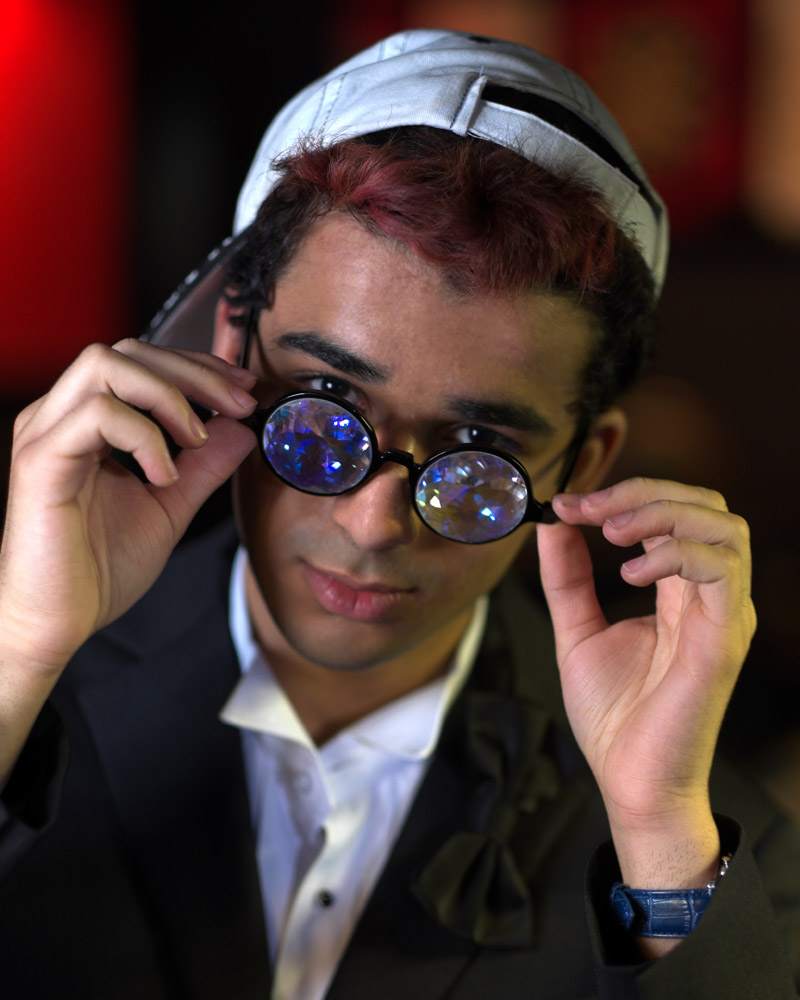
I also did some head shots with Alex (who is an easy, professional model to work with). I backed this indie film called Hallucinaut on Kickstarter last year and as my reward, I got these kaleidoscope-lensed glasses that appear in the film as a prop. I chose them specifically as my reward as something that would make a really cool prop for photo shoots. This was their first appearance in one of my shoots. They really pick up and reflect colors well, and make for a dramatic statement.
Alex, with Hallucinaut glasses
A variation on the theme, I broke out my welder’s goggles and matched them up with a vintage leather jacket for a steampunk look. Alex’s short-cropped hair adds to the look by letting the goggles really stand out against the shape of his head.
Alex, going Steampunk
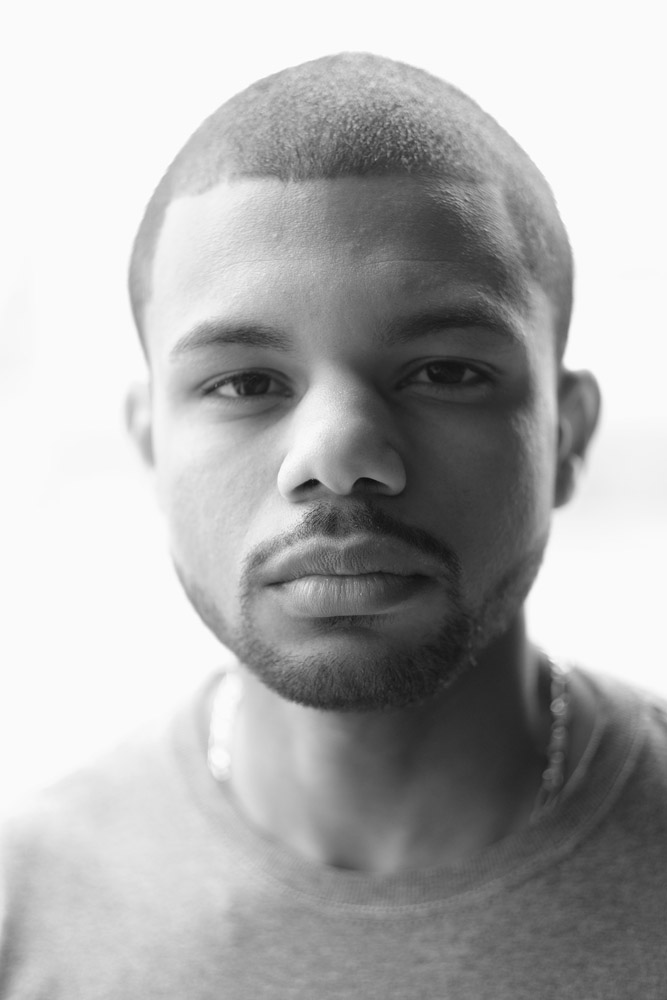
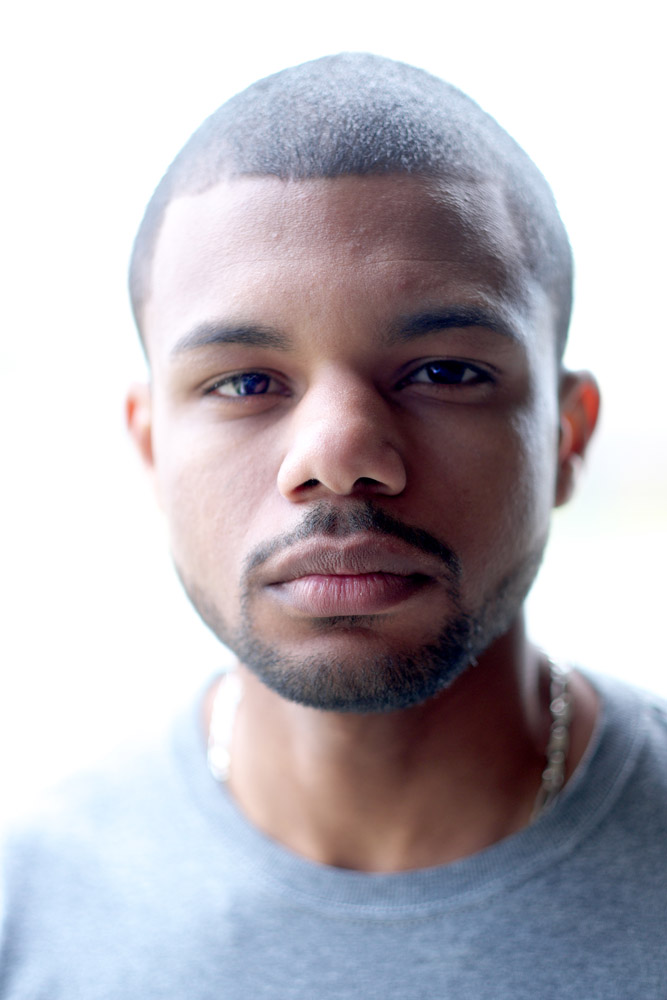
In the last look for Alex, I did two versions of this really clean, minimal portrait. When I showed it to him on screen he commented “I have a really long neck!” as if that was a bad thing. I reminded him of what you’ll hear on every season of the now-ended America’s Next Top Model – it’s a really good thing to have a long neck. Tyra Banks and her photographers were always reminding the contestants to elongate their bodies and gestures, to create drama and elegance. If you have a short neck, stretch it out, otherwise the camera can make it look like you’re neckless and just have a head glued directly to your torso.
Alex
These were both shot outdoors under the eave of a parking garage, and combining the flash in a beauty dish as a fill with the backlight of the street behind made it easy to completely blow out the background into a nice even white. Handy trick when you’re going studio-less and need an even background.
Alex
I shot all these images in RAW, then converted afterward to JPEG. I like working this way because it feels more like traditional darkroom photography, where I’m working from the in-camera negative. Working from in-camera JPEGs, while still very good, to me is not as good because it’s like making a copy of a print – changes have been made and nuances have been degraded.
Not that there should be any doubt, but the Fuji 56mm is a knockout lens (Fuji has always made some top-grade glass, especially for their medium-format cameras). The falloff in sharpness at wide-open or near wide-open is creamy-smooth, and the rendering of out-of-focus highlights is never harsh or jagged.
Takeaways from this shoot:
-Work with good models. Not everyone is a good model, and not all good models start out that way, but if you’re new to the process of working with models, hire folks (and I do mean hire, as in pay for with cash, not just trade-for-prints/CD) who have experience working with photographers.
-know your equipment. If I were not as experienced with studio lighting, figuring out what was going on with my Calumet/NEEWER flashes could have been a pain, as they don’t have modeling lights (to save on battery life) and are not TTL because they’re made to be universal and are not dedicated to any one system.
-have fun. Be loose, work with your environment, take advantage of the opportunities it presents, and challenge yourself to overcome its obstacles. You’ll make much better pictures that way.
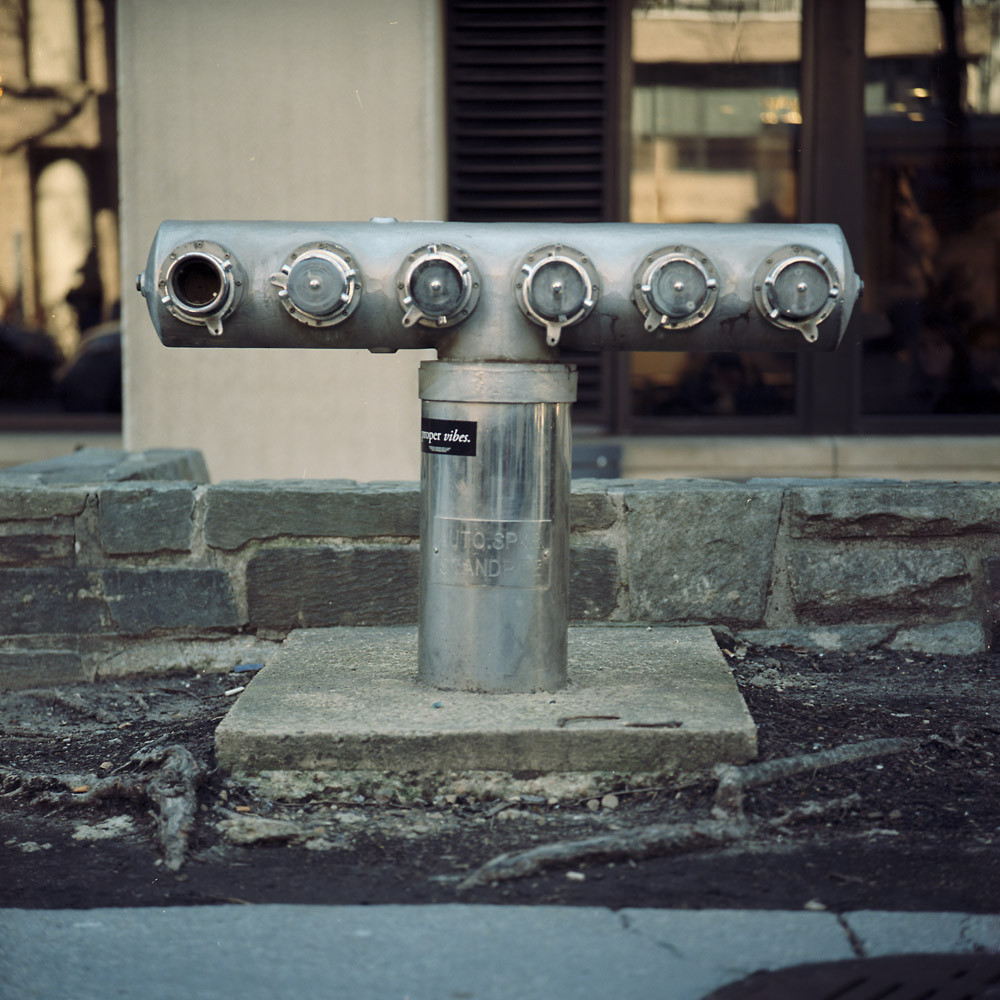
I don’t know if I’ve ever seen a fire hose connector with more connections on it than this one, outside the George Washington University library. The location may be key – if the library ever catches fire, that much paper will require a lot of water to keep it all from going up in a ball of flame.
Multi-Hose Connector
Either that or it’s some kind of arcane commentary on the Starbucks Coffee in the library basement immediately behind it.
As most of you know, I’m a die-hard film shooter. And I’m not about to stop- I seriously love my Rolleiflexes. But there is a real-world place for a good digital camera in my toolkit.
I was using a Canon 5D mk.1 for a long time- perhaps ten years now. It still does a very good job of doing what it does, but it is BIG, it is HEAVY, and the image quality and technical features of newer cameras have really outstripped what it can do.
I’ve been investigating alternate options to replace it. One thought was a Canon 6D, which would give me another full-frame chip with higher resolution, better color rendering and low-light performance, and I could keep all my existing lenses. But that would still have been really outside my budget. Even more so a 5D mk.3. Neither one would have solved my issue with weight, which quickly becomes an obstacle to regular use.
I looked at what I use my camera for- mostly events (as in documentary shooting, not commercial event photography), portraits and travel. I wanted something that would give me improved low-light performance, be much smaller and lighter, and give me the quality of glass I was used to with my Canon L lenses.
I turned to mirrorless cameras, did some looking around, and after getting feedback from some trusted friends, arrived here:
Fuji X-T1
The Fuji X-T1. It has a 16 megapixel APS-C sensor, a line of outstanding lenses in the focal length range I use the most, and as you can see in the photo above, is quite a bit smaller than the 5D. Not to mention quite a bit more affordable.
Right now I only have the “kit” zoom lens. Calling this a kit lens is a bit like calling the 24-105 L lens with my 5D a kit lens. It’s an 18-55, or the equivalent of a 27-84 in 35mm/full-frame terms. A maximum aperture of f2.8-f4 means for a compact zoom, it’s quite fast. It also has optical image stabilization, a nice plus when shooting hand-held in low light.
stairwell- hand-held @ 1/8th second
Things I like about the lens: image quality is excellent. The range of focal lengths covered is very useful. It does a great job with both near and distant subjects. The out-of-focus rendering is pleasant.
dogwood bloom, night-time
Things I don’t like: switching from autofocus to manual requires a separate switch to be toggled. That switch is small and on the back of the barrel, close to the body, so toggling it requires taking the camera away from your eye. The aperture control ring is not mechanical with defined click-stops, but is instead electronic, making it hard to tell if you’re turning it the right way, and easy to turn it away from your preferred f-stop.
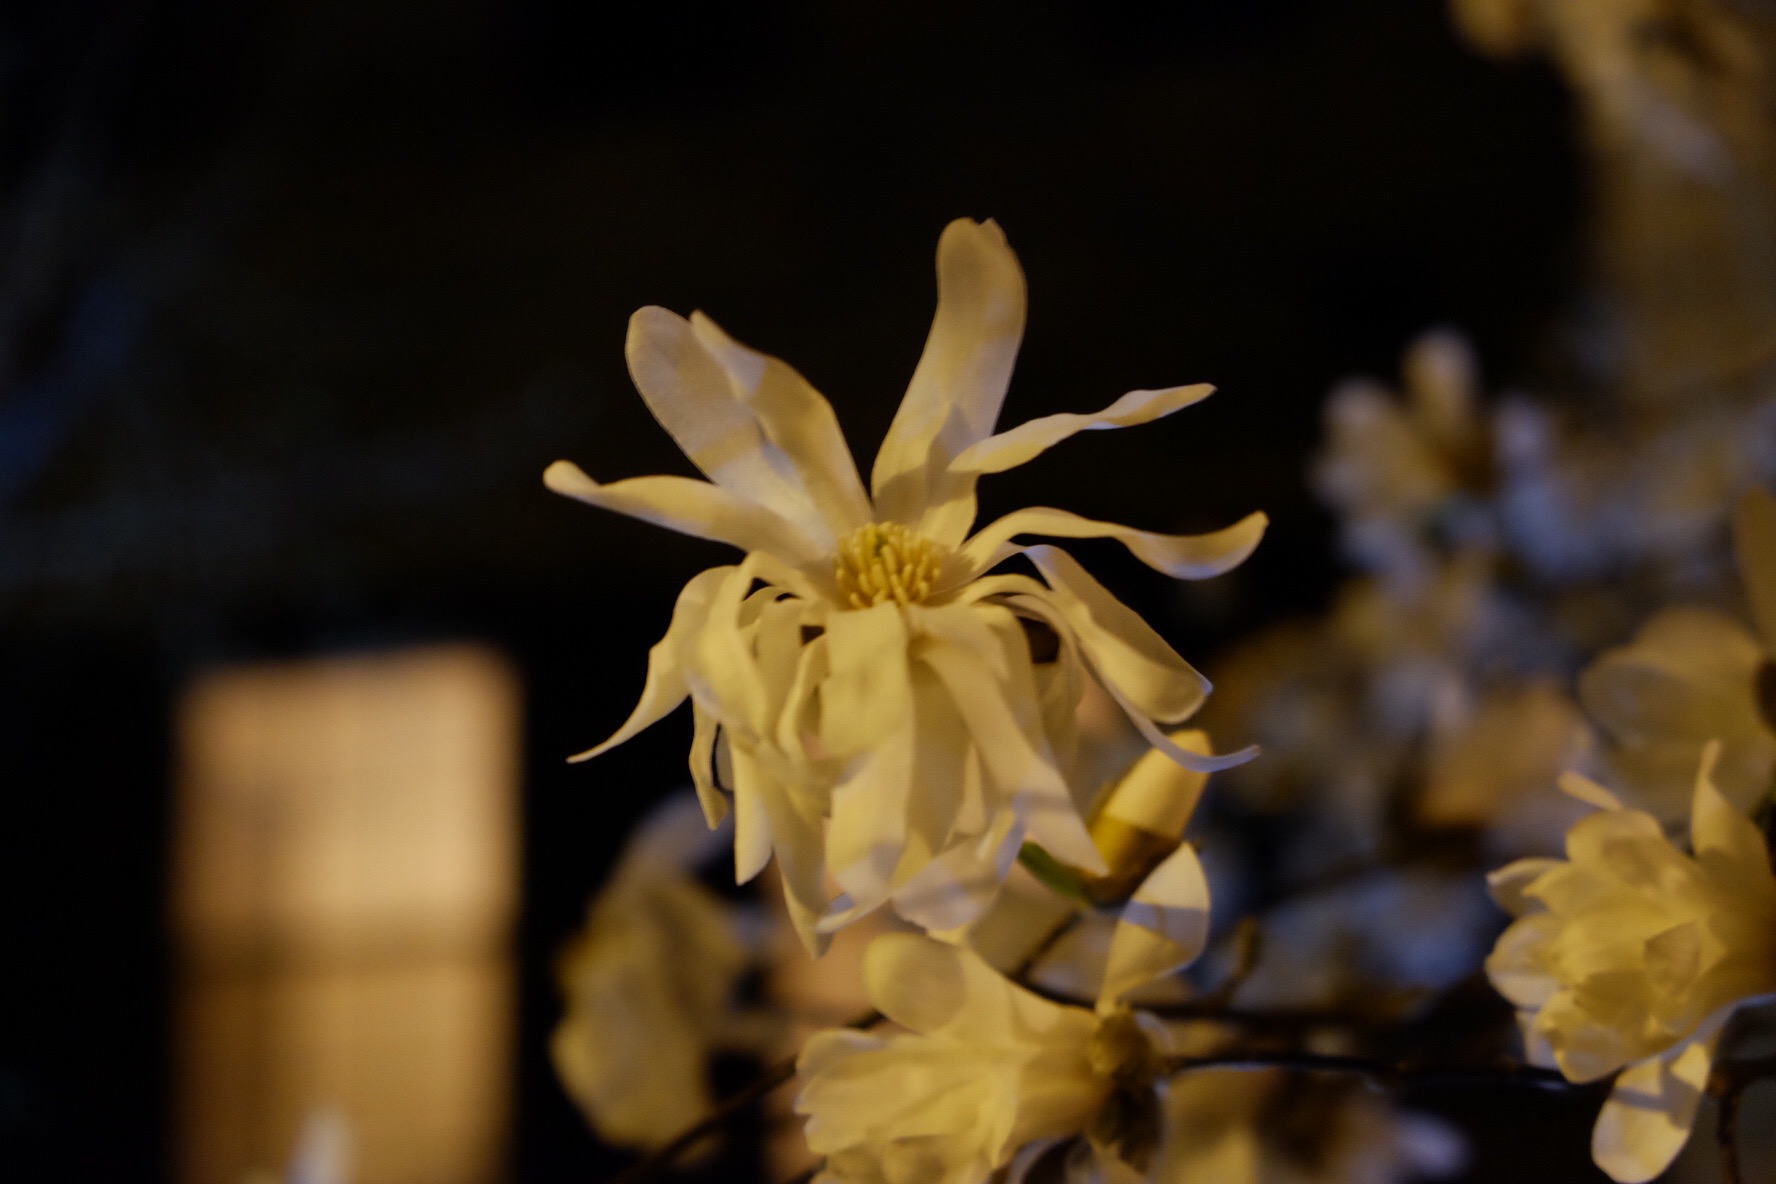
magnolia blooms
This is not a problem with their prime lenses, two of which I will be acquiring soon.
Also, as you can see, the image quality and color rendition of the image chip in the X-T1 leaves nothing to be desired even at relatively high ISO. The dogwood bloom at night was shot at ISO 6400. It has two extended range ISO settings above that, but I have yet to explore those.
The camera has a whole host of other options including film emulsion emulation modes (all of these were shot in Astia simulation, which is a little lower in contrast with a slightly less saturated palette for more pleasing portraits). It also has black and white modes, including red filter and yellow filter simulations.
Some environmental portraits:
Julian TanMissy
A black-and-white shot with the red filter mode on:
Here’s a video of my friend Tracy Storer talking about the 20×24 polaroid camera. Tracy is the manager of the San Francisco 20×24 studio, and has been working with the cameras since the late 1980s in Boston and New York when Polaroid owned and operated their own studios.
the Polaroid 20×24 operates in vertical only orientation
Chuck Close used one to take portraits of President Clinton in the Oval Office. Getting the camera in and out of the White House was quite the undertaking, as the camera and stand combined weigh over 240 lbs.
When you rent the Polaroid 20×24, it includes a staffer to operate the camera for you.
There’s something to be said for natural light portraiture. I love studio portraits for the creative control you have- there is no light in a studio portrait but what you put there – if you don’t want it, don’t add it. Working with natural, available light, though, can help you be a better studio photographer as well because it teaches you to really see the light in the scene and understand what you’re looking at. To make a great natural light portrait, you need to look at where the light is coming from, how to position your subject in the scene to maximize the light you have, and where is the best quality of light.
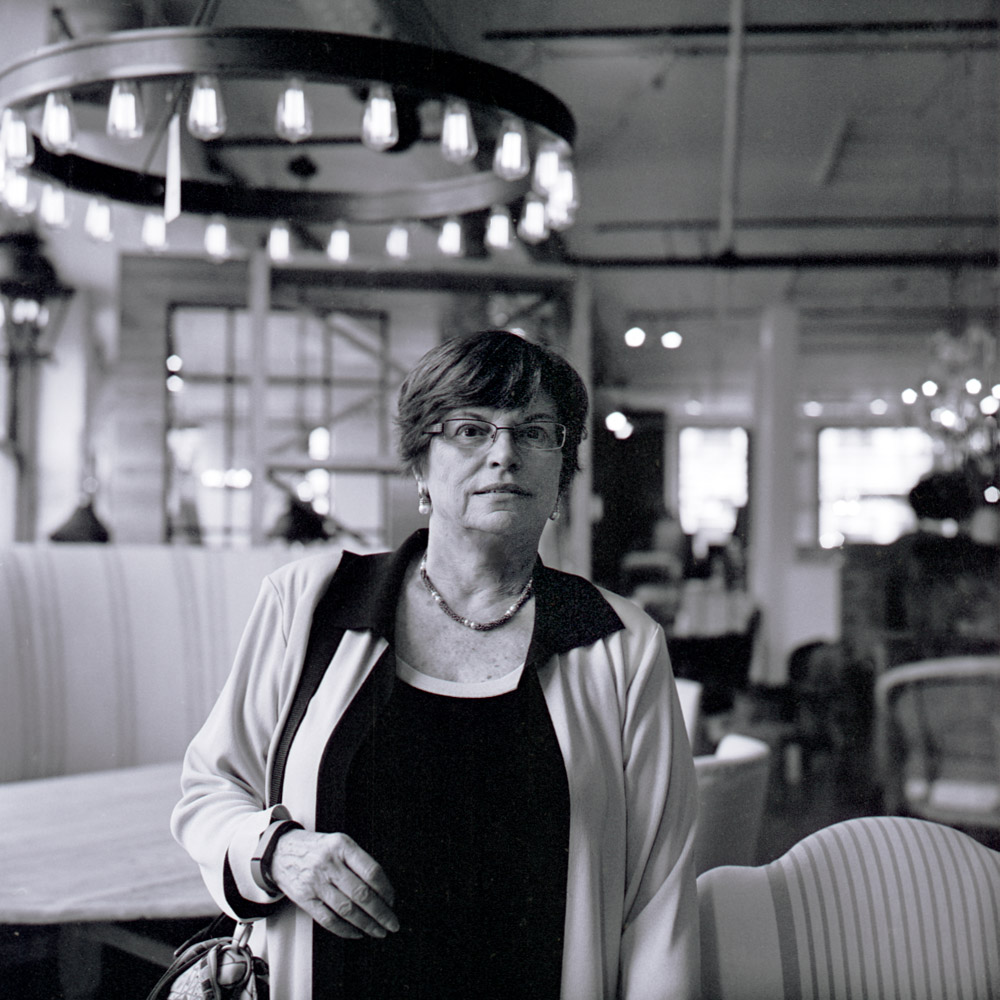
Mom at ABC Home, New York
Here I was with my mother at ABC Home, a giant (and I do mean giant- seven floors in two buildings on opposite sides of the block on Broadway, including two restaurants) interior decor store in Manhattan. We were on one of the upper floors of the main store (carpets are in the other building across the street), and there was this beautiful diffuse afternoon light pouring through the giant windows. I positioned her so she was bathed in this light. It’s a very flattering light for anyone, especially for women. The light may have been soft and flattering, but even though we were on the 4th floor, we were indoors and buried in the canyons of Manhattan buildings, so the light was quite dim, forcing me to shoot wide open with my Rolleiflex.
One of the great benefits to the Rolleiflex is that since there is no mirror to get out of the way when taking the exposure, you can easily hand-hold exposures that would otherwise be a challenge – this was maybe 1/30th or even 1/15th of a second. Another trick that’s easy on the Rolleiflex is placing focus at the edge of your depth of field, especially useful when you’ve got a busy background that would be distracting if it were sharp. The reason it’ easy on the Rollei is that when you’re looking through the waist-level finder, you can look to the side at the depth of field scale on the top of the focusing knob and quickly roll the focus point to the far end of the depth of field without having to take your eye away from what’s going on in the viewfinder. You can’t do that easily with an SLR which has the DoF indicator on the top of the lens barrel.
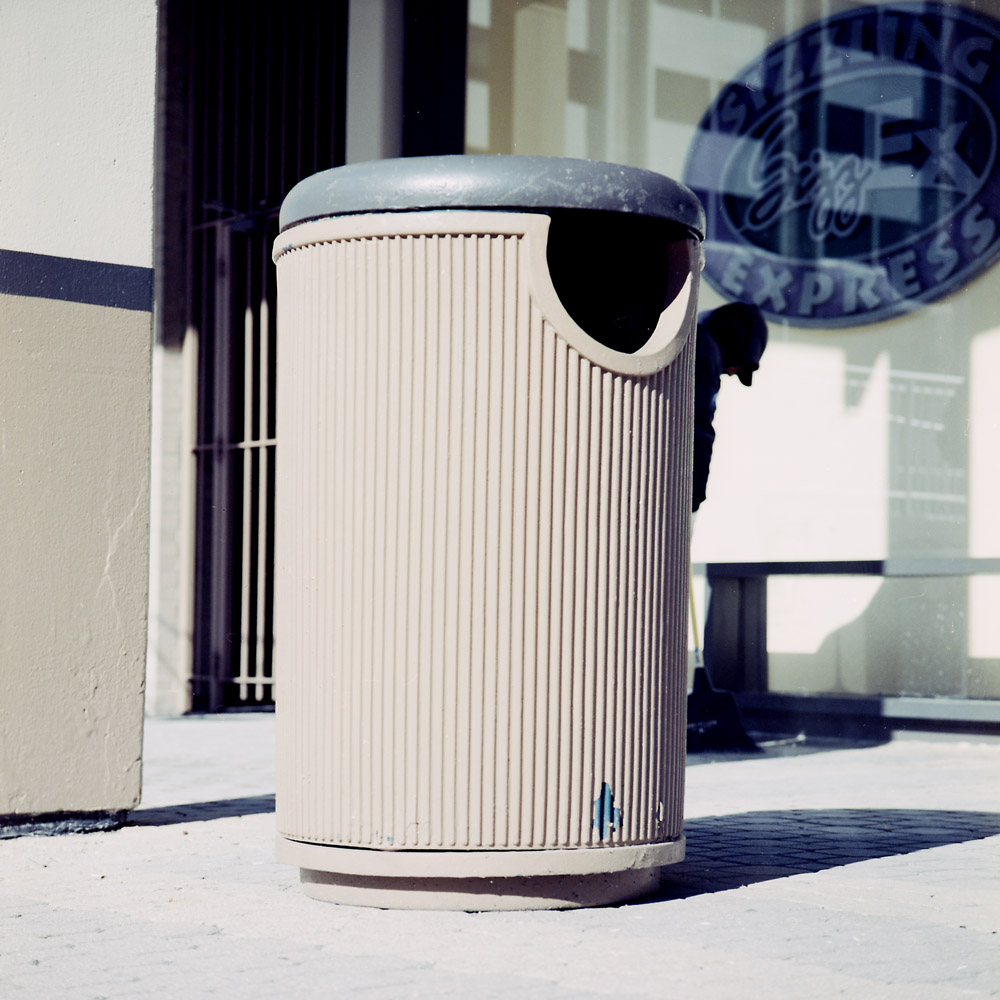
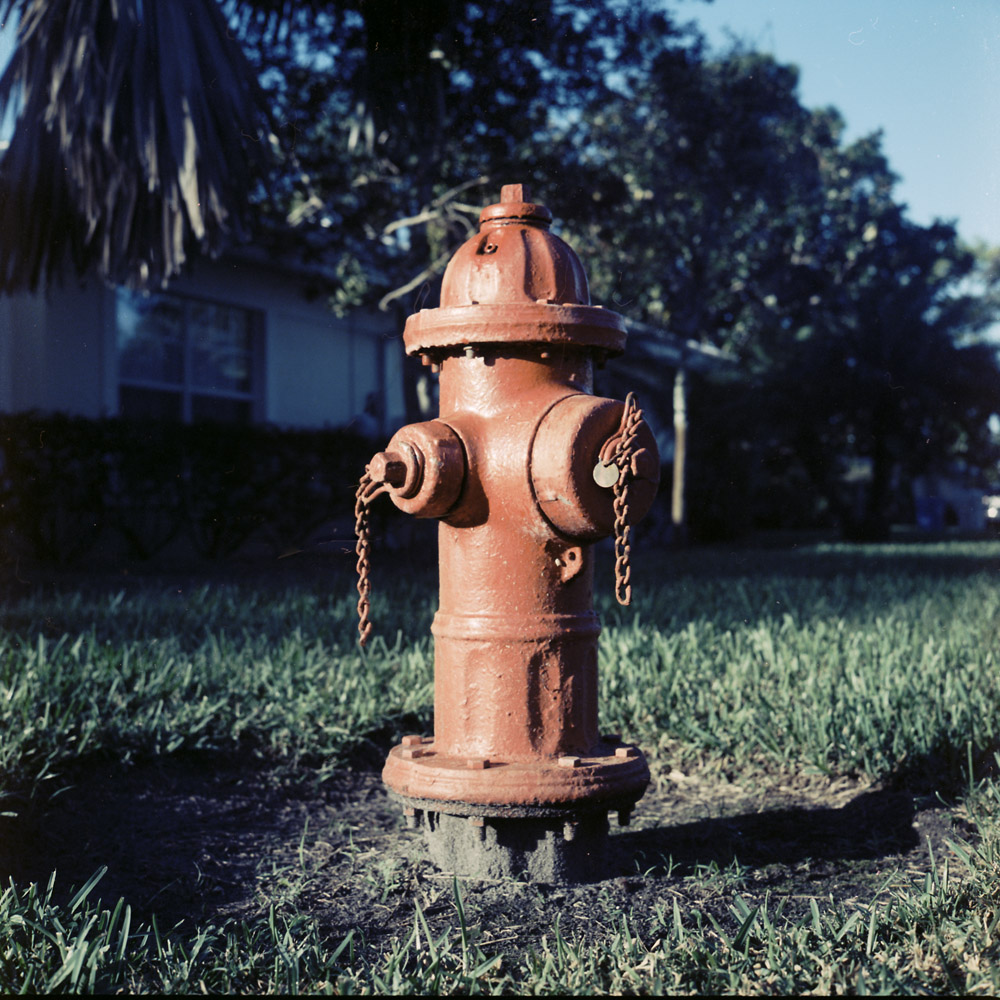
I’ve noticed that as the series continues, my style of shooting it has evolved, which is a good thing. The photos are becoming more consistent, especially in terms of composition. The camera is placed on a level with the object, which usually means much lower than eye or even sometimes waist level, and more frontally square to the object.
Fire Hydrant, Vero Beach
The hydrant is in a suburban Florida cul-de-sac where the tallest things around it are date palms, and they’re not massed together to form a giant wall, so the lighting is direct sun, not a diffused sky. I’ve been looking at it and trying to decide how well it fits the series – I think it does on the subject matter and the compositional level, but until I shoot more objects in suburban or rural environments it feels weird because the background isn’t walls or windows or passing traffic, but grass and trees.
One of the most important things you can do as a photographer is interact with the general public a.k.a. your audience. Often you don’t have a lot of time to sit down with them, have a nice chat over coffee, and explain what you photograph, how, and why. You need a memorable leave-behind that will intrigue them enough to get them to come back to your website or blog (ahem!), look at your work in depth, and interest them in hiring your services or buying your work.
business card portfolio box, by Moo
I’ve made multiple attempts at business cards of various designs. They’ve all been reasonably successful, but I think a lot of them have been too busy, graphically speaking. I saw an ad on Facebook with a promo code for Moo, who print business cards with a few unique touches, and decided I’d try them out. One of the features they offer is the ability to print many different designs in small batches- you can do one design for your text side, and upload up to 50 images to put on the back. Print runs start as small as 50 cards, so you could end up with all your cards being unique.
travel portfolio
In this case, I wanted to do two different lines of cards, to promote my portrait work and my travel photography. I uploaded ten images from each of my relevant portfolios and had a run of 200 cards printed. Above you can see the travel portfolio in the mini card holder box that came with the cards. The card box makes a great display piece for on a table or desk.
portrait portfolio Here is the portrait portfolio. That’s another benefit to the Moo business cards- with the multiple designs, you can carry an entire portfolio in your pocket all the time.
business card profile
The third quality I really appreciate is the paper stock options. I opted for the premium heavy-weight paper stock with a middle ply in an accent color, in this case black. It’s yet another characteristic that can set your cards apart from everyone else.
Wether you’re handing out cards to individuals or making a mini presentation portfolio to mail to a potential client, Moo cards can help you stand out. You can get more information about them by going to Moo.com. In addition to the square cards, they have traditional rectangular cards, mini cards, and other promotional products on a range of paper stocks to fit a wide range of budgets.
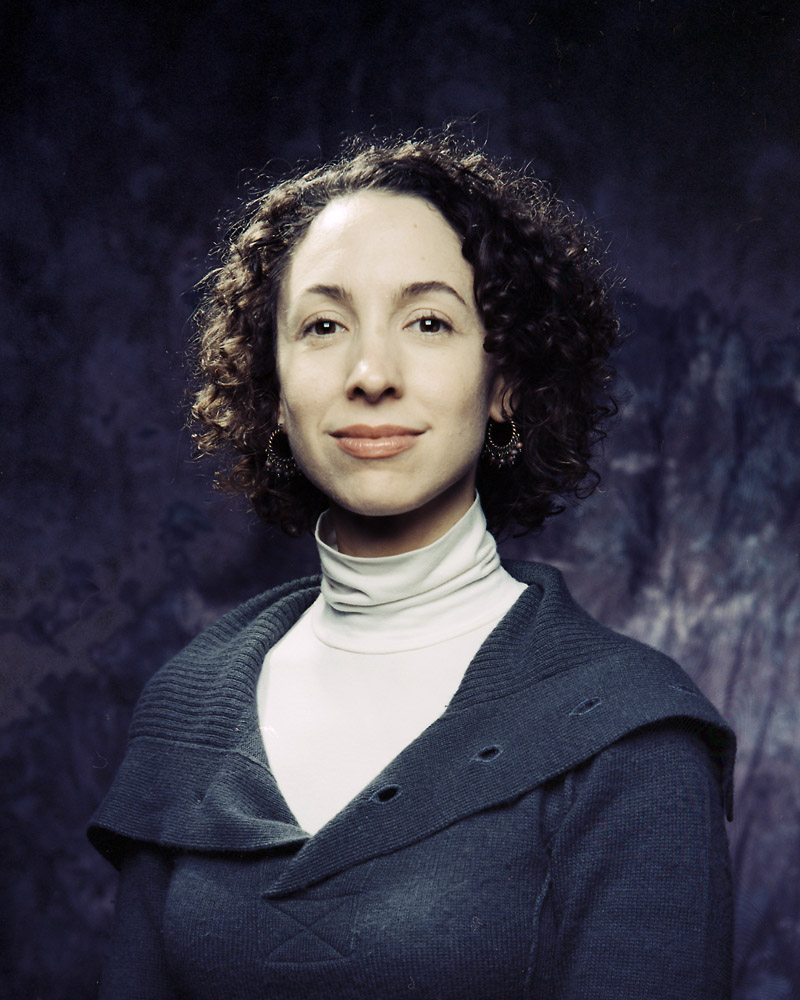
Back in November I taught a studio lighting class at Photoworks. This was my first time offering this class, so the curriculum was a bit of a gamble – I started with foundations of studio lighting, working from hot lights on still life setups and a single light source, and built my way up to electronic flash systems with multiple lights. In this case, my students had the burning itch to jump straight to portraiture, as that was their primary interest. I had a wonderful bunch of students in the class and everyone brought something to the table.
The portraits here are taken by me of my students. The portrait of Joe was done to demonstrate side light with a large diffuse light source, and a reflector. For demonstration purposes I moved the reflector in and out to lighten and darken the shadows, and shot it with both high and low contrast. This is my favorite of the bunch – there’s three-dimensional modeling of his face with the light, but the shadowed side of his face is not lost.
Joe P.
Geraldine was lit to show soft, flattering light. This was the classic “butterfly light” with a large diffuse light directly above and in front of the subject, a reflector below to open up the shadows a bit, and then hair light and background light applied to create separation of the subject from the background.
Geraldine W.
The shot of Matthew was done to demonstrate that “edge lighting” look you often see in sports photos of young athletes in shoe commercials. Obviously Matthew is no longer a high-school football player, but the look is very masculine and rugged and it works well on him. This was accomplished with two equal-powered heads in soft boxes, placed behind the sitter, at 45 degree angles to the subject-camera axis, and then adding in a little fill in the front so his face wouldn’t get lost.
Matthew F.
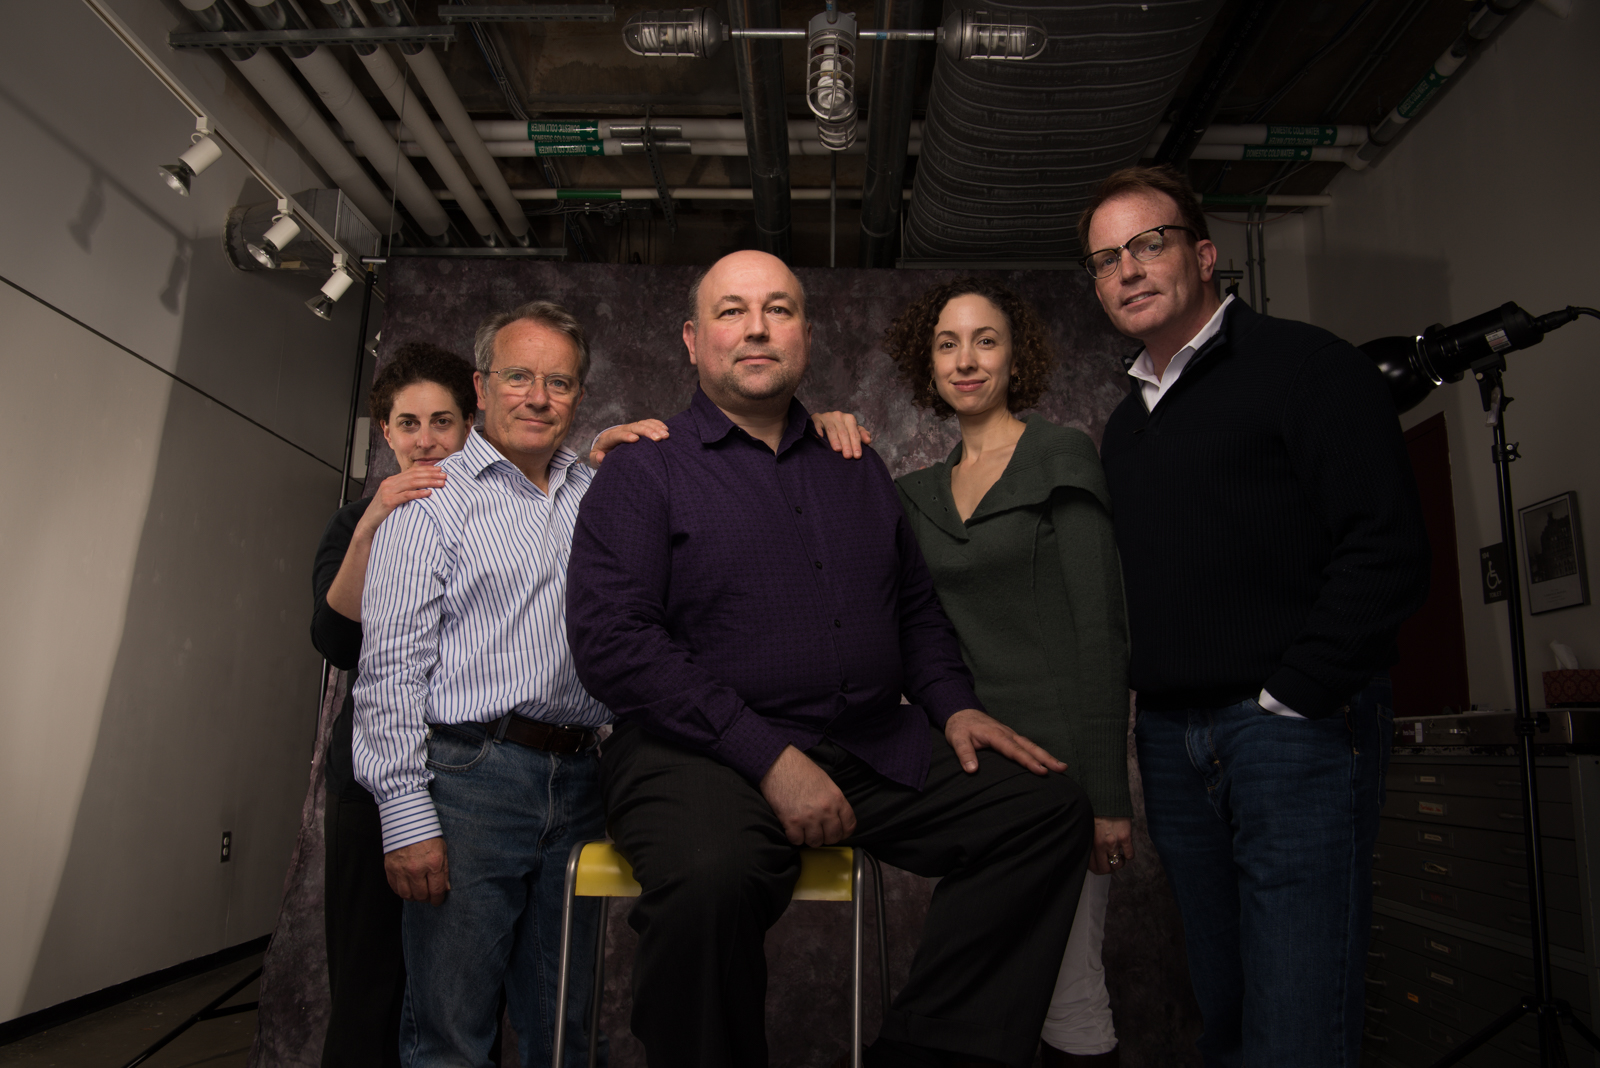
The final photo of the day is our group shot. That’s me in the center, if you’re wondering. My fourth student in the class was Leslie, who is the one hiding behind Matthew’s shoulder.
Studio Lighting Class
All individual portraits were done with a Tele-Rolleiflex and the Rolleinar 0.35 close-up adapter, on Kodak Ektar 100 color film. The two black-and-white images were converted from Photoshop. Ektar is a good portrait film in natural light, I’ve decided, but for studio portraiture, Portra 160 is better.