Windows, Jin Wang BoutiqueHotel Triton, Grant Street
All of these were shot with my 240mm Voigtlander Heliar f4.5 lens. It is fast becoming one of my favorite lenses for its rendition of out-of-focus areas. I knew it was a legendary lens for black-and-white shooting, but was unsure how it would render color. As you can see here, it does a beautiful job with color, despite being uncoated. It does give a slightly vintage look to the color palette, but some of that might also be the film I’m using – Kodak Portra 160 NC.
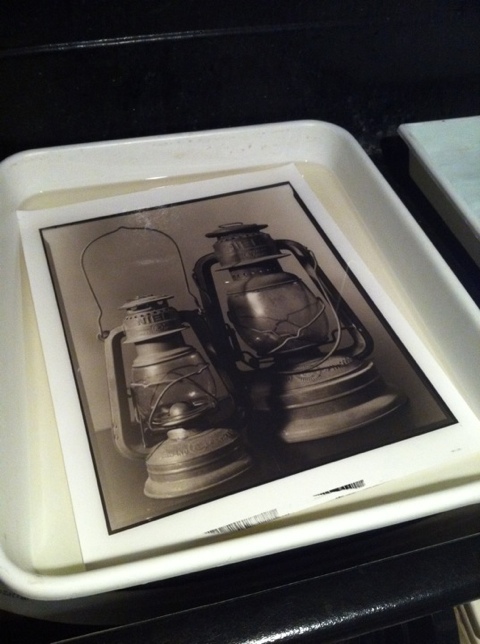
Here’s the first print in the wash from the 14×17 still-life shoot I did a week ago. Looking at the negative I was worried it would be too thin to print well in palladium. My fears as you can see were totally unfounded. This was a straight palladium print with 33 drops of Pd, 33 drops of Ferric Oxalate (FeOx), and 2 drops of NA2 (sodium platinum) as a contrast agent. The paper is Bergger COT 320.
Well, I finally got off my keyster and went out shooting tonight. I loaded up ten sheets of 5×12 in the Canham and went over to Dupont Circle to burn some long exposures onto film. This process always takes a lot longer than you think it should because inevitably setting up with a 5×12 (or any view camera for that matter) invites dozens of total strangers to approach you and ask questions. I always view it as an opportunity to educate people about the ongoing viability of film photography, and so I’m always happy to chat, even if the light is changing (fortunately after dark there’s no worry about the light changing – you only need to take one meter reading and stick with it for the rest of the shoot).
I’ve had this idea for a shot for a long time, and never quite got around to trying it until tonight. I did two versions of it – here’s hoping at least one works. The idea was a shot of a city bus pulling up to the bus stop, and loading/unloading passengers. Ideally it would be a 30-second or so exposure. I played a bit fast and loose with this one because the traffic pattern at the bus stop I was using resulted in a lot of stop-and-go and made it hard to get the shot in just 30 seconds. I’m going to develop the film tomorrow and we’ll see what came of it. If it worked as planned, I’ll have light trails leading up to the bus at the curb, and a fairly clear bus at the stop, along with the passengers and the interior. I did one version with my 240mm Apo-Germinar, which wasn’t wide enough to get the whole bus in at the bus stop. I switched to the 159 Wollensak Extreme Wide-Angle for the second shot, and stopped the lens down further to allow for the longer exposure time needed. I’m pretty sure I’ll get most if not all the bus in at the bus stop (I don’t mind if the roof gets a little cut off), but it’s hard to tell without watching the scene through the lens, and at that hour of the night it would mean waiting another half hour for the next bus to come around, and maybe nobody would be waiting to get on or wanting to get off at that stop, and I’d miss the shot. If this first try doesn’t work out, I’ve got other locations I can give a whirl that might work better.
Yesterday, in a fit of activity, I got in to the studio and shot a few still-life photos. I’m participating in a print exchange through the Large Format Photography Forum (www.largeformatphotography.info/forum) and I needed to shoot some images for the exchange. The final images will be platinum prints. I decided to use a lead crystal cut glass decanter I have as a subject – I wanted something challenging to photograph and that would create some striking images. I got the inspiration seeing the decanter on my coffee table with the sunlight coming through it and casting a shadow. I brought it over to the studio and set it up on a sweep of white seamless paper, and lit it with just one light, as it would be in the real world (there is only one sun!). It casts a beautiful shadow on the seamless, especially the way the crystal is cut with these random little scallops out of the body. I used the Century Master portrait camera, which after having been hauled around a bunch is starting to get a bit loose. As always, the lens on it is my Seneca Portrait f5. I put the whole plate back on the camera for these shots, as it’s about my favorite format. I indulged in my film choice and used some of my remaining stock of Arista.EDU Ultra 200 (aka Fomapan 200). Arista.EDU Ultra is Freestyle Photo‘s house-label film, made for them by Foma in the Czech Republic. Foma discontinued the 200 a year or two ago when their source for one of the critical components dried up, and just started re-making it but only in roll film. It’s one of my all-time favorite films, not only because it was dirt cheap (1/3 the price of Ilford), but because it produced beautiful results – it has this old-time feel to the image quality from a reduced red sensitivity. Here’s a couple of shots of the setup (pardon the poor quality- they’re taken with my iPhone which is not the best in low light). I’ll post some scans later of the finished prints. Studio setup #1 Studio setup #2
I was out to my parents’ house for lunch yesterday, and on a whim, as we were discussing possible family vacation plans, I decided that it was time to bring the studio camera from their basement down to the studio (a much more logical place for it to live). So with a bit of clever maneuverings, we drove their Toyota Highlander across the snow-filled yard (they still have a good 6 inches on their grass) and pulled it up at the basement door. Mom had this fear that the Toyota (with a good 8 inch ground clearance) would get stuck in the snow, so she got on the John Deere lawn tractor with the snow-blower and blew a path from the driveway to the basement door. Completely un-needed, and she probably did more harm to the lawn with the John Deere (which had chains on the tires) than the Toyota would have.
Dad and I got the camera stand out of the basement, which was a minor miracle, as my dad is 72, with a bad back, and the stand is made of solid oak and cast iron. It fit, barely, in the back of the Highlander with the rear seats folded forward. On the way home I rounded up a couple friends and we unloaded everything down at the studio much easier than getting the stand into the back of the car (it helps that the studio is at street level and we only had to take the stand up one single step to get it in the back door. While I have the Highlander, I’m going to do another run over to the studio today with a bunch of accessories, and try to get the space a bit more organized.
Although I do not consider my Whole Plate cameras to be “Single Use Devices”, I am truly in love with the format and am very happy to shoot with it, and even moreso to find another member of the (very small) whole plate clan.
So far this blog has been long on pictures and short on words. Lucky you. I figured it was time to actually write something, and now was as good a time as any to explain how I got into all this giant cameras and funky antique process stuff. The story of it kind of mirrors the story of how I got in to photography to begin with- almost by accident.
I started doing photography after college, as something to do while looking for a job. I originally thought I would learn JUST enough to use it to record subject matter for painting and drawing. It was a means to an end. That plan went out the window when I saw my first negatives come out of the developing tank, and was even more firmly convinced that this was the thing for me when that first print appeared in the red-lit tray on a rack in my bathtub.
Back maybe six or eight years ago, there was this big scare that Ilford might go bankrupt and that silver gelatin paper might go away, and maybe even film too. Well, I was so much in love with wet darkroom printing that I figured it was time to learn how to do hand-coated processes so I could keep using my 4×5 that I liked so much. I didn’t realize what a Pandora’s box this would open. Prior to this epiphany, I was only vaguely conscious of the existence of antique/alternative processes. I knew cyanotypes existed, and someone in a class I took once did some VanDyke Brown prints on fabric. I saw a handful of platinum prints at the View Camera conference, but that was about it.
That event was I think the turning point for me because it was there that I also saw people working in wet plate collidion. My eyes were opened to the possibility of what could be done without commercially manufactured products. After seeing some more prints,
I decided I would try platinum printing. I was mostly shooting 2 1/4 inch square roll film with some 4×5 mixed in at the time, and 4×5 negatives were big enough to learn on, but platinum like almost all other alternative/antique processes is mostly insensitive to non-UV light. This means that you can’t enlarge an image to whatever size print you want from a small negative- you have to work from a negative the size you want the finished print to be.
Realizing the limits of 4×5 prints rather quickly, an 8×10 camera ensued. 8×10 is a beautiful size print but a pain in the ass of a camera. Along came my Argentina trip and a 5×7 joined the family. And so on. Platinum printing became my mainstay as I grew to love the medium for itself, to the point that I have all but retired my enlargers, and only work in contact printed alternative processes. I’ve dabbled in wet plate and I’ve even learned how to make daguerreotypes.
This is my medium, these are my processes, and this is the how and why I make my photos.
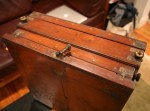
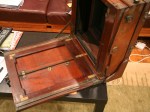
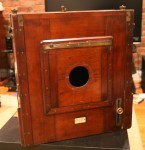
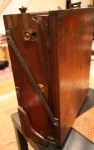
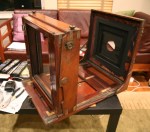
Well, here’s a piece of ambition for you- getting this 12×15 W. Watson & Sons 12×15 inch “field” camera restored and up and running again. The W.Watson & Sons dates to around 1880. Once it is up and running, I’m planning on putting a nice 16″ (405mm) Kodak f4.5 Portrait meniscus lens on it.
The biggest hassle will actually be getting new film holders made for it, since it’s a bit of an exotic size to begin with, and it was originally designed for glass dry plates, not film. I’ve got someone lined up for the film holders – it’s just a matter of negotiations and finding the time to have them made.
I’m shopping around for new bellows for it because I’m just too damn lazy to make my own – this would be a simple case to do because the bellows are square and not tapered (I had a fragment of the original bellows but they were too rotted to use for anything, and they stank something awful).
Making the new ground glass will be easy – I just have to get some reasonably accurate measurements from the ground glass frame, go to the hardware store and have them cut me a piece, then get busy with the valve grinding compound. By the time I’m done with it, I’ll have a very buff left arm.
I was very lucky really, that the camera was in as good a shape as it is – when it arrived from the UK, it was quite filthy and looked like it needed a complete stripping and rehab. With a bit of cleaning and some olive oil, the mahogany came back quite nicely, and I was pleasantly surprised to discover that the brass hardware was originally gilded, and that much of the gilding remained.