This morning I started another gum print. Got two layers on today. I think I’m being deviled by that constant enemy of all hand-coated processes, low humidity. When my paper dries between coats, it dries out so much that when you apply a second layer, the paper starts to buckle even when you have the paper taped down to mask the borders because the gum emulsion is so much wetter than the paper. This means you have an uneven coat with some areas in the valleys between the buckled areas on the paper that get too much pigment, no matter how carefully you work the coating. I’m still getting the kinks out of the mixing process, as getting the right amount of pigment for any given color is a long cycle of trial and error.
Category Archives: Antique Processes
The John Dugdale School
In doing a bit of browsing around today in response to a Facebook posting, I came across a link for the John Dugdale School. I once had the opportunity to take a two-day seminar with him at his studio in New York City. The experience of studying with him was transcendent – I count that weekend as one of the greatest influences ever on my photographic trajectory. The fact that his VISION is so strong even with his sight almost entirely gone is just one of the inspirational things about working with him. He’s also the only person I’ve ever felt comfortable enough with as a photographer that if he asked me to pose nude for him, I would. He’s such a brilliant, gentle soul, full of searing honesty, that being around him brings out the same in you, and helps you make more revealing, connected photographs. My intent is to find out if the school is still operating, and take another seminar with him when the weather is warmer. John, you see, is a bit like John Coffer – he prefers to live a 19th century life, with minimal trappings and intrusions of the electronic world. His farmhouse in upstate New York has no central heat or air conditioning, most likely no phone and definitely no internet. I wouldn’t be surprised if the road is dirt, for that matter. I’ve posted a link to his website for the school in my links. In any case, here’s to you, John, may you make many more photos for many decades to come!
Pre-acidification of Rives BFK
Well, my experiment with pre-acidification of Rives BFK for doing palladium/platinum/Ziatypes was a success. I got a flawless Ziatype over which I will now try several gum layers. My pre-acidification consisted of a 5 minute bath in 5% Oxalic Acid. I sized the paper AFTER the acidification bath. Image to follow.
Here is the image with the first two layers of gum over Ziatype. Colors are Alizarin Crimson and Sepia. I’m planning on doing at least two more layers, probably another sepia or burnt Sienna and then another red, maybe something deeper red.
Prep Work
Well, today was spent prepping paper for gum and gum-over-platinum printing. I did two batches of 10 sheets of 11×15 Rives BFK. The first batch had an oxalic acid pre-bath. The last time I used Rives BFK for a platinum/palladium print, I got these funny discolored blotches, which could be attributable to paper pH, so I’m trying the acid pre-bath to see if that makes a difference. Twenty sheets doesn’t sound like a lot, until you realize that I can really only size paper in 10 sheet batches because that’s about all my clothes-drying line in my darkroom can handle. In any case, it’s enough to get me printing for a few weekends, so I won’t have to do it again for a while. It’s a necessary evil in the gum printing process, because without it your gum image would dissolve off the paper in the development step.
Here’s my darkroom sink with ten sheets of sized paper hanging up to dry:

Sizing is an interesting creature – basically it’s Knox unflavored gelatin with a hardening agent added. To make it, you put a box of four 7 gram packets in 300 cc’s of cold distilled water, let the gelatin bloom for 30 minutes give or take, then mix the bloomed solution with enough water to bring it to 1 liter. Place this new solution in a water bath and heat until the gelatin solution reaches 140 degrees Farenheit. Add your hardener, mix, then you’re ready to coat. I have a bain marie pot that I use on a hotplate for heating the gelatin so it doesn’t scorch, and I can do it in my darkroom instead of on the kitchen sink.
Here’s a shot of my sizing mixing setup-

Sizing needs a hardening agent to help it stand up to repeated soakings in water. Hardeners are all something other than pleasant chemicals – typical hardeners are Chrome alum, Glyoxal and Formaldehyde (Formalin), in ascending order of toxicity. This time I decided to give the chrome alum a try because it doesn’t off-gas, has minimal effects from exposure, and requires the least safety gear for handling (latex gloves are sufficient). I had been using Glyoxal before, which requires good ventilation. My darkroom has minimal ventilation, and at this time of year, fresh air comes with a massive temperature penalty. Formalin pretty much HAS to be used outdoors, so that’s not happening either.
Here’s my Chrome Alum, 5% mix-

Isn’t it a lovely purple color? Don’t mistake it for grape Kool-Aid though…
New batch of Rives BFK arrived today!
I got a new batch of 100 sheets of Rives BFK from my favorite supplier, Bostick & Sullivan, today. I’ll be having a sizing marathon this weekend getting all that paper ready for gum printing. I’ve not tried a lot of other papers yet, to keep the variables down, but I’ve been quite happy with the Rives BFK so far. It’s a 90# watercolor paper with good wet strength, and I’ve been able to coat up to five layers so far without having to re-size. After I get through this lot, I’ll have to try the Lana Aquarelle I have sitting around. I’m also going to try using an alum-based hardener in the sizing instead of glyoxal because it’s not exactly practical to try and size paper outdoors in this weather, and my basement darkroom doesn’t have good ventilation.
Why I do this stuff
So far this blog has been long on pictures and short on words. Lucky you. I figured it was time to actually write something, and now was as good a time as any to explain how I got into all this giant cameras and funky antique process stuff. The story of it kind of mirrors the story of how I got in to photography to begin with- almost by accident.
I started doing photography after college, as something to do while looking for a job. I originally thought I would learn JUST enough to use it to record subject matter for painting and drawing. It was a means to an end. That plan went out the window when I saw my first negatives come out of the developing tank, and was even more firmly convinced that this was the thing for me when that first print appeared in the red-lit tray on a rack in my bathtub.
Back maybe six or eight years ago, there was this big scare that Ilford might go bankrupt and that silver gelatin paper might go away, and maybe even film too. Well, I was so much in love with wet darkroom printing that I figured it was time to learn how to do hand-coated processes so I could keep using my 4×5 that I liked so much. I didn’t realize what a Pandora’s box this would open. Prior to this epiphany, I was only vaguely conscious of the existence of antique/alternative processes. I knew cyanotypes existed, and someone in a class I took once did some VanDyke Brown prints on fabric. I saw a handful of platinum prints at the View Camera conference, but that was about it.
That event was I think the turning point for me because it was there that I also saw people working in wet plate collidion. My eyes were opened to the possibility of what could be done without commercially manufactured products. After seeing some more prints,
I decided I would try platinum printing. I was mostly shooting 2 1/4 inch square roll film with some 4×5 mixed in at the time, and 4×5 negatives were big enough to learn on, but platinum like almost all other alternative/antique processes is mostly insensitive to non-UV light. This means that you can’t enlarge an image to whatever size print you want from a small negative- you have to work from a negative the size you want the finished print to be.
Realizing the limits of 4×5 prints rather quickly, an 8×10 camera ensued. 8×10 is a beautiful size print but a pain in the ass of a camera. Along came my Argentina trip and a 5×7 joined the family. And so on. Platinum printing became my mainstay as I grew to love the medium for itself, to the point that I have all but retired my enlargers, and only work in contact printed alternative processes. I’ve dabbled in wet plate and I’ve even learned how to make daguerreotypes.
This is my medium, these are my processes, and this is the how and why I make my photos.
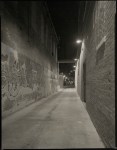
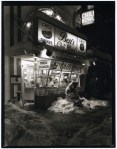
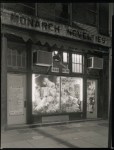
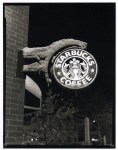
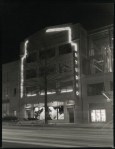
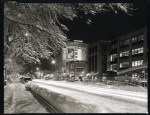
DC Streetscapes
Here are a few excerpts from my DC at Night series. All shot in whole plate (6.5 x 8.5 inch) format, printed in palladium.
Platinum printing – paper choice
One of the great pleasures of alt process printing is that it gives you complete and total freedom of paper choice. Not all papers will work of course, but you can always experiment. I recently dug out some old negatives to give a try with a Japanese Kozo paper, the lightweight variety which is very thin, translucent, but still has excellent wet strength. It’s a very soft paper, so it loses detail, and lends itself to images that have perhaps too much to be flattering – a great portrait paper.

These are some nudes I did with it of a transgender friend of mine – traditional develop-out Palladium prints to give that nice rich brown tone to the shadows. I think the Kozo paper works very well with these images because it also implies the skin nature of the image – a surface with a depth behind it. It’s a comment on the nature of being trans – that the skin of a person is just one layer of who they are.

More recent gum work

This image is a simple two-color gum bichromate print. Burnt Sienna and yellow ochre if memory serves correctly. Both layers were manipulated with a watercolor brush to create texture in the background.
Recent Gum Work
Three recent gum bichromate prints. Gum bichromate is perhaps the most labor-intensive photographic process because it involves building an image, one layer of pigment at a time. Most gum images need at least two layers, but often three or four are a minimum. Even working rapidly, you can only do about two layers a day. Gum is one of those processes that is all about the choices you make adding up to a finished product. All three images are whole-plate size images, 6.5 by 8.5 inches. Whole plate is the original photographic format, having been designed by Louis Daguerre for his first camera. Whole plate has a long and varied history, having come in and out of fashion repeatedly. It is enjoying a small modern-day renaissance not only for its historical echoes but for its aesthetically pleasing proportions and relative size.
This first image is a gum over Ziatype. Ziatype is a printing-out version of Palladium. A printing out process is one where the image is fully formed during exposure, and does not need a chemical developer to produce a final image. Ziatypes are really neat because they offer a very wide range of contrast, color and tonality depending on how you mix the chemistry. I do the Ziatype under the gum to start with a sharp base image with well-defined shadows and midtones. The gum builds on top to add physical texture and create color.

The second image is a pure gum image, with only two layers, black and blue. As you can see, it is possible to create a successful gum image with only two layers of pigment. I manipulated the layers to bring out the blue color and the detail in the hair.

The final image is a four layer gum bichromate. It is a pretty accurate representation of the model’s actual skin color, but it is made from a single black-and-white negative. I worked it over with a watercolor brush during the printing process to bring out the highlights on the model’s back.

