Tag Archives: Platinum Printing

Platinum/Palladium Printing – Issues and Solutions

As a photo educator, I want to make sure I have the best information to pass along to students when it comes to troubleshooting processes. A friend of mine and one of the best platinum printers out there today wrote this excellent pair of articles on a common problem – the dreaded “black spots”.

https://ianleake.com/blog/black-spots/

close-up-of-a-black-spot-320x258

And a viable solution to the problem, at least part of the time:

https://ianleake.com/blog/why-oxalic-acid-combats-black-spots/

Ian does an excellent job of explaining the chemistry behind the issue in a simple, straightforward manner that even a non-chemist like me can understand.

CarbonWorks Blog by Richard Sullivan, FRPS

I wanted to put in a good mention for Richard Sullivan’s new blog, CarbonWorks. Richard is a brilliant photographer and photo chemist, co-founder of Bostick & Sullivan, the premier source for all things alt-process. I found his blog today and was reading up on some innovations he has discovered and published, including the Athenatype (a silver-based printing technique that yields a near-platinum print look) and a fumed silica treatment for alt process printing that helps boost dmax (maximum black density) a common shortcoming of many antique processes. Richard has been honored as a Fellow of the Royal Photographic Society for his work in reviving alternative/antique photographic processes and for inventing new variations on the same, specifically the Ziatype, a printing-out process variant on Platinum/Palladium. He is a master carbon printer (thus the blog title). He also teaches non-silver processes at Santa Fe Community College. Give the blog a read, and follow it if you’re interested in anything antique photo process related!

Palladium Printing at Large Sizes

If any of you out there have ever done alternative process printing, you’re probably aware of the increase in technical difficulty that comes along with making bigger prints. Each size up adds a new wrinkle, especially when it comes to getting an even, consistent coat. It certainly helps to have a good paper that facilitates a consistent coating via sizing, baryta, or other pre-treatment. Another very important step is using the right brush. I’ve become very fond of the Richeson 9010 “Magic” brush for a good reason – the Richeson brushes have earned their name “magic” by the way the bristles are designed, they just make it easier to coat evenly and smoothly without disturbing the paper surface. They’re worth the price you pay for them from the savings in coating time, reduced re-prints, and hair not pulled out in frustration.

Especially when getting into platinum/palladium printing, most novice printers are extremely cost-conscious. After all, a basic pt/pd kit to make roughly 30 8×10 prints costs in the range of $200 today. And that’s just for the chemistry. However, you’ll quickly learn that there is such a thing as false economy. While printing at smaller sizes, it’s fine to try and economize on your coating solution to see if you can still coat the entire image area. If you under-coat, it’s painelss enough to toss a bad print and start over. All that goes out the window when you start printing bigger than 8×10. Better to be generous with the chemicals until you KNOW your requirements for your paper and your image size, otherwise you’ll be throwing away blotchy, uneven print after blotchy uneven print until you get one. A couple extra drops of palladium or platinum “wasted” will cost you far less than an entire 14×17’s worth that turned out poorly. I was printing some 14×17 prints this week and I realized at the current prices for materials, I was somewhere in the region of $30-40 per print, my cost. You don’t want to mess that up.

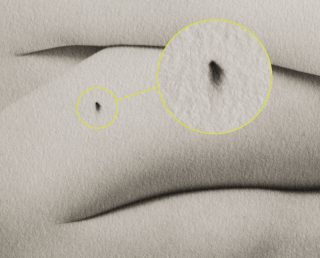
When I coat prints that big, I usually mask the edges of the coating area for several reasons. One: I’m using a 3″ or bigger coating brush. Watercolor wash brushes that big are not precision instruments capable of stopping on a dime and not slopping chemistry around. Two: I like nice clean white borders on my paper unless I’m aiming for that ragged, handmade look. Three: the masking tape helps keep the paper in place while coating so it is easier to brush on an even coat of emulsion. One of the challenges of masking is preventing the paper from adhering to the masking tape and tearing when you lift it off. To that end, I’ve found that the 3M “delicate surface” blue painters tape works best. It’s still not a 100% solution, because even when I’m being what I think is careful, I will have the odd occasion where the tape sticks to the paper a little too much and a layer of the paper surface comes up with the tape. I prefer masking with tape during coating to using rubylith to mask while exposing because the rubylith mask just prevents the emulsion from being exposed. You still have to clear the unexposed chemistry out of the paper and if your paper is particularly binding and/or your clearing bath is insufficient, you’ll end up with a rather embarassing looking stain on the paper around your image area. The 3M tape is cheap enough, don’t skimp and try to go cheap. Throw away your tape and pull new strips with each print – again false economy if you try to re-use it, as you run the possibility of contaminating your new print with old chemistry. At potentially upwards of $40 per print, is it worth it trying to save money on $0.10 worth of tape?

FotoWeek DC events at Photoworks in Glen Echo

Photoworks in Glen Echo, Maryland (just outside Washington DC) will be putting on a slate of events as part of FotoWeek DC from November 5-12, 2011. I will be participating in the alternative process show-and-tell on Sunday, November 6, from 11AM to 4PM. I will be showing selections from my recent body of work of DC at night, all shot on large format film.

I will also be giving a platinum/palladium printing demo later that week (date/time to be determined) – admission is $40 plus a $10 materials fee. Here is the slate of presenters and schedule for November 6. I encourage everyone to come out and see the show, and if you’ve never been out to Photoworks before, please come check it out, it’s a lovely facility in the terrific (and photographically ripe) setting of Glen Echo Park, which is part of the National Park Service!

For more information about the park and its cultural, social and educational activities for people of all ages, here is a link to the park’s website:
Glen Echo Park

11:00 11:30 Barbara Maloney Intro/Temperaprint/Photoetching/Cyanotype
11:30 12:00 Scott McMahon Gum bichromate
12:00 12:30 Scott Davis Platinum/palladium
12:30 13:00 Sheila Galagan Lith Printing
13:00 13:30 Andrew Currie Tintype
13:30 14:00 break
14:00 14:30 Grace Taylor Vandyke brown
14:30 15:00 George Smyth Bromoil
15:00 15:30 Keith Williams Monobath/IR/UV
15:30 16:00 Richard Pippin Lith Printing

A Non-Silver Manual now available for free

I just needed to put in a good plug for this book. It’s what I learned gum printing from, and contains some very useful information on other alt processes. The book is “A Non-Silver Manual: Cyanotype, Vandyke Brown, Palladium & Gum Bichromate with instructions for making light-resists including pinhole photography”. It was available for sale for many years in a soft-cover spiral bound edition directly from the author, Sarah Van Keuren. Mrs. Van Keuren has decided that she no longer wants to maintain the book and deal with the printing and shipping, so she is making it available chapter by chapter for free to download on www.alternativephotography.com If you want a hard copy, you can contact the publisher of AlternativePhotography.com and see about remaining stock.

Platinum printing – paper choice

One of the great pleasures of alt process printing is that it gives you complete and total freedom of paper choice. Not all papers will work of course, but you can always experiment. I recently dug out some old negatives to give a try with a Japanese Kozo paper, the lightweight variety which is very thin, translucent, but still has excellent wet strength. It’s a very soft paper, so it loses detail, and lends itself to images that have perhaps too much to be flattering – a great portrait paper.

Alex O, Portrait

These are some nudes I did with it of a transgender friend of mine – traditional develop-out Palladium prints to give that nice rich brown tone to the shadows. I think the Kozo paper works very well with these images because it also implies the skin nature of the image – a surface with a depth behind it. It’s a comment on the nature of being trans – that the skin of a person is just one layer of who they are.

Alex O, stretching