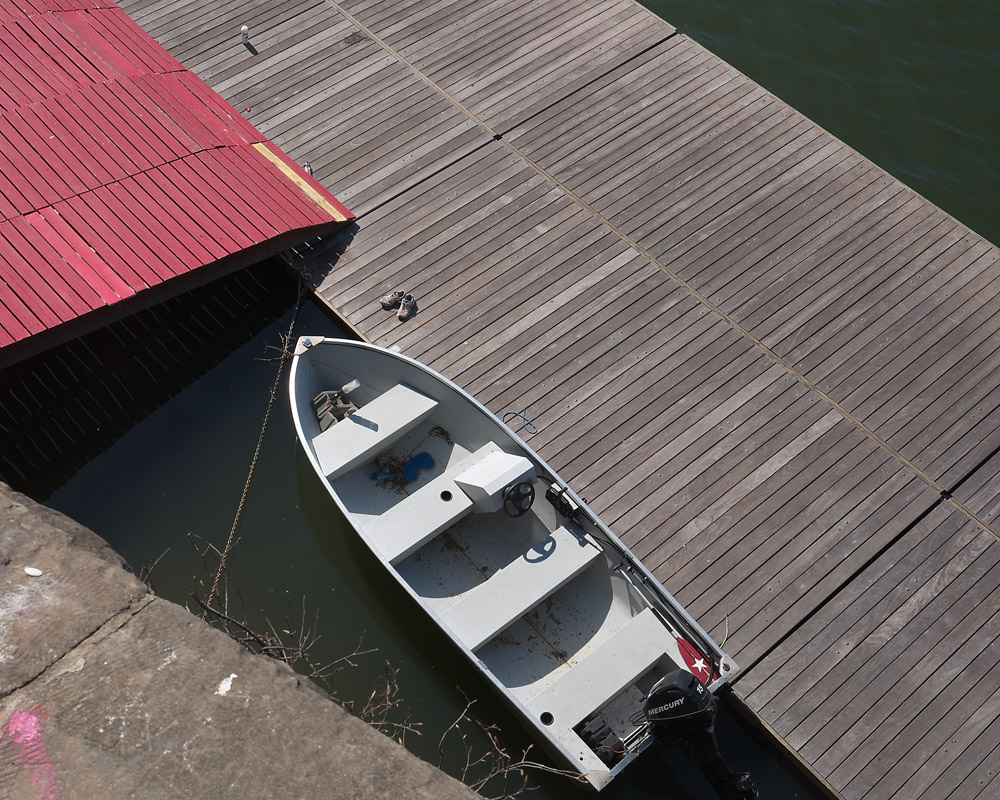
This is a view I’ve seen a number of times but wasn’t ever sure how to capture it until yesterday. I’ve always had the wrong camera with me, either from the focal length, the aspect ratio, or both, perspective. This is an outtake in the sense that I was doing a model shoot with a friend of mine on the pier of the old C&O Canal bridge that used to cross the Potomac River in Georgetown, so taking this photo was not the purpose of the shoot. This is the view looking straight down at the dock for the boathouse.
Boathouse Dock, Georgetown
I was particularly drawn to the geometry and angles formed by the decking on the boat dock, with the red decking running perpendicular to the unpainted deck, and all the triangles formed by the perspective you have to take to see the scene in the first place. Even the boat, which has a totally different shape and texture to the decking, creates more triangles with its prow, and provides visual tension running the opposite direction so you move your eye around the image.
There are times when you want to capture something delicate in backlit lighting – a translucent flower for example. Going strictly with the natural light you end up with either the translucent parts blown out to get detail into the front, or you have a dark blob in the middle to keep the delicate highlights under control. This is where fill flash comes in handy.
Normally I loathe little pop-up or shoe-mounted flashes because they’re about useless when trying to light anything more than a couple feet away, and they’re so close to the lens that they give people red eye and make pets look like demons. But as a fill flash, they really shine (shine, get it? pun!). They put out just enough light to take the edge off backlit shadows and add a little catchlight into people’s eyes. When used this way redeye isn’t a problem because in daylight people’s pupils are closed down enough that their retinas don’t reflect (the cause of red eye in photos).
Fortunately, flowers don’t have retinas, so we can dismiss the concern altogether.
Pink Blossoms
I was using my Fuji X-T1 and had the tiny little toy-like pop-up flash that comes with the camera as an accessory. I took one shot of the blossoms without the flash. I knew right away that the blossoms would be too dark and not have detail; the little flash was exactly what I needed. I popped it up and let it put in a little kick. Voila!
In this set I’m including some black-and-white shots along with the color ones to show what the Fuji can do. I used the b/w+R setting (the equivalent of using a red filter when shooting black and white film). I don’t know that this is as extreme as actually shooting black-and-white film with a red filter in terms of the contrast and look, but I like it.
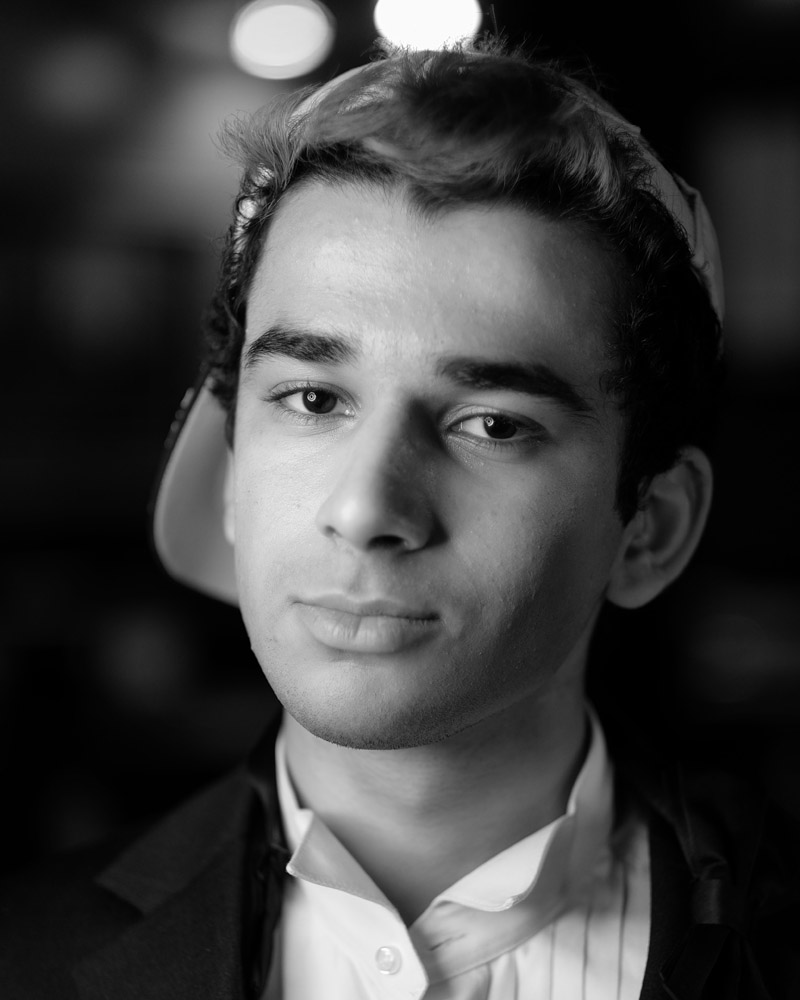
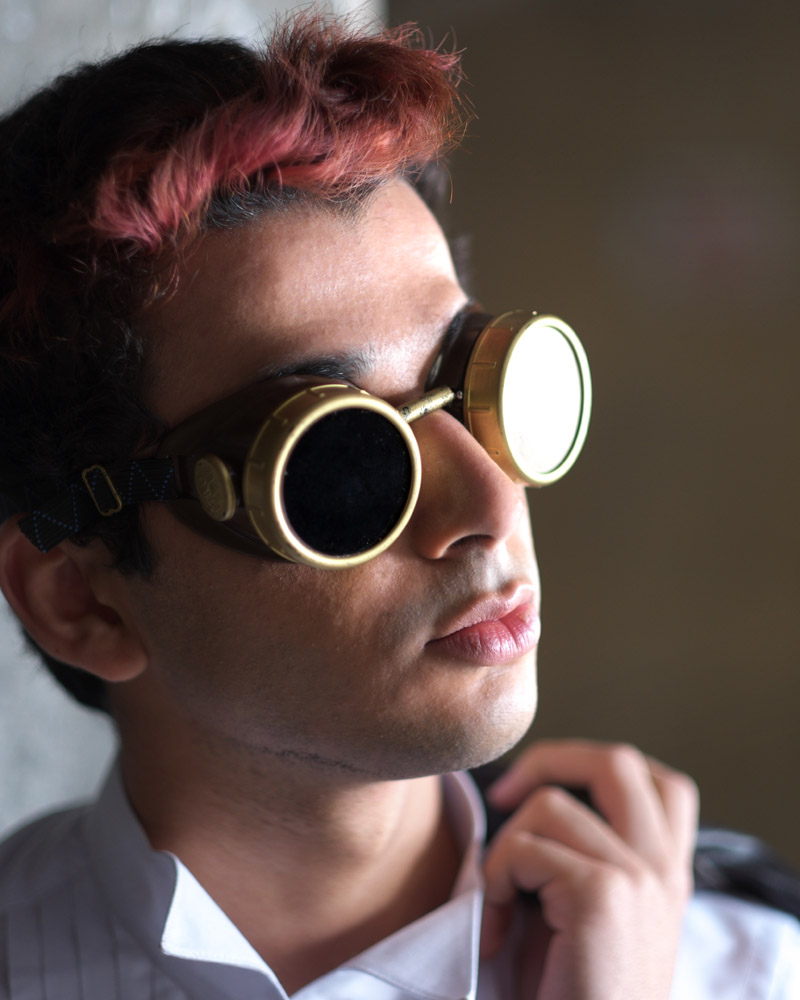
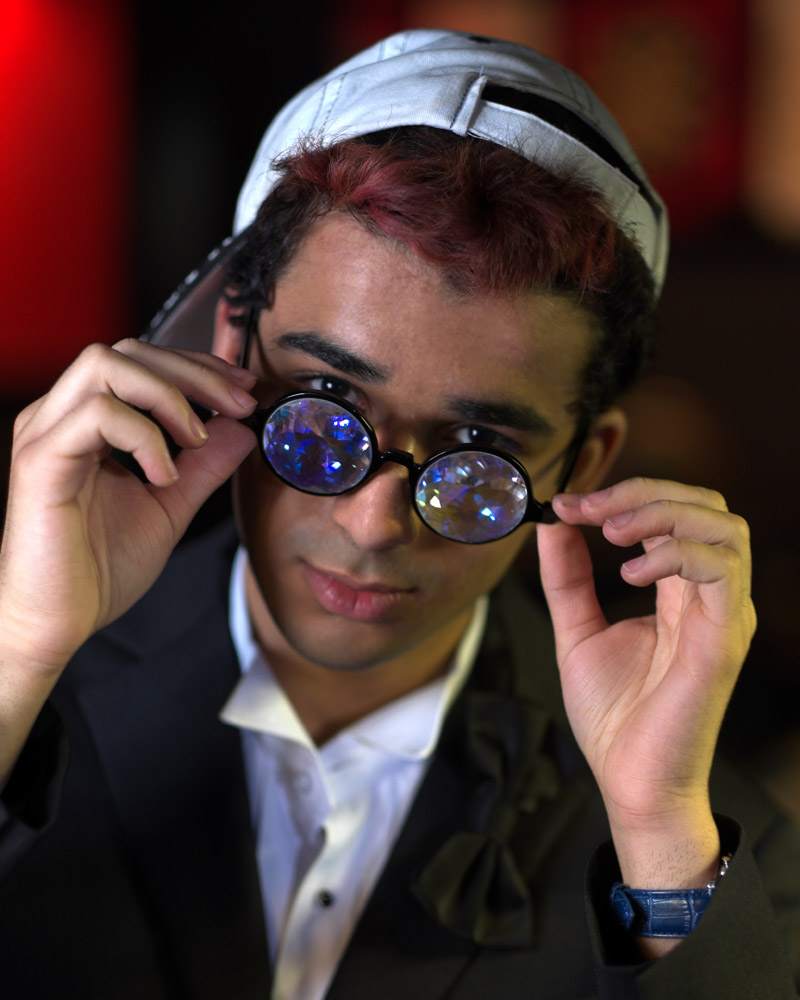
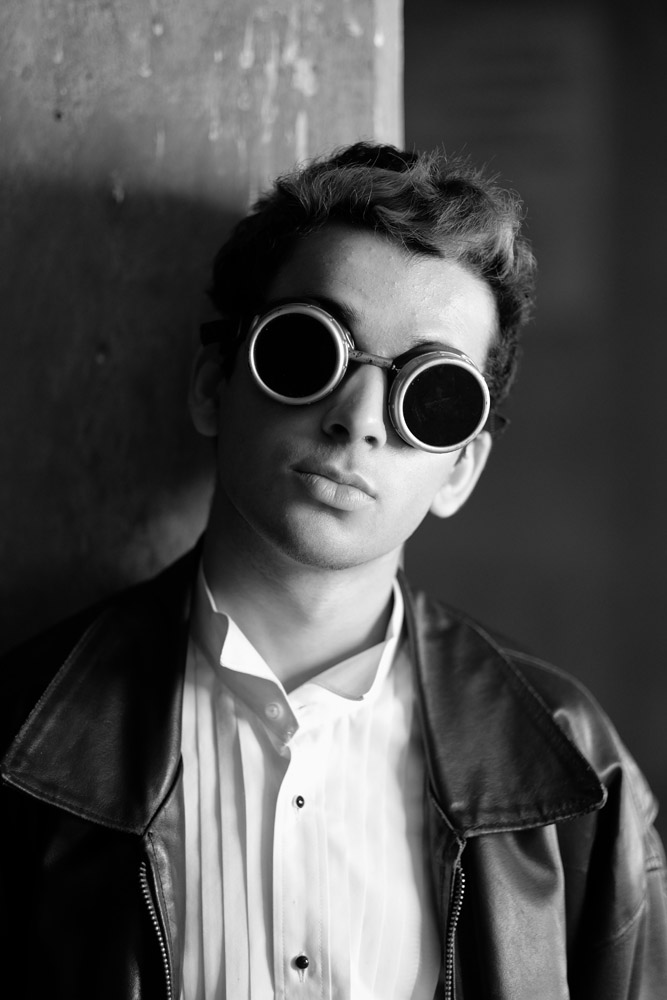
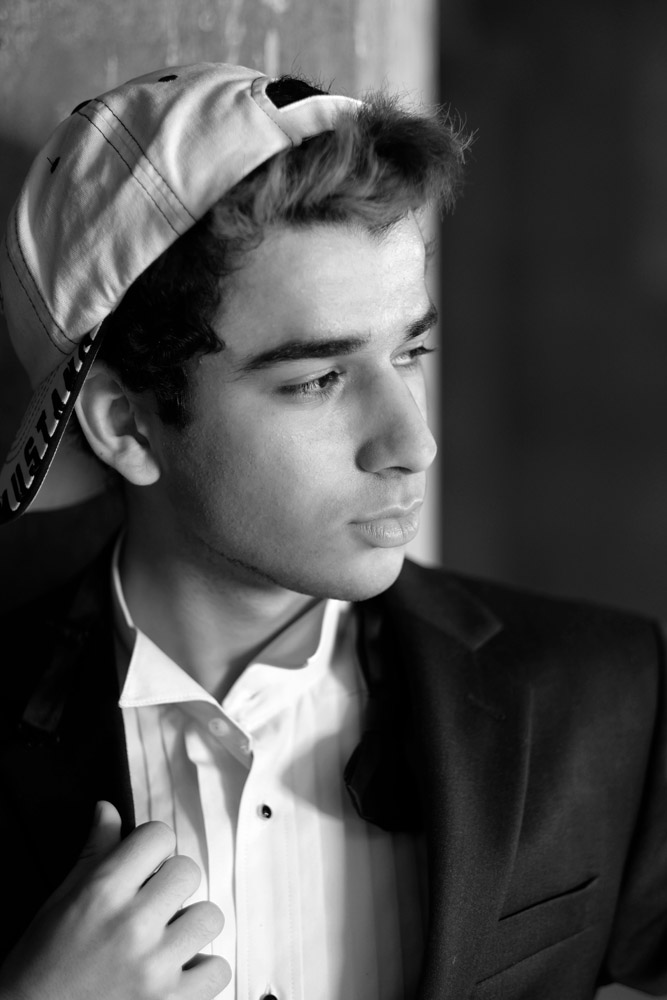
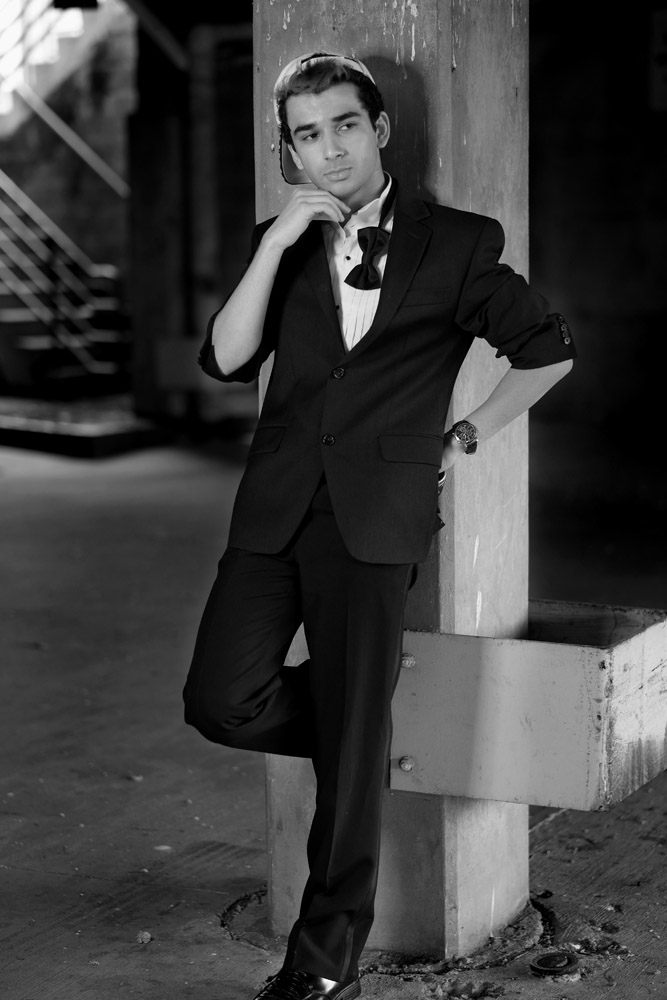
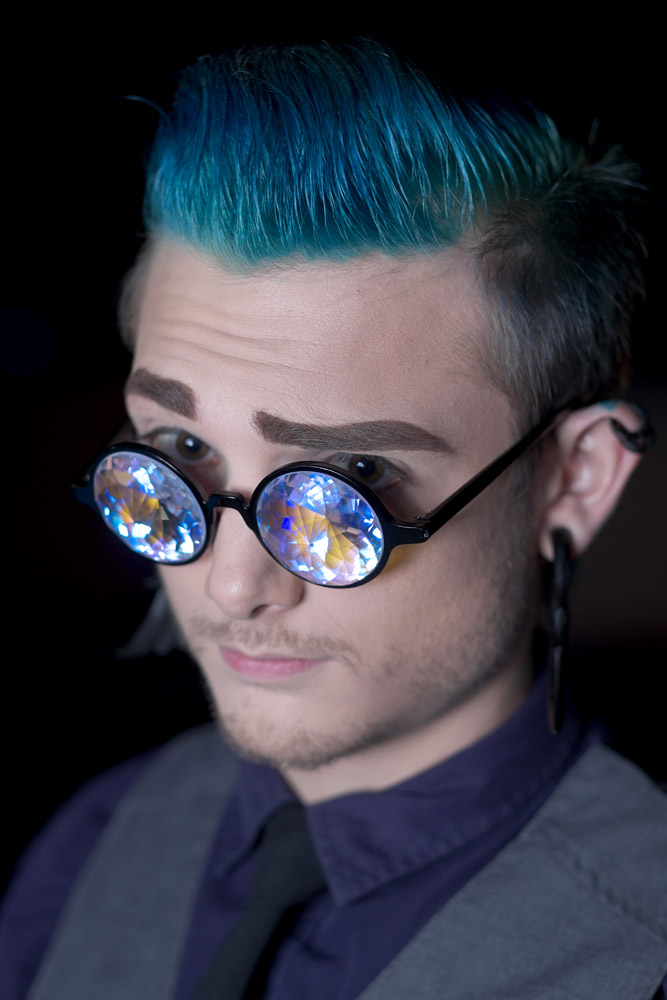
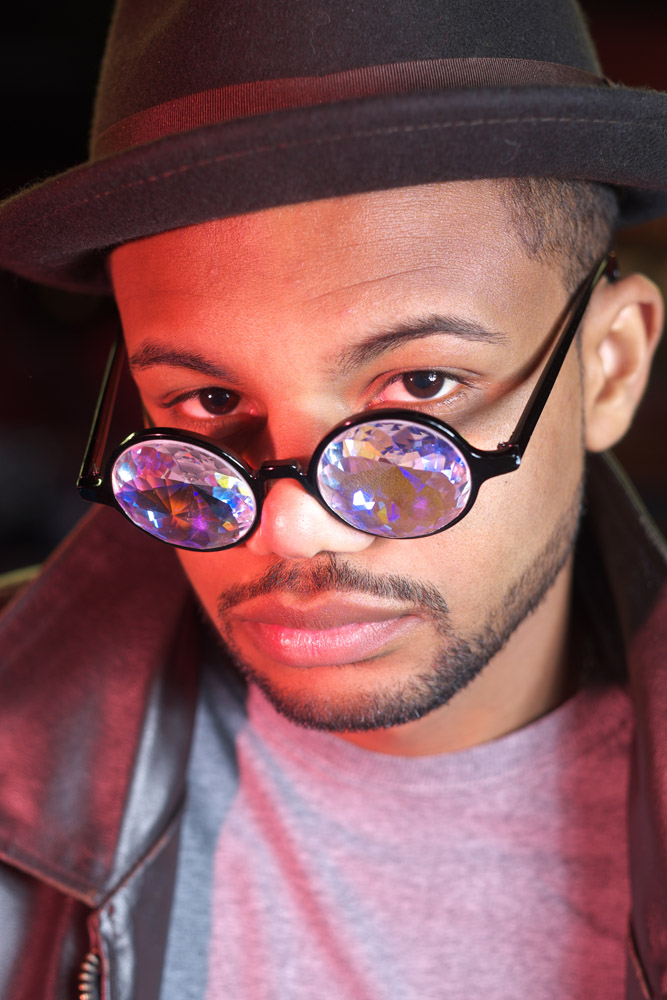
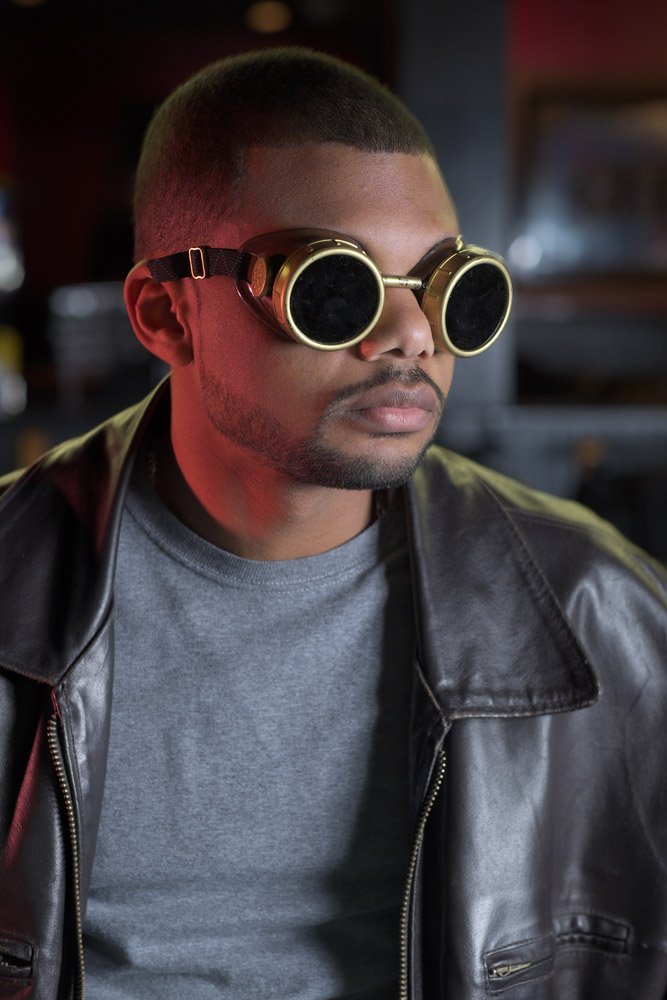
MustafaMustafa
Mustafa showed up to the shoot in a tux, which is hard to work around if that’s not what you’re aiming for. It’s a good look, and a very elegant one, but not necessarily fitting a pool hall. I tried to shake things up a bit with the kaleidoscope glasses, the steampunk welder’s goggles and my own vintage leather jacket. Tip to models – unless you are told wardrobe will be provided, always bring at least two different looks to a test shoot with you so you don’t get stuck looking out-of-place on the shoot.
MustafaMustafa
Mustafa has a great face – he looks good from lots of angles. When posing a model or a portrait subject, you want to make sure that you’re not doing anything un-flattering. If you’re turning the head away from front-on, you want the nose to either obviously stand back from or break the contour of the cheek so you don’t inadvertently flatten it by having it by having the tip of the nose meet the outline of the cheek. At the same time, pay attention to the eyes – you want to see whites on both sides of the iris. If you turn someone’s head in part profile and then have them look back at the camera with their eyes, the irises in the corner of the eye make them look like a psycho-killer. In these shots it works because he’s looking the same direction with his eyes as his face is pointing.
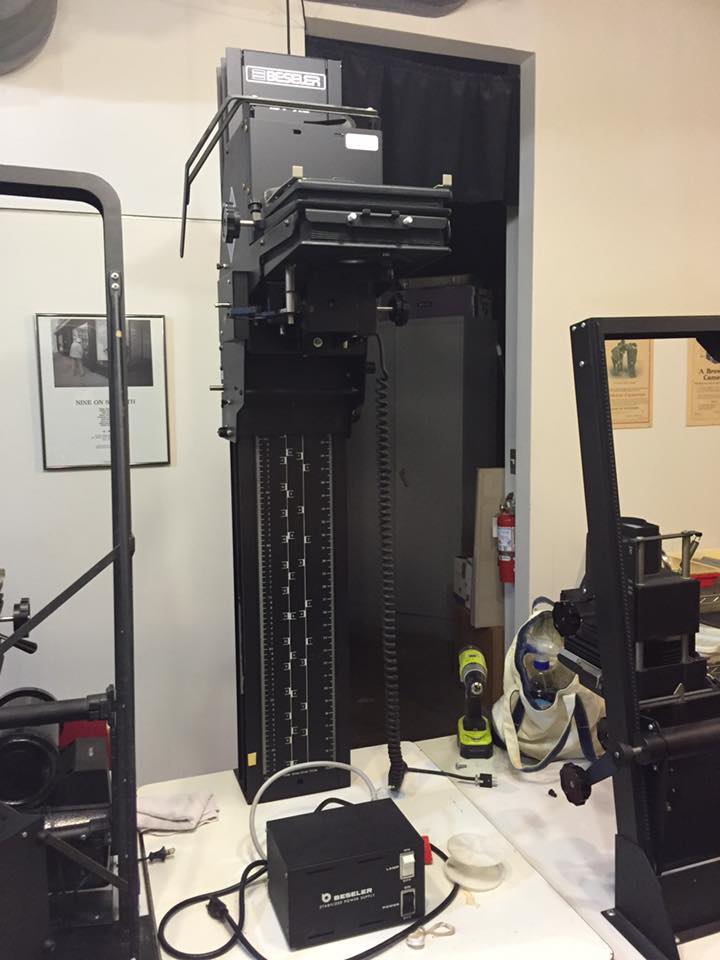
Just in case with all my recent postings about the Fuji X-T1 you all thought I was converting over to the binary side, here is a photo of my newest darkroom treasure. It’s a Beseler 45V-XL enlarger chassis (I already have a light source to mount on it). It’s really my dream enlarger. I currently have a 45 MX(? – not entirely sure of the model number. It’s the older style Beseler 45 M-series with the blue finish), which while very good, is a little cantankerous and it has a problem – when I try to print small, because of the design of the columns (they’re angled) I can’t print small on it with my easels – the head is too close to the column and I can’t move the easel far back enough to center the image.
Beseler 45V-XL
This baby solves that problem. The head sticks out far enough that it is ALWAYS centered on the baseboard. Now the challenge will be to fit it in the darkroom because the column is taller than the 45MX by a good 8-9 inches, and my ceilings are tragically low. Oh, and the best part? It was free. Photoworks was de-accessioning some enlargers and if I hadn’t taken it, it would have gone to the scrap heap. Yay recycling!
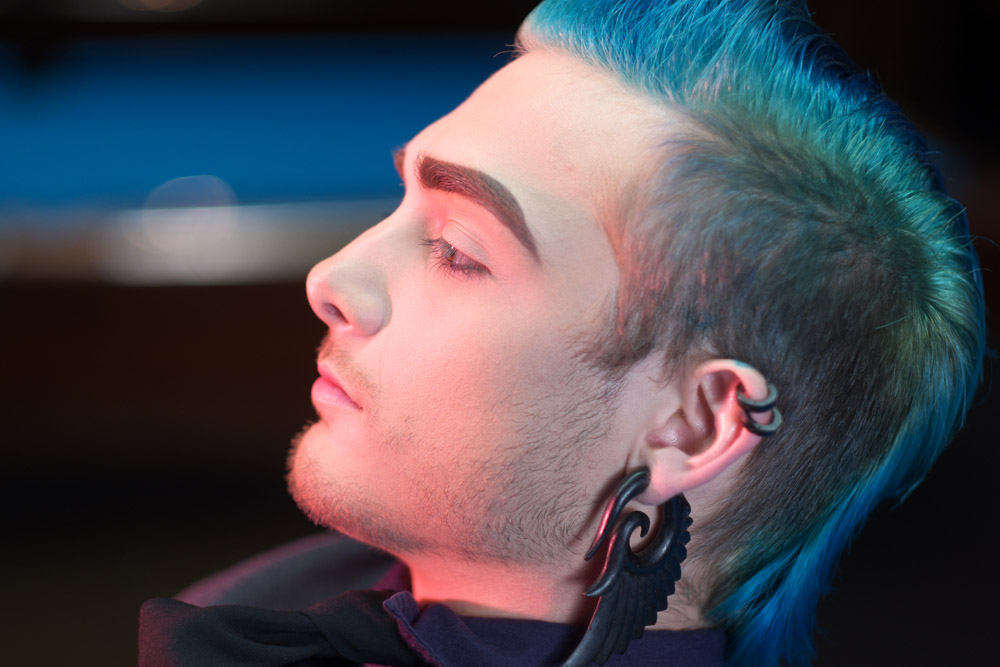
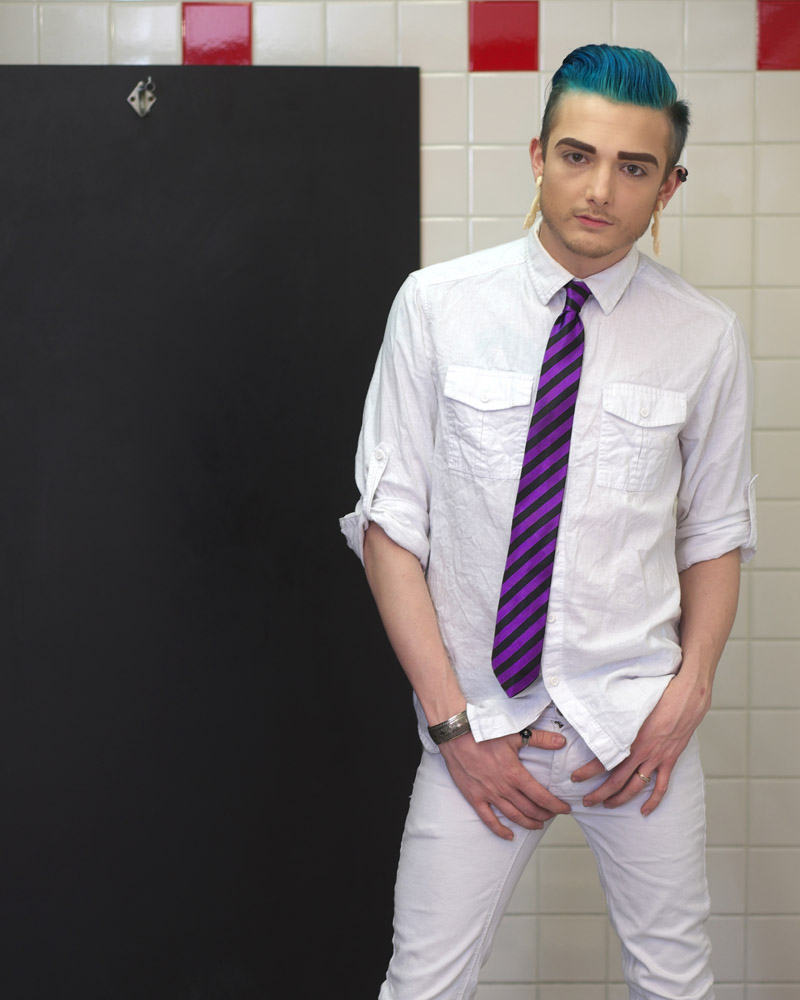
Here’s the set I did with Jayy Ruger (his professional name). While it definitely pays to add the colored gel to the fill light to add a touch of drama and character to a scene, it also pays to give it a light touch. In this first profile shot, if his face had gone totally red, it would have looked freakish or just poorly exposed/lit. Instead, the red on his cheek gives the image depth, and makes his otherwise flat makeup look more alive. Compare to the second image which was lit entirely with the overhead fluorescent light above the pool table where he looks almost corpse-like (entirely appropriate if you’re going Goth but maybe not the best look if you’re doing a family portrait).
Jayy RugerJayy Ruger
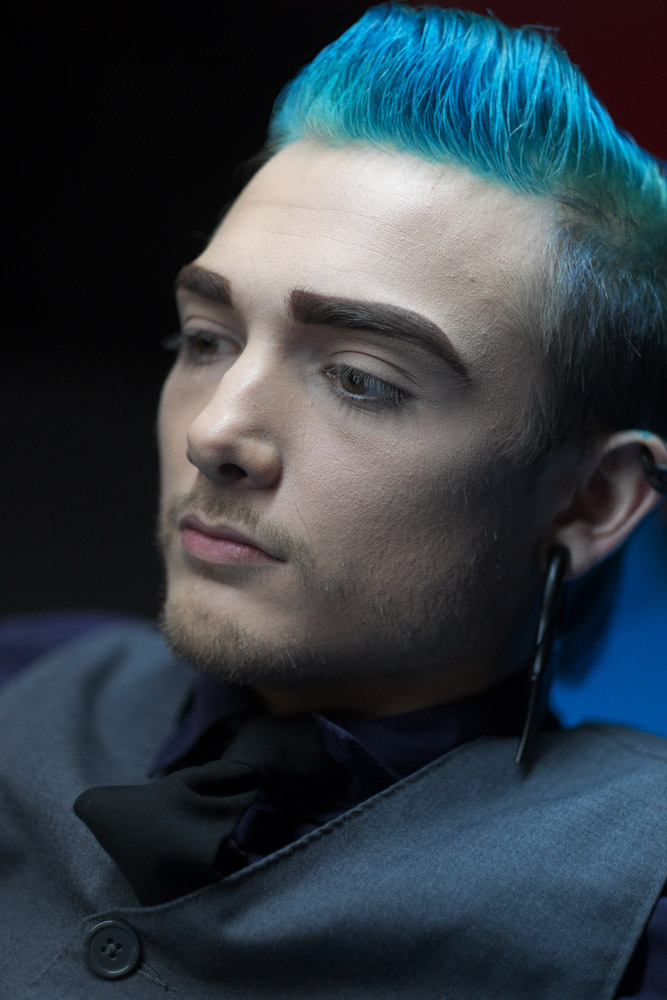
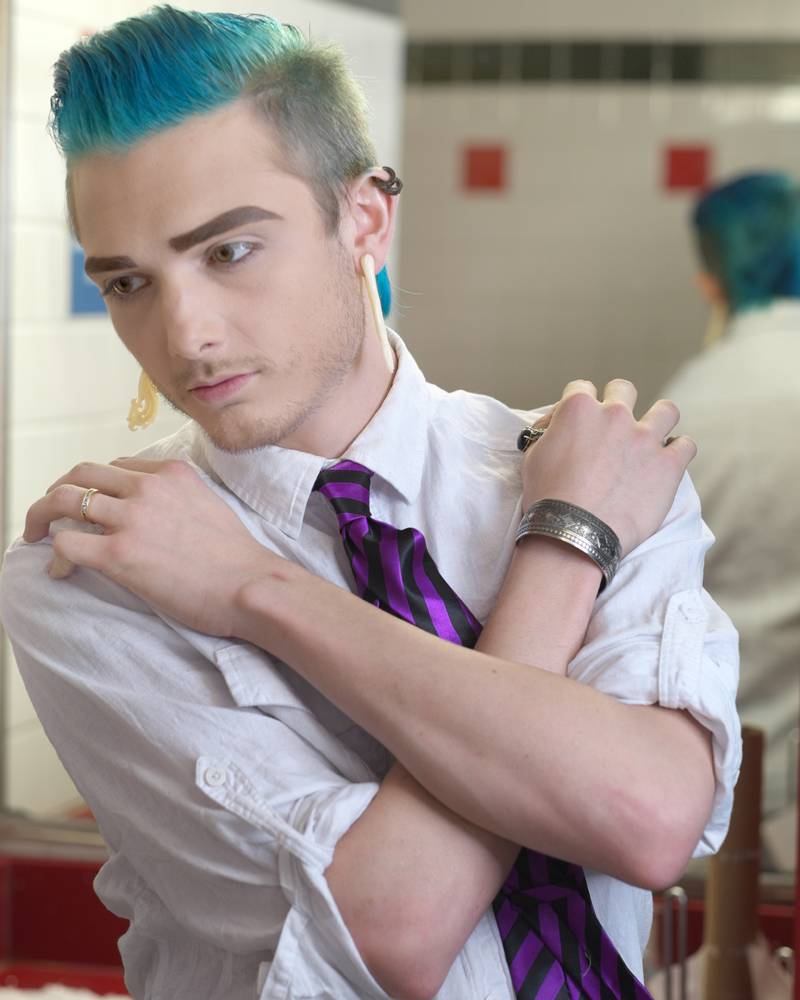
Late last year I went on a lighting binge, and one of the light modifiers I bought was a beauty dish. I had this specialized one from Bowens I really wanted to try out because the dish has a hybrid diffuser with a center grid. In the bathroom interior shots, it was the only light source I brought to the scene. The rest of the light is from the existing bathroom lights and the fill created by the white walls acting as reflectors.
Jayy RugerJayy Ruger
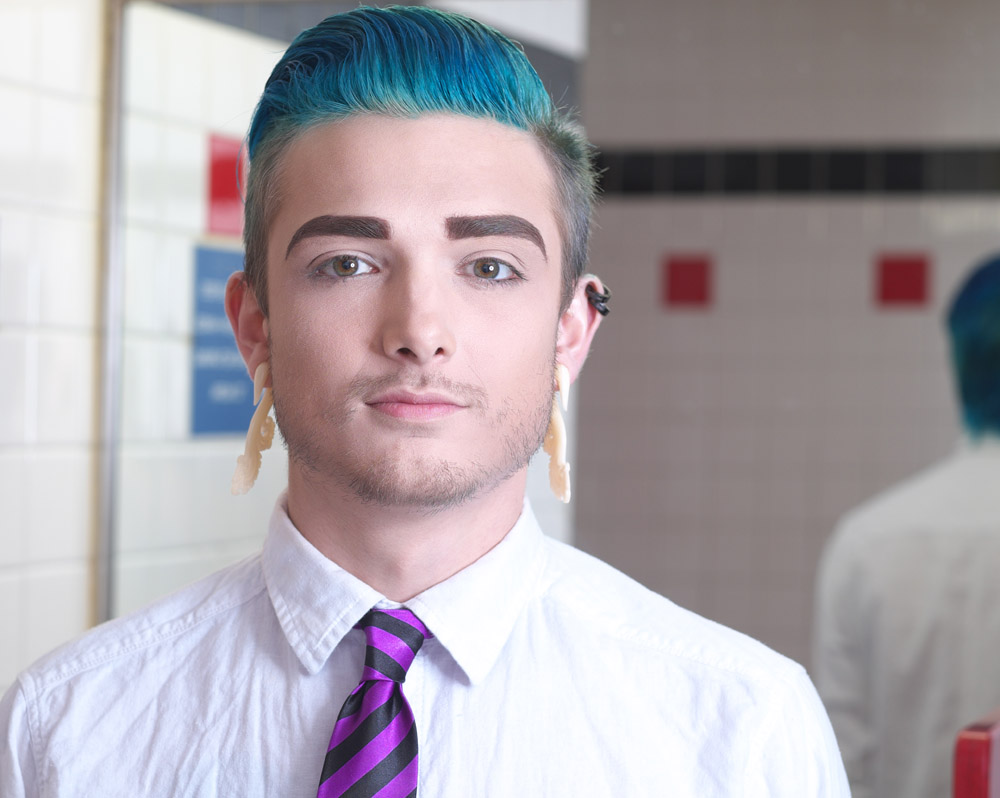
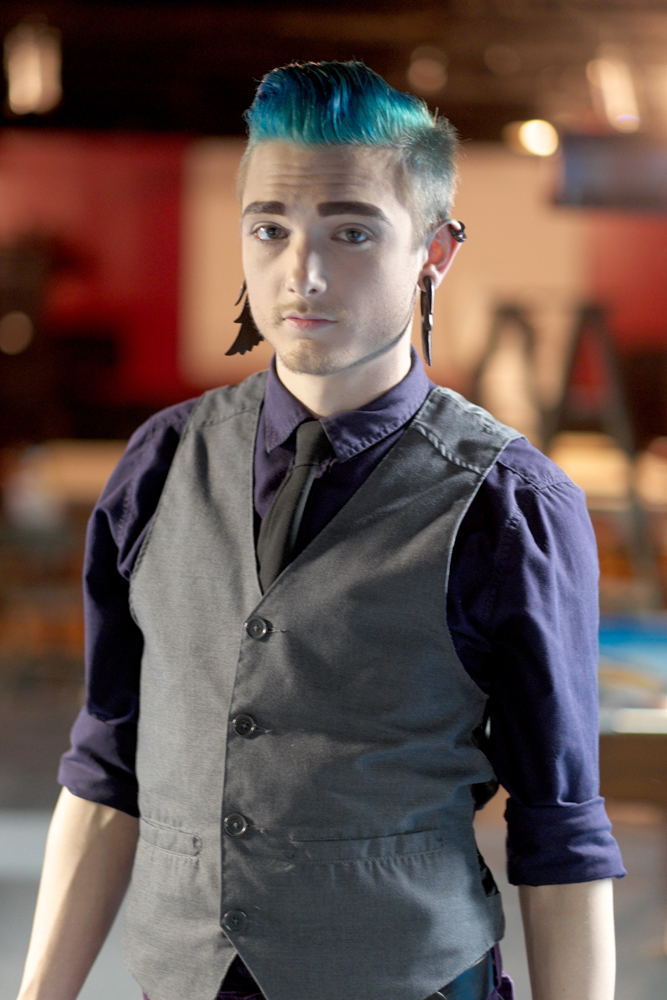
One of the great strengths of the Fuji (and one of the reasons I bought it) is its incredibly good handling of mixed color temperature lighting. You can see the color of light in the next several shots does vary, but regardless of what I threw at it, the Fuji did a terrific job of keeping skin tones natural and not shifting fabrics off in some wild direction in response to a mix of light sources.
Jayy RugerJayy Ruger
Back to using a red gel again – it adds a bit of a sinister note to the shot, which creates an interesting tension between that look and the suggestive pose.
Jayy Ruger
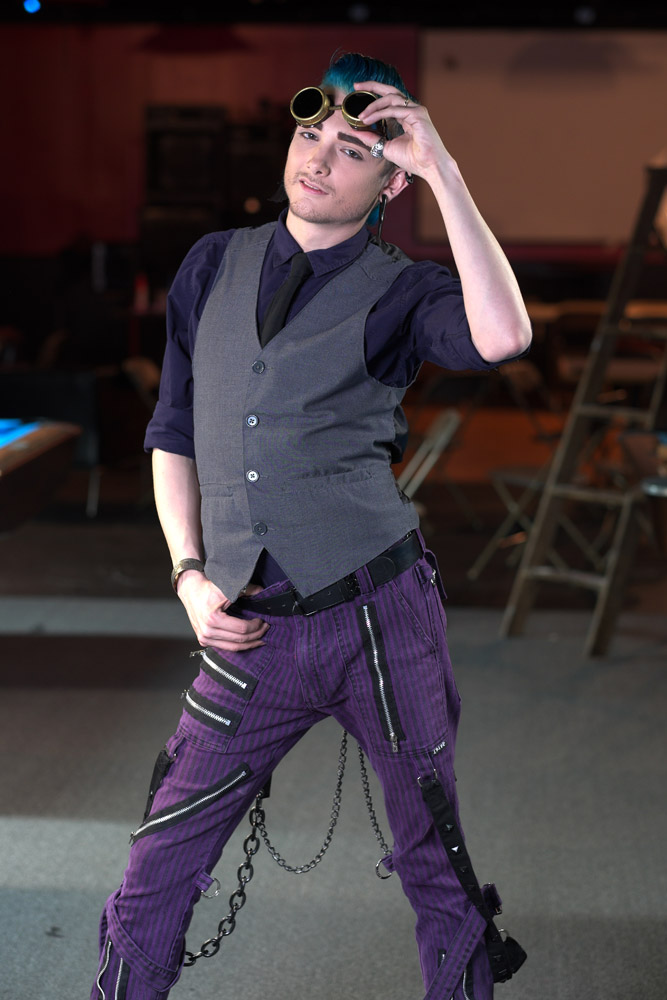
And we’ll close on a fun note – Jayy was being a great model and got into the whole steampunk thing with the goggles (he was already halfway there with his outfit!)
Jayy Ruger
These are the same kaleidoscope glasses you saw in the previous model set with Alex. This shot was lit solely with an umbrella softbox. It’s like an umbrella, but more of a tight parabolic shape instead of the broad surface umbrella you normally think of. There’s a slit in the side of the fabric that allows the flash unit to sit inside the umbrella’s body, and then you can close it inside entirely with the diffuser (if you remember to bring it!). I wanted to focus your attention on Jayy in this shot so I moved in super tight and used a relatively fast shutter speed to let the background go completely dark. In the full length shot immediately previous to this one, I dragged the shutter to give a lot of background light, allowing you to sense the quality of the space behind him.
How did you get into photography as an art medium (as opposed to casual or professional use)?
I do not remember for sure, I have a darkroom since 1966 and soon was interested in fine art printing, made solarisations and lith-printing. Later I hand-coloured my still life photographs.
Which alternative processes do you practice?
copperplate photogravure following method of Talbot/Klic.
What attracted you to alternative processes in general?
Interest in photohistory and in aesthetic well composed pictures.
What drew you to the specific media you practice?
Pictorialistic photogravures in literature and museums.
How does the choice of media influence your choice of subject matter (or vice versa)?
The medium fits the message.
In today’s mobile, electronic world of instant communication and virtual sharing of images, how important is it to you to create hand-made images?
Important enough to spend three days work per print edition
Is your choice to practice alternative, hand-made photography a reaction to, a complement to, or not influenced by the world of digital media?
When I began photography, there was no digital. Later I had my first computer. It was a Tandy TRS 80 model 3 and already had a mouse. She crawled through the floppy drive slot and tragically died within. I suppose, then the mouse did not like computers. I made some stills with dead mice. This was the strongest influence of digital media to my work.
Do you incorporate digital media into your alternative process work?
Photogravures need an inter-positiv, which I make chemical-based on document-film or digital on pictorio ohp. Digital so-called full frame cameras give freehand a quality like 24x36mm film cameras on tripod, but tend to have no soul.
I use digital capture sometimes if film is not possible. In the scrap project I captured pictures as well electrical as film-based (middle-format to 8x10inch).
If so, how do you incorporate it? Is it limited to mechanical reproduction technique, or does it inform/shape/influence the content of your work?
I use digital media for inferior photowork and seldom for multimedia projects.
What role do you see for hand-made/alternative process work in the art world of today? Where do you see yourself in that world?
This may be decided some 50 years later
If you’ve never curated a group show before, especially one with international reach, it’s hard to imagine the level of effort that goes into putting on an art exhibit. You have to put out the call for entries, manage the publicity to make sure you get enough work submitted to fill the walls even after reviewing and editing, and then handle the acceptance emails and collect the accepted work.
Oh, and be prepared for things not working out as planned. I feel extremely lucky we had only two hiccups with submitted work. One was minor – one piece of work came off its mounting in transit. With a quick email to the artist, I got his permission to open the frame and re-mount the work properly so it would present well on the wall. In the process, I also replaced the source of the problem (gummy adhesive squares that were NOT archival) with water-activated linen tape loops using acid-free wheat paste for adhesive. No artist’s work is going to be damaged by me on my watch!
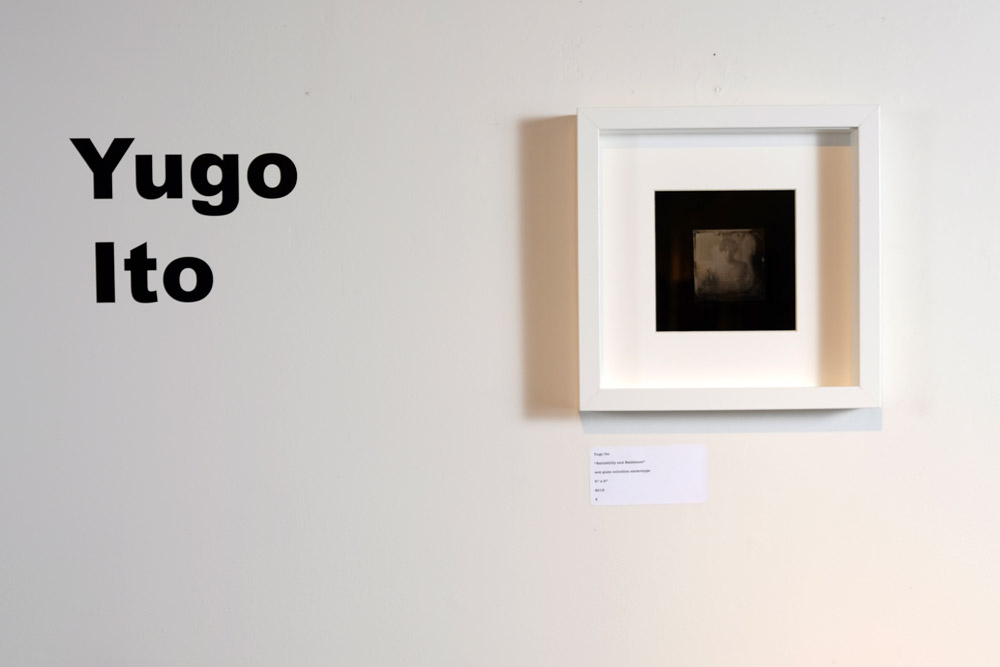
The second hiccup was totally beyond anyone’s control, which is what made it so maddening. Yugo Ito’s photograph coming from Japan was shipped in plenty of time to arrive at the gallery. However, it got stuck in customs in New York for almost two weeks. There was nothing to be done but to wait, as customs is a black hole into which things enter and exit at their own pace and there is no transparency or communications possible beyond checking the tracking number on the USPS website. Creativity saved the day, though – since the actual work was not in the gallery for the opening, I took the JPEG of the work from the submission and printed it, mounting it to the wall with a sheet of glass and some L-pins. It would be represented in spirit even if not in actuality.
Once all the work has arrived, you have to plan how you’re going to hang it. You can look at JPEGs all you want, and generally gauge which artist’s works should hang next to which other artist, but the actual sequencing and spacing can’t really be figured out until you have the actual framed work in hand at the gallery. Next it’s measure, measure, measure, and then plan, and re-measure, before driving the first nail into the wall. Having gallery interns to help with the hanging makes life so much easier (Shout-out to my interns! Thank you!!).
Now the work is all hung, you can relax, right? NO. Then it’s plan the reception, send out the invites, send out the press releases, buy too much cheese and crackers at Costco, and then throw a party. There’s the curator’s remarks to prepare, and handouts about the work to write. Oh, and blogging about it all the while!
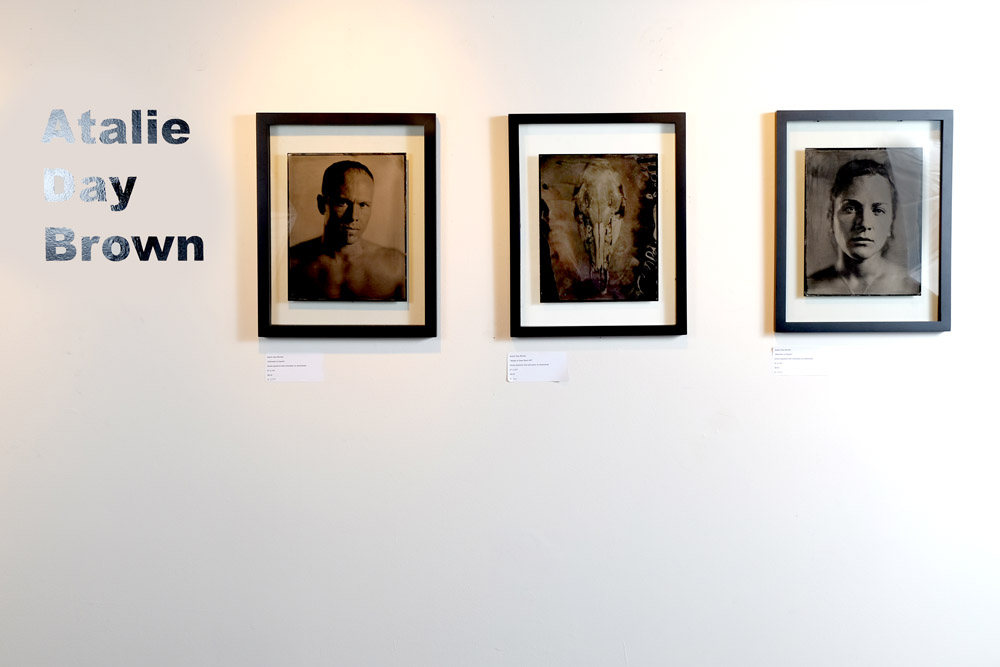
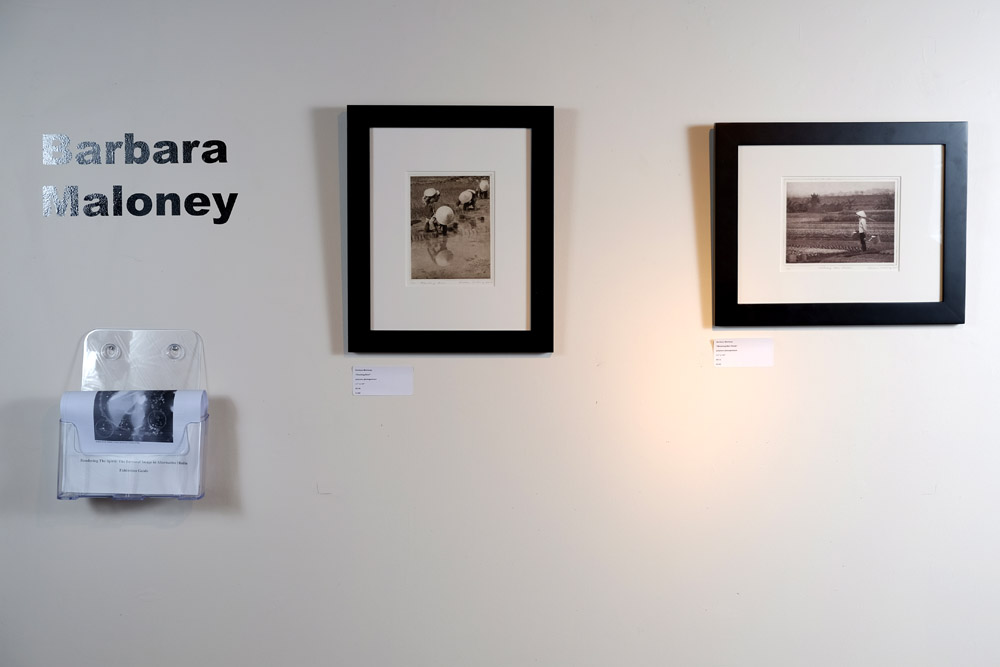
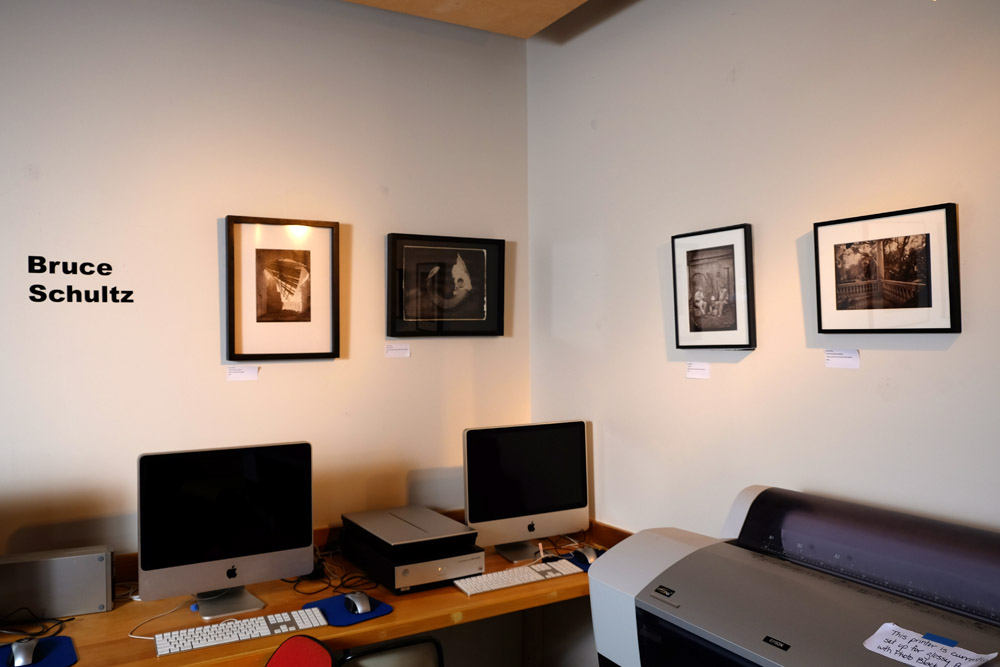
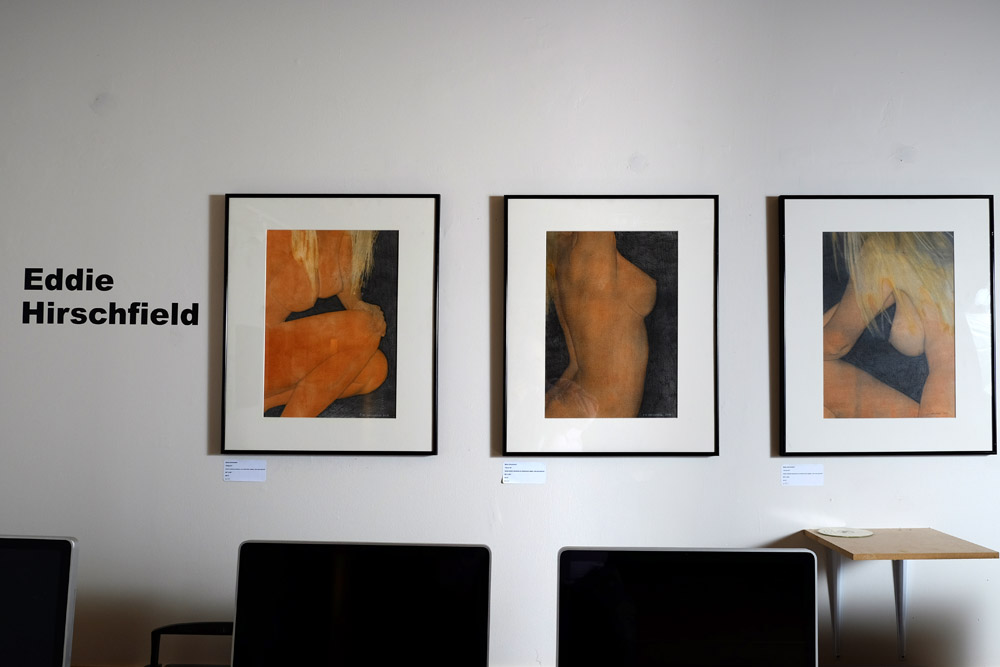
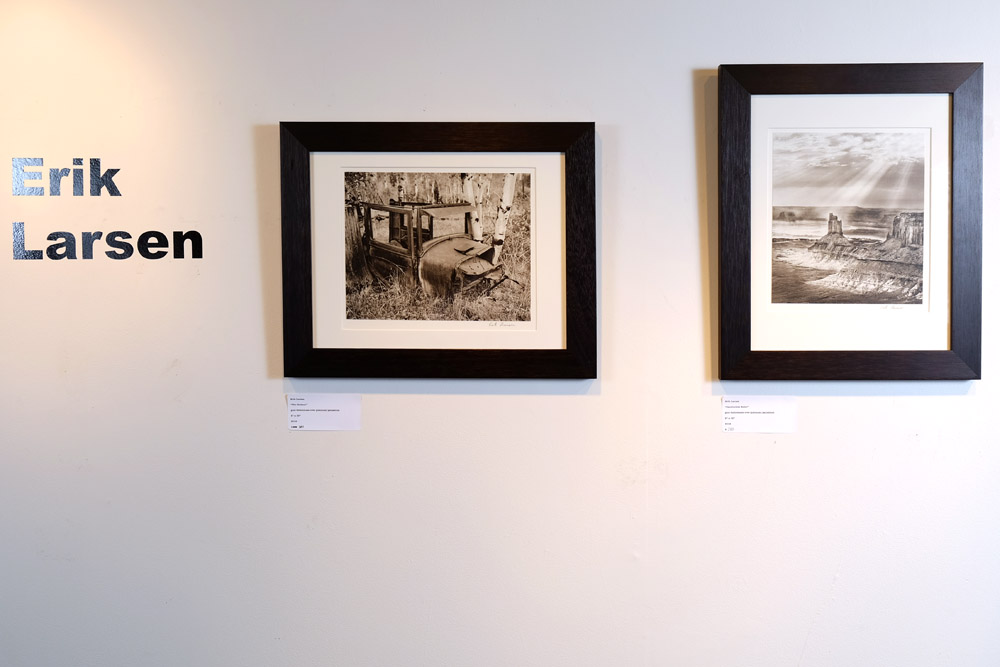
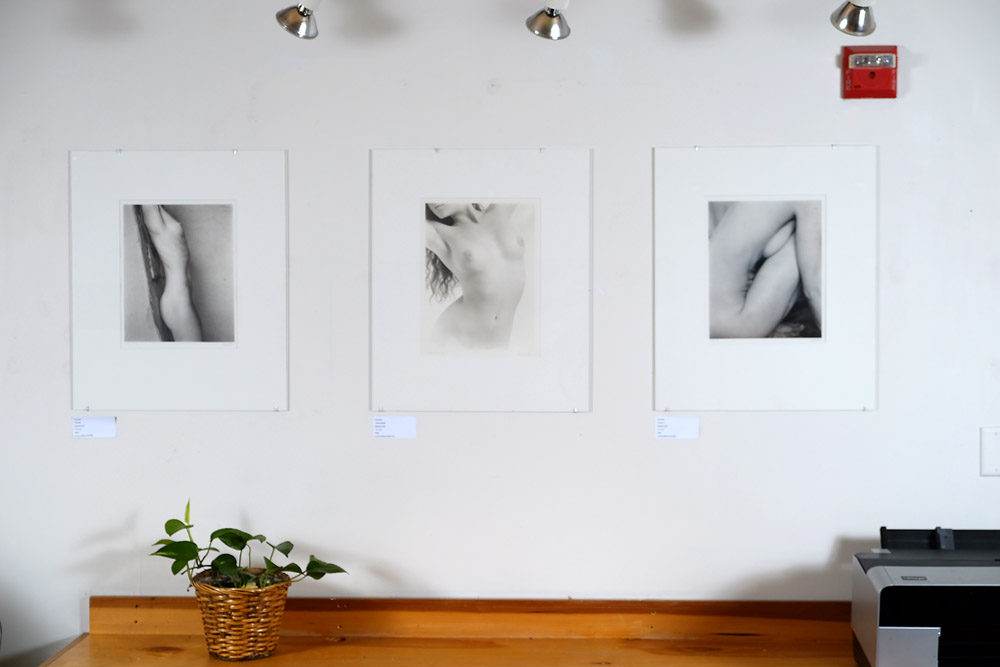
At some point during the show, ideally right after you’ve hung the work but before the public comes in to see it, you document the exhibit. Below are a few excerpts from the show as hung. One of the great challenges of curating a show is that once you have it up on the wall, what might look good in the space presents a wicked challenge to document. Trying to photograph pieces in corners where you can’t get a light on them from the other side means that you’ll either have dramatic falloff in the scene from one side to the other, or you’ll have a hideous reflection of your umbrella or other diffuser in the picture glass. I opted for a bit of falloff rather than reflections where possible because the falloff can be compensated for to a degree in Photoshop – a big blinding white reflection of an umbrella cannot.
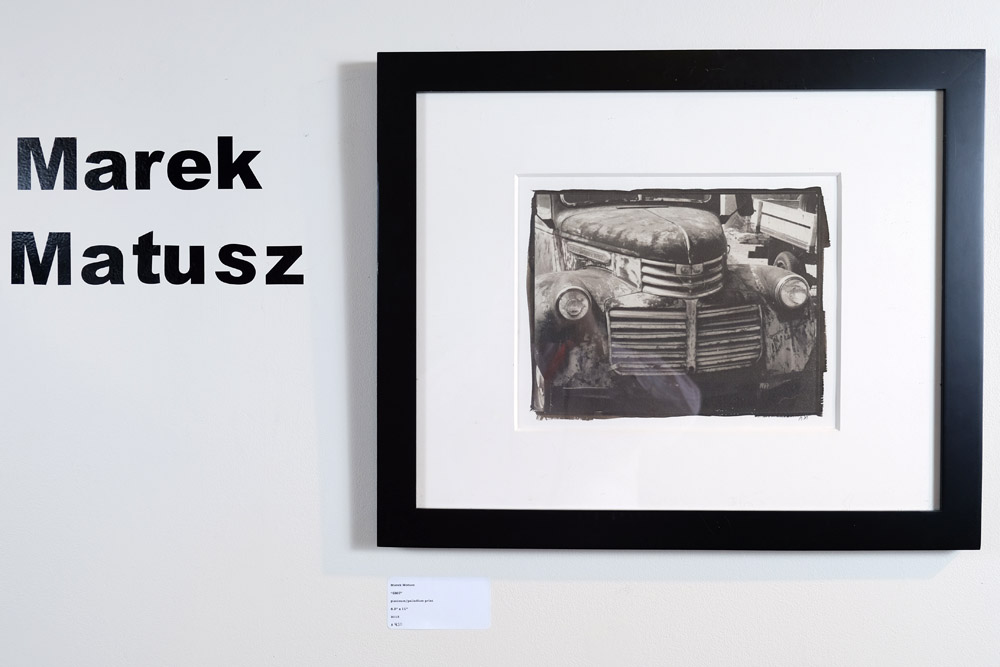
Atalie BrownBarbara MaloneyBruce SchultzEddie HirschfieldErik LarsenIan LeakeMarek MatuszYugo Ito
You’re not done until the show is over, the work taken down, and the artists have picked up their work or you’ve shipped it off to hither and yon. Then you get to relax for a day or two, and if you’re a busy curator, it’s back to the process all over again!
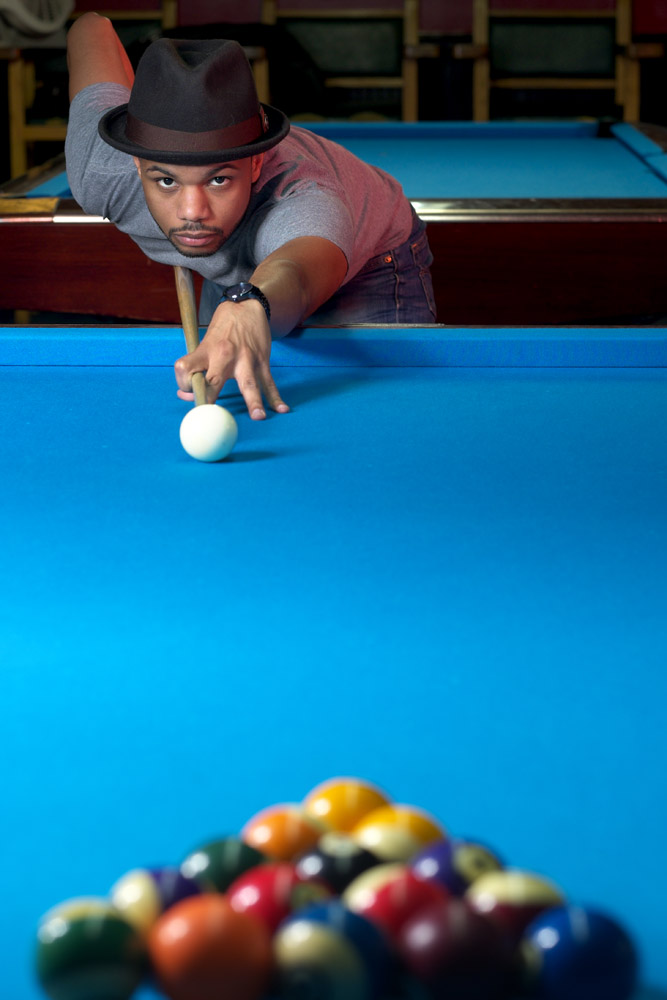
Yesterday I had a model shoot with three aspiring models who needed to build their portfolios. We went to a billiards parlor for the afternoon and I put them and the Fuji through its paces. It was also the first test in the field for my new 400 w/s bare-bulb strobes. The new strobes are battery-powered via external rechargeable batteries. They can be configured to sit on-camera and be triggered via hot shoe, take a wireless remote trigger like a PocketWizard, be triggered via sync cord, or be triggered by a proprietary wireless trigger system that also allows you to remotely adjust the power level from the camera position. The first one I bought was a Calumet-labeled version. When Calumet was still in business in the US, these were quite expensive – a single head unit plus the required but not included battery pack would have set you back a cool $1000. Nowadays, they’re on clearance on Amazon for $300 or so. They are also now being sold with the NEEWER, Flashpoint and Godox labels, at a much more reasonable price – I got a NEEWER version with the external rechargeable battery pack for $400 as a second unit for doing fill flash or background lighting.
These first two shots were taken with Alex shooting pool. In the first shot, I set him up taking the break shot. Don’t let the fact that he’s a model fool you- he’s also a pool shark – right after this shot, his break dropped three balls. I wouldn’t bet against him. This was taken with the Fuji 56 f1.2. My main light was the Calumet Genesis in an umbrella softbox, and the fill was the NEEWER with a gridded reflector and a red gel in it. Having the ability to both color gel and grid the fill is really handy, as the color adds a touch of drama to the scene, and the grid keeps it from spraying all over the place and coloring things you don’t want it to, like the table felt.
Alex
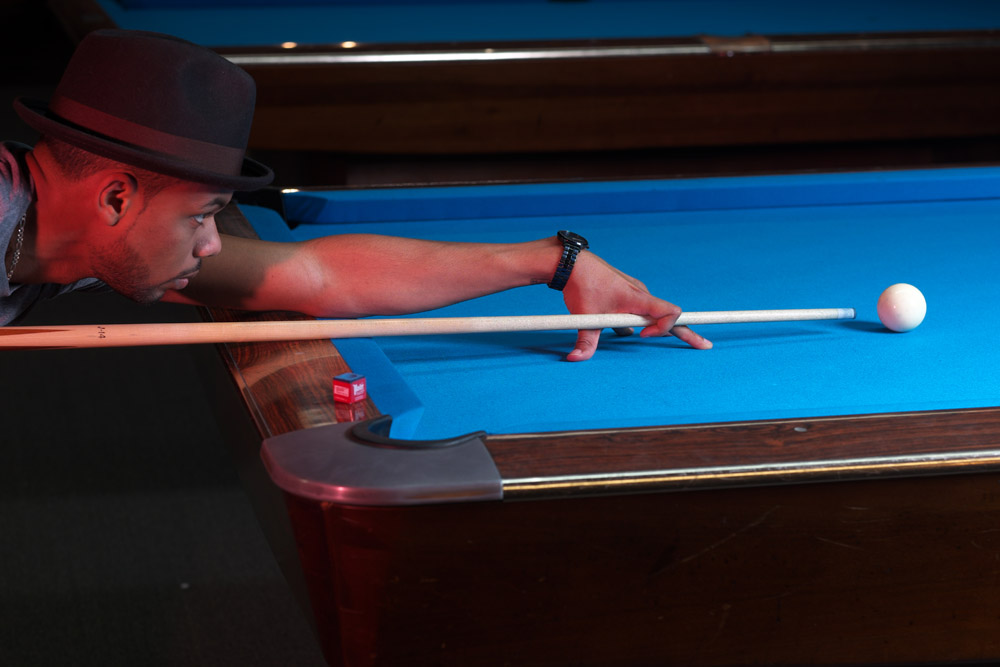
For this shot, I kept the lights the same but switched to the 23mm f1.4 so I could get in close and still get the extension of his shoulder, arm, cue, and the ball on the table, as this table was in the middle of the room with other tables behind me, and I only had about four or five feet to work in. The red gel adds a touch of drama and energy to the shot without overwhelming, and is a good way to deal with the very mixed light in a pool hall where you can have fluorescent (the over-the-table lights), halogen/tungsten (lights in the bar area and on the walls) and LED (accent lights like rope lights around partition walls and the like, or under the bar) all in the same area.
Alex
I also did some head shots with Alex (who is an easy, professional model to work with). I backed this indie film called Hallucinaut on Kickstarter last year and as my reward, I got these kaleidoscope-lensed glasses that appear in the film as a prop. I chose them specifically as my reward as something that would make a really cool prop for photo shoots. This was their first appearance in one of my shoots. They really pick up and reflect colors well, and make for a dramatic statement.
Alex, with Hallucinaut glasses
A variation on the theme, I broke out my welder’s goggles and matched them up with a vintage leather jacket for a steampunk look. Alex’s short-cropped hair adds to the look by letting the goggles really stand out against the shape of his head.
Alex, going Steampunk
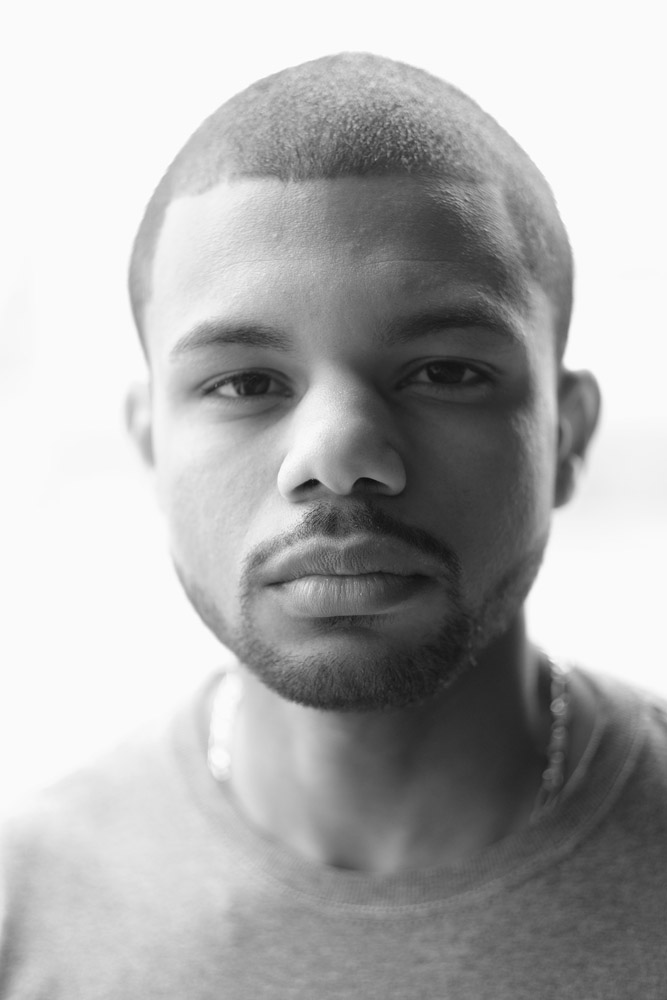
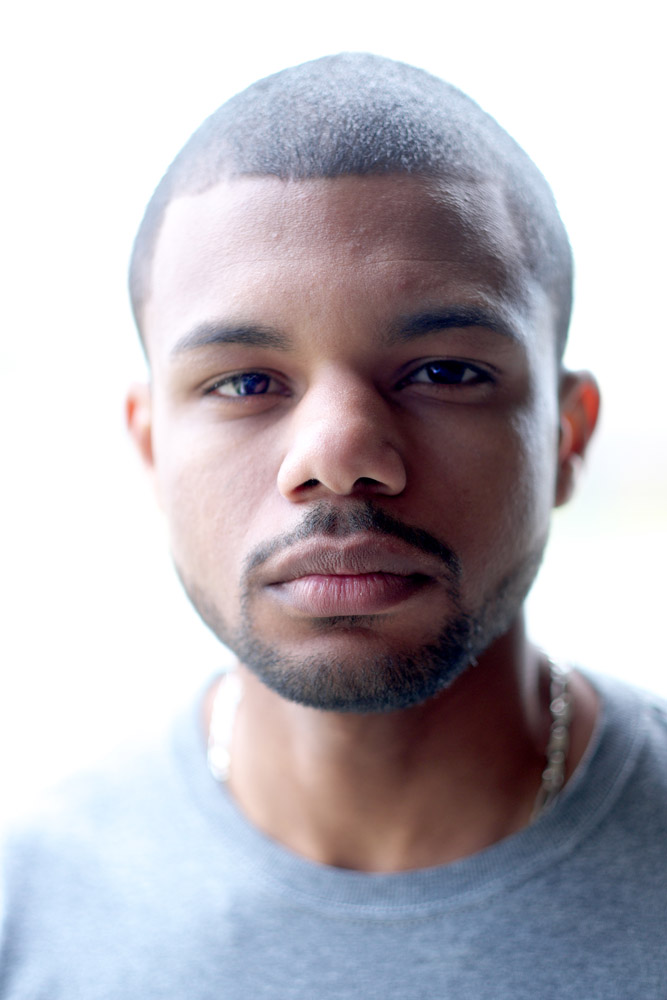
In the last look for Alex, I did two versions of this really clean, minimal portrait. When I showed it to him on screen he commented “I have a really long neck!” as if that was a bad thing. I reminded him of what you’ll hear on every season of the now-ended America’s Next Top Model – it’s a really good thing to have a long neck. Tyra Banks and her photographers were always reminding the contestants to elongate their bodies and gestures, to create drama and elegance. If you have a short neck, stretch it out, otherwise the camera can make it look like you’re neckless and just have a head glued directly to your torso.
Alex
These were both shot outdoors under the eave of a parking garage, and combining the flash in a beauty dish as a fill with the backlight of the street behind made it easy to completely blow out the background into a nice even white. Handy trick when you’re going studio-less and need an even background.
Alex
I shot all these images in RAW, then converted afterward to JPEG. I like working this way because it feels more like traditional darkroom photography, where I’m working from the in-camera negative. Working from in-camera JPEGs, while still very good, to me is not as good because it’s like making a copy of a print – changes have been made and nuances have been degraded.
Not that there should be any doubt, but the Fuji 56mm is a knockout lens (Fuji has always made some top-grade glass, especially for their medium-format cameras). The falloff in sharpness at wide-open or near wide-open is creamy-smooth, and the rendering of out-of-focus highlights is never harsh or jagged.
Takeaways from this shoot:
-Work with good models. Not everyone is a good model, and not all good models start out that way, but if you’re new to the process of working with models, hire folks (and I do mean hire, as in pay for with cash, not just trade-for-prints/CD) who have experience working with photographers.
-know your equipment. If I were not as experienced with studio lighting, figuring out what was going on with my Calumet/NEEWER flashes could have been a pain, as they don’t have modeling lights (to save on battery life) and are not TTL because they’re made to be universal and are not dedicated to any one system.
-have fun. Be loose, work with your environment, take advantage of the opportunities it presents, and challenge yourself to overcome its obstacles. You’ll make much better pictures that way.
How did you get into photography as an art medium (as opposed to casual or professional use)?
That went hand-in -in hand with the discovery of alternate processes
Which alternative processes do you practice?
Just about anything: platinum/palladium, silver/iron processes, chrysotype (gold), gum bichromate
What attracted you to alternative processes in general?
I was attracted to the chemistry at first and then the aspect of creating one of a kind hand made images
What drew you to the specific media you practice?
Platinum and palladium prints were are of the technically most accomplished and able to produce most delicate highlights and deep shadows. Seeing great examples of early XX century work in museums and galleries made mu pursue the process . I have started over 25 years ago and the information back then was scant and confusing
How does the choice of media influence your choice of subject matter (or vice versa)?
When taking and composing a picture I try to visualize which alternative process would fit, whether I wand process edges showing, etc.
In today’s mobile, electronic world of instant communication and virtual sharing of images, how important is it to you to create hand-made images?
Two aspects are important. Education of consumer in the existence and quality of hand made images and history of photography through a practice of XIX century processes. The second is keeping and enlarging patron/collector market. Real collector wants something to be touched and held in hand, not a shared digital image.
Is your choice to practice alternative, hand-made photography a reaction to, a complement to, or not influenced by the world of digital media?
It would be totally silly to ignore the digital world. It exists regardless of our feelings about it (good, bad??). SO with that respect it is just a complement. But it is also a strong protests against huge color enhanced digital prints that have invaded galleries.
Do you incorporate digital media into your alternative process work?
Yes, I use the technology as a toll. Some of my captures are digital, most of my negatives are created with digital processes. I am also not against digital alterations of the photograph in the process of creating a picture
What role do you see for hand-made/alternative process work in the art world of today? Where do you see yourself in that world?
I see myself as a part of alternative photography movement. A small (by digital standards) but growing group of practitioners and educators that shares information, practices and the word of photography at its roots