Well, I just got finished loading up film holders in preparation for the next few days’ shooting. I have one shoot scheduled for tomorrow evening after work, and another for Saturday evening. I may well be certifiably crazy for the amount of darkroom work this will have me doing – I’ve got 10 sheets of 14×17, 20 sheets of whole plate (6.5×8.5 inch), and 16 sheets of 5×12 loaded and ready to shoot. I may be even more insane for even considering the jumps between formats. I’ll risk it though because I have so many ideas – I want to try and shoot my three-panel “folding screen” idea on the 14×17 with at least one of my models, I’ve got some more ideas for the “human commodities” series, and I also have ideas for the body panoramas. I’ve got to remember to bring some of my costume pieces from my RenFest outfit tomorrow as well as the shopping bags for the Human Commodities bit. See what I mean about crazy? At least this is a GOOD crazy.
Category Archives: Large Format
Human Panoramas
Here’s a couple of shots I did of Justin, a model from New York, with my 5×12 “banquet” camera. I was playing around with the “panoramic” format for photographing the human body as I think it’s an interesting take on the subject. The human body is after all a pretty good fit for a vertical 1:3 proportion image. I also like breaking “the rules” of composition when trying out some of these ideas, like the horizontal portrait where the head is exiting the frame at the top, and approaches the center of the image. I think I can get away with that one in this shot because the lighting on the background expands the area of the eye’s focus beyond just the face and so it isn’t dead center in the frame.


The Tattoo says “AGAPI” in Greek, which means “Love”.

All the above were printed in palladium on Bergger COT320 paper, a specially formulated paper made specifically to cater to alternative photographic process printers. I’ve got a couple more of Justin that I may post at a later date but I’m happiest with these for now. Justin was a great model to work with, and brought his own challenges (he’s 6’4″ for starters). I really liked working with him and would highly recommend him to others. He understood how to move and pose and create dynamic tension in a still image, which many models don’t understand, and he was willing to strike a pose and hold it unlike many would-be fashion divas who can’t sit still for more than 30 seconds.
San Francisco Sojourn Part 3
Even MORE of my San Francisco images.


All of these were shot with my 240mm Voigtlander Heliar f4.5 lens. It is fast becoming one of my favorite lenses for its rendition of out-of-focus areas. I knew it was a legendary lens for black-and-white shooting, but was unsure how it would render color. As you can see here, it does a beautiful job with color, despite being uncoated. It does give a slightly vintage look to the color palette, but some of that might also be the film I’m using – Kodak Portra 160 NC.
San Francisco Sojourn Part 2
More of my San Francisco images.


While I was out shooting these photos, I was approached by a number of people to talk about the camera, which I’ve come to expect. ALMOST all of them are very interested in what I’m doing, what’s the story of the camera, how old is it, etc. And then you get the occasional joker, like the fools driving past me in their Porsche sedan who had to roll down the window and shout, “Haven’t you heard of a thing called digital? Why haven’t you gotten with the program yet?” To which I responded – ” This (my 5×7) is a half a Gigapixel”. I smiled politely, turned my back, and muttered to myself, “so bite me”. Which is actually a bit of an understatement – a 2000 dpi scan of a 5×7 negative is 1.4 gigapixels.

San Francisco Sojourn
I just got home from a well-deserved, long overdue vacation to San Francisco. It’s one of my favorite cities on earth. I love the geography of the place, the architecture, and how they’ve managed to balance proximity of a highly developed urban environment to wide open natural environment. You get the best of both worlds there. Tonight’s posting will be a bit of a departure for me as I mostly shoot black and white. These are large-format color images, shot at night. One night I wandered around the neighborhood of my hotel, shooting whatever struck my fancy, and another I took a side-trip up to the Castro to shoot some street scenes. Here are some first scans of the images.
 |
 |
|
 |
||
 |
||
 |
 |
|
Busy photo weekend
This was another really busy photo weekend. Yesterday was a shoot with two models in the studio. Today was darkroom work. Yesterday was interesting – I went in to the studio in the morning to help out one of my studio-mates by shooting with two models he had brought in from New York and Philly to do some portfolio development work with them. The first one to arrive was a bouncing ball of unfocused energy. I suspected there would be trouble as short attention spans and I don’t get along well. Things worked out ok in the end because I got some decent shots with him, but getting there was, well, challenging. Knowing what I know now, would I hire him as an art model? NO. Would he be fine for a fashion shoot or as a fitness model where poses only last 3-5 seconds each? Sure. I hate to stereotype, but this guy lived up to the male equivalent of Cameron’s supermodel girlfriend in In & Out who couldn’t figure out how to use a rotary phone.
The second model arrived shortly afterward, and he and I shot while the first guy pumped up with some resistance bands. Mr. Fitness (I’ll call him that to distinguish him from the second model) wanted to shoot second even though he was there first because he wanted to get pumped up first. That was the first strike against him.
I generally keep a quiet set so I can concentrate on the work and communicate with my model. Mr. Fitness decided he was bored, so bored I had to stop, dig out the iPod speaker dock that belongs to the studio and plug it in for him so he could have some music. He promptly selected some very obnoxious hip-hop that he then played at an intrusive volume level. Not impressive.
My set that day was my first attempt at re-creating after a fashion the old Victorian photo parlor feel, with some IKEA drapes and tie-backs I found at Bed Bath & Beyond pulled out a couple feet from a backdrop. Since my studio is shared, I can’t build anything permanent, but instead the whole thing gets pulled together with some Manfrotto Auto-Poles which just happen to reach the ceiling of the studio with a couple inches to spare. I think the effect is working, although I’d still like some bigger tassels on the tie-backs. See some of my previous posts here from my collection of CDVs for examples. Images from the shoot will follow. One set of images I did of each model had them posing clothed and nude in the same pose. It’s a visual riff on the standard CDV portrait concept, but with of course modern attire, and then pairing it with nudity, certainly something you wouldn’t see in most Victorian CDVs. I also had some fun posing one model with a neat Art Deco floor lamp we have sitting around the studio.
I did run into some major frustration with gear, as the shutter on my preferred lens, the 240mm Heliar, decided it wasn’t going to trigger my studio strobes anymore. Adapt and overcome, a-la the US Marines – I pulled out another lens I have of the same focal length, but mounted in a modern shutter that never refuses to trigger my strobes, and carried on. Can I entirely fault the Heliar? Not really – perhaps it’s too much to expect that it trigger the strobes reliably, after all the shutter is nearly 70 years old. I’ll feel lucky if I work as well as that shutter when I’m 70.
Mr. Fitness capped the day off by not listening to directions while helping me strike the set so my studio-mate could get his backdrop and lighting arranged. He managed to completely release the background support on his side of the background, dropping it from maximum extension to fully collapsed in the blink of an eye, wrinkling the seamless paper and bending the pin on the other background support. To his credit, he did apologize for wrinkling the seamless.
Today was a big darkroom day. I started the morning off doing a major cleaning in the darkroom. I had been accumulating all these chemical storage bottles from back in the day when I did enlarging onto silver gelatin paper. I went through all of them, pouring the thoroughly exhausted remains of several batches of Dektol and Ansco 130 down the drain, followed by copious amounts of water. Most of the other bottles were fortunately empty. They all got packed up in plastic storage bins and put in the downstairs bathroom. Now I have enough space that I can put all my print developing trays under the sink when I’m running film in the Jobo, and the Jobo has a place to live other than the hall floor when I’m printing. Have I said before how tiny my darkroom is? It’s about 7′ by 8′, with a 6’3″ ceiling. It works quite well under the circumstances. Having gotten that out of the way, I ran four batches of sheet film in the Jobo. 15 sheets of 5×7 and four sheets of whole plate. I’ve got one more batch of 5×7 from Saturday to run, then I’m all caught up, and ready for NEXT weekend! I’ll go from a souping fiend to a printing fiend for the rest of October.
Busy weekend in the studio
This weekend was a really busy weekend in my studio. I was supposed to have a shoot on Saturday. The model I had made arrangements with cancelled on me, but with more than reasonable advance notice, so I’m not pissed off about it – he gave me two days heads up. I’ve had some models flake out two hours ahead, some an hour after the shoot was supposed to start, and some who never bothered to call or cancel (that was the previous weekend, for example). I was talking to my studio-mate who had the studio booked for Sunday, and he said, “I’ve got two models coming in on Sunday, why don’t you work with them before I get there? I need someone to keep them occupied, and it’ll be a big help giving them a chance to work with someone who has a very different style of shooting, because they’re new to the business”. I was more than happy to help out, as it meant free models for me, and I’d be helping out a friend anyway. Since I had the studio booked for Saturday anyway, I went in and did some still life work using a flower I bought whose name escapes me but looks like a cross between a leafy cactus and a gigantic q-tip. I left my stage setup I had created (I took the old curtains I had from the previous studio and made a little ‘stage’ setup for a backdrop) for Sunday, as I thought it would be great to work with the models as well.
WELL, thus go the best laid plans of mice and men. I get in to the studio Sunday morning, meet the first model, Justin, a 6’4″ ex- football player, and get ready to shoot. On the third test pop of my flash, what happens but one of the capacitors in the power pack goes tits up. And I don’t have my own backup. I call my studio mate who is coming later, and he says just use his, which happens to be compatible with my accessories. So another half-hour goes by digging out his flash unit and setting it up. We do get on with the shoot, and once things get moving, it goes well. Justin is a good model and understands how to create dynamism in his body – I had no trouble setting him in poses that accentuated his physique and worked well with the somewhat exotic format I was shooting in – I was trying out the 5×12 for human figure work, mostly shooting verticals. Working with me, from a models’ perspective, is a real challenge and a physical workout because I need them to hold poses for an extended period of time while I compose each shot. I’m not shooting like a typical fashion photographer who likes to ‘run-n-gun’ and fire off hundreds of photos in an hour. I think with Justin, in about 1 1/2 hours, we took 8. I had him holding a pose for sometimes four or five minutes while I played around under the dark cloth.
My studio mate is a good friend (loaning me his strobes is an instant qualification!), but he’s a bit frantic. He’s a fashion photographer and likes to run-n-gun, for one thing, and he’s just a bit keyed up all the time anyway. Fortunately Justin and I wrapped our shoot just before he and the other model got there. The other model is a college student named Peter, (only) 6’2″, and about 2/3 the body mass of Justin. Peter was tragically late because of traffic and poor directional sense. What he lacks in timeliness, he makes up for in facial features. He’s one of those models who looks relatively ordinary when you pass him on the street, but when you see him through the camera lens, his face just screams High Fashion (that’s actually a good thing). They set up and shot while I went to the Nationals game with my father. When I got back, they were still there, and since my set had been taken down, we did a few shots in the air shaft outside the studio, which has a really cool steel security door and lots of exposed brick. Another great thing about shooting in the air shaft is that because it has these nice tall walls, you get beautiful soft indirect light from overhead – like a north light window. It’s very even, very consistent – you can meter once and not have to re-meter for hours. Reflectors are very helpful though because it is a top-down light and makes people into sunken-eyed zombies if you don’t bounce a little fill on their faces.
In talking to Peter about the poses I was looking for, I asked him to do a nude. I knew because he was agency represented that frontal nudity was a no-no, so I explained the pose would keep his intimate parts covered, and he was fine with it, but then he asked if he could cover himself with a sock. I find the whole ‘hide it in a sock’ business to be laughable – I’m not there to stare at your anatomy, and if someone IS nude in real life, do they ever run around with a sock on their penis? NO. We got that out of the way and went on. I did some head-shots of him with the 5×7 Canham, getting to put some film behind the 240mm Heliar I have for the first time with a human subject. The image on the ground-glass positively glowed! The shallow depth-of-field at f5.6 just made the features that were sharp SNAP, and the brick wall in the background looked like a painting seen through running water, it was so smooth. I’m DEFINITELY taking this outfit with me when I go out west for some figure-in-the-landscape shooting!
When I shoot, I’m used to shooting all by myself, no assistants, no “creative input” from other photographers. Sometimes having the helping hand is very welcome (adjusting lights, etc). Other times, not so much. My studio mate was watching the shoot with Peter, and while I was still arranging a pose, he had to jump in and start directing the model because he had this love handle that showed up only when in a certain kind of pose. I would have seen it and adjusted his pose, but I didn’t get the chance. GRRRR. And then, to make matters worse, I wasn’t done shooting before my studio mate mentioned a shot he wanted to do in the air shaft as well, and boom, the two of them were off doing their own shot. Moral lesson here – assistants are fine, but two principal photographers probably shouldn’t share the set – too many chefs end up putting someone’s finger in the chili.
Palladium Printing at Large Sizes
If any of you out there have ever done alternative process printing, you’re probably aware of the increase in technical difficulty that comes along with making bigger prints. Each size up adds a new wrinkle, especially when it comes to getting an even, consistent coat. It certainly helps to have a good paper that facilitates a consistent coating via sizing, baryta, or other pre-treatment. Another very important step is using the right brush. I’ve become very fond of the Richeson 9010 “Magic” brush for a good reason – the Richeson brushes have earned their name “magic” by the way the bristles are designed, they just make it easier to coat evenly and smoothly without disturbing the paper surface. They’re worth the price you pay for them from the savings in coating time, reduced re-prints, and hair not pulled out in frustration.
Especially when getting into platinum/palladium printing, most novice printers are extremely cost-conscious. After all, a basic pt/pd kit to make roughly 30 8×10 prints costs in the range of $200 today. And that’s just for the chemistry. However, you’ll quickly learn that there is such a thing as false economy. While printing at smaller sizes, it’s fine to try and economize on your coating solution to see if you can still coat the entire image area. If you under-coat, it’s painelss enough to toss a bad print and start over. All that goes out the window when you start printing bigger than 8×10. Better to be generous with the chemicals until you KNOW your requirements for your paper and your image size, otherwise you’ll be throwing away blotchy, uneven print after blotchy uneven print until you get one. A couple extra drops of palladium or platinum “wasted” will cost you far less than an entire 14×17’s worth that turned out poorly. I was printing some 14×17 prints this week and I realized at the current prices for materials, I was somewhere in the region of $30-40 per print, my cost. You don’t want to mess that up.
When I coat prints that big, I usually mask the edges of the coating area for several reasons. One: I’m using a 3″ or bigger coating brush. Watercolor wash brushes that big are not precision instruments capable of stopping on a dime and not slopping chemistry around. Two: I like nice clean white borders on my paper unless I’m aiming for that ragged, handmade look. Three: the masking tape helps keep the paper in place while coating so it is easier to brush on an even coat of emulsion. One of the challenges of masking is preventing the paper from adhering to the masking tape and tearing when you lift it off. To that end, I’ve found that the 3M “delicate surface” blue painters tape works best. It’s still not a 100% solution, because even when I’m being what I think is careful, I will have the odd occasion where the tape sticks to the paper a little too much and a layer of the paper surface comes up with the tape. I prefer masking with tape during coating to using rubylith to mask while exposing because the rubylith mask just prevents the emulsion from being exposed. You still have to clear the unexposed chemistry out of the paper and if your paper is particularly binding and/or your clearing bath is insufficient, you’ll end up with a rather embarassing looking stain on the paper around your image area. The 3M tape is cheap enough, don’t skimp and try to go cheap. Throw away your tape and pull new strips with each print – again false economy if you try to re-use it, as you run the possibility of contaminating your new print with old chemistry. At potentially upwards of $40 per print, is it worth it trying to save money on $0.10 worth of tape?
Photo Weekend in Connecticut
This past weekend I went up to Rocky Hill, Connecticut (just outside Hartford) to attend a two-day, three evening seminar and get-together, sponsored by the New England Large Format Photography Collective (NELFPC). The main theme of the weekend was to learn about digital negative making and carbon printing. The side benefit was most people brought examples of their current work to share and show after hours. What a terrific weekend! Our instructor for the weekend was Sandy King, an elder statesman for the chemical wet darkroom. A specialist in carbon printing, he is also the inventor of Pyrocat-HD (and its variants), a film developer with special benefit for people working in antique and historic photo processes.
Day one began with displays of some of Sandy’s carbon prints, and a discussion of digital negative making. Sandy does still use ultra-large format cameras from time to time (he has a 20×24 with 12×20 and 10×24 reducing backs), but he mostly travels with medium format gear and then scans his film to enlarge it digitally. He demonstrated the Precision Digital Negatives system for making digitally enlarged negatives, and discussed the benefits and flaws. He then discussed the QTR (Quad Tone RIP) method which has significant advantages over the PDN system, but is far more user-unfriendly to configure. We then scanned some film and made digital negatives to print from the next day.
After all the computer wonkery was finished for the day, dinner was served and the prints to show came out. I showed my two bodies of work, the platinum/palladium travel shots and the male nudes in gum and platinum I’ve been working on. Both series drew a lot of comments and praise, which was very nice. I was especially tickled when certain individuals who I hold in very high esteem made a point of complimenting me in private.
The next day we got down to the business of printing. Carbon is water-activated, like gum bichromate, and uses the same dichromate as a sensitizer. To make a carbon print, you first coat a gelatin and pigment (india ink mixed to taste with other pigment(s) to adjust the tone warmer or cooler) layer on a thin, flexible but non-absorbent medium (mylar or other similar material). This is your donor tissue. You then sensitize it with an ammonium dichromate and alcohol mix, dry it in a cool, dark place, then sandwich it with your negative, emulsion to emulsion, then expose to UV light. After exposing, you put your receiver paper (it can be anything from art papers to fixed-out silver gelatin paper) in a water bath, allow it to swell. After a minute, put the exposed carbon tissue in the water and sandwich it to the receiver paper. continue for another minute and a half or so, then take it out of the water. GENTLY separate the two, then place the receiver in another bath of warm water. You’ll see the image come up in the water bath. You can use a clearing bath as well, but it is not required. The clearing bath will greatly reduce washing time though, so it is a good idea.
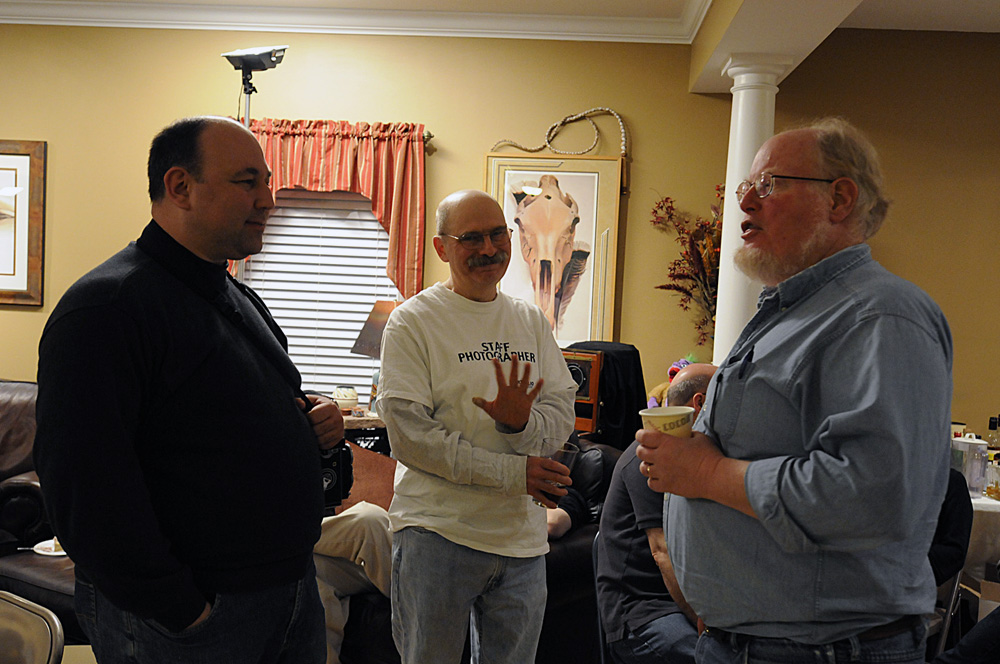
To me, while learning carbon printing from a master printer was an awesome reason to travel 400 miles, the bonus that made it worth the effort was meeting the people who attended. Steve Sherman (the beyond generous host – we used his gigantic and brilliantly designed darkroom for the printing sessions and his living room for the show-and-tell sessions, general hanging out, and consuming all the amazing food), Gene LaFord, Dave Matuszek, Jack Holowitz, Glenn and Marie Curtis, Sandy King, Jim Shanesy and Diwan Bhathal (fellow Washingtonians and my travel pals for the trek up and back), Alex Wei, Armando Vergara, Robert Seto, Tim Jones, Paul Paletti just to name a few all made the weekend a really enjoyable experience and I am dying for the next one!
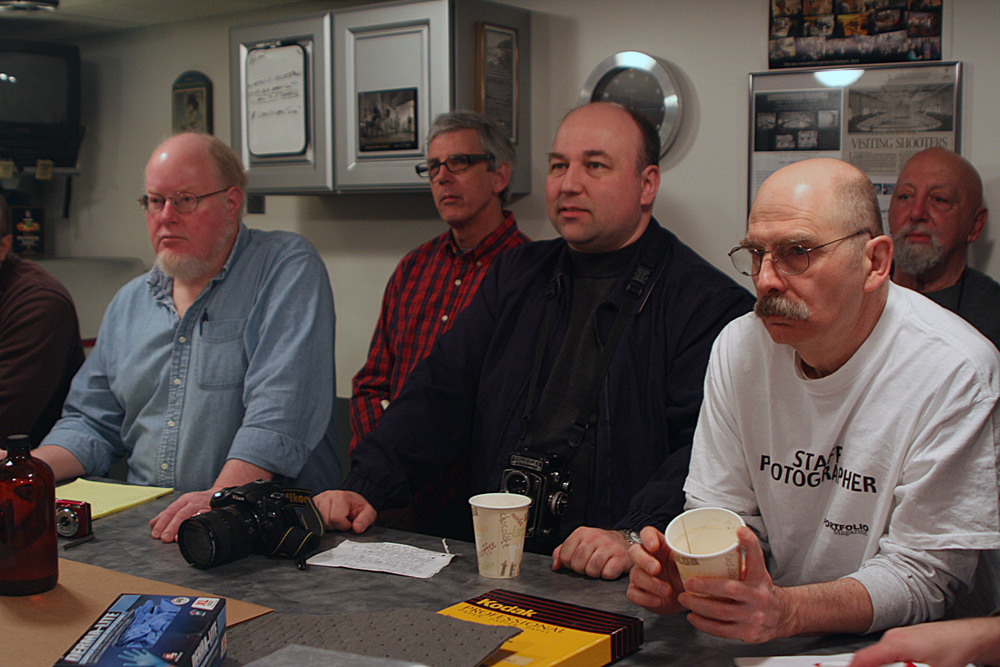
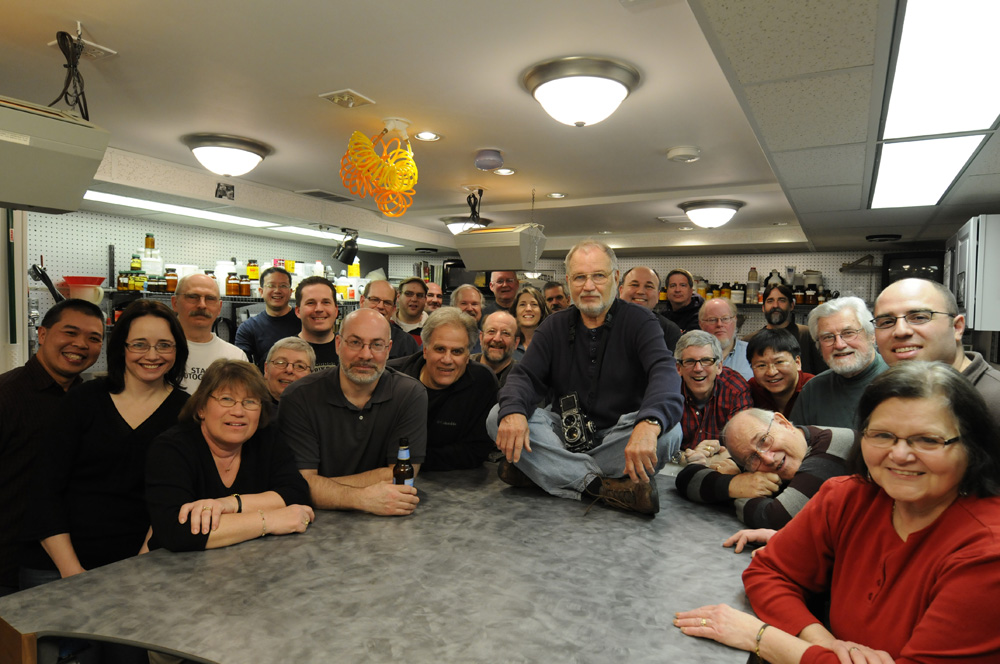
In the group photo, the one on the right, Sandy King is the one with the rolleiflex in his lap – which happens to be my rolleiflex. When I can get the negatives from the trip scanned, I’ll post some shots here.
Getting back into the studio again…
Yesterday, in a fit of activity, I got in to the studio and shot a few still-life photos. I’m participating in a print exchange through the Large Format Photography Forum (www.largeformatphotography.info/forum) and I needed to shoot some images for the exchange. The final images will be platinum prints. I decided to use a lead crystal cut glass decanter I have as a subject – I wanted something challenging to photograph and that would create some striking images. I got the inspiration seeing the decanter on my coffee table with the sunlight coming through it and casting a shadow. I brought it over to the studio and set it up on a sweep of white seamless paper, and lit it with just one light, as it would be in the real world (there is only one sun!). It casts a beautiful shadow on the seamless, especially the way the crystal is cut with these random little scallops out of the body. I used the Century Master portrait camera, which after having been hauled around a bunch is starting to get a bit loose. As always, the lens on it is my Seneca Portrait f5. I put the whole plate back on the camera for these shots, as it’s about my favorite format. I indulged in my film choice and used some of my remaining stock of Arista.EDU Ultra 200 (aka Fomapan 200). Arista.EDU Ultra is Freestyle Photo‘s house-label film, made for them by Foma in the Czech Republic. Foma discontinued the 200 a year or two ago when their source for one of the critical components dried up, and just started re-making it but only in roll film. It’s one of my all-time favorite films, not only because it was dirt cheap (1/3 the price of Ilford), but because it produced beautiful results – it has this old-time feel to the image quality from a reduced red sensitivity. Here’s a couple of shots of the setup (pardon the poor quality- they’re taken with my iPhone which is not the best in low light). I’ll post some scans later of the finished prints.


