I received great news today – with over a week to go before the wednesday night demo, I have 10 people registered. This is terrific. I’m really looking forward to the event, and I can’t wait to meet all the people interested in the process. There’s still room to sign up if anyone is interested, so please head over to the Photoworks website and sign up.
Category Archives: Platinum/Palladium
Glen Echo PhotoWorks press release for FotoWeekDC 2011 events
Here is the press release about the Glen Echo Photoworks events coming up for FotoWeek DC. I will be participating in the “Celebration of Alternative Processes Symposium” on Sunday, November 6 and running a demo of Platinum/Palladium printing on Wednesday, November 9. I know a lot of the other presenters and they’re really great people and great artists. This will be a terrific event and I’m really looking forward to it.
|


Reinventing the Victorian Portrait Parlor
Having been a big collecting fan of 19th century studio portraits, I thought it would be interesting to take on the genre and see if I could manipulate the conventions and subvert them while preserving enough visual continuity that you could visually trace the lineage. Here are my first two efforts. I chose diptychs of my models nude and clothed to inaugurate the series; placing the nude image to the left means the nude reads first in a western left-right reading order, giving primacy of meaning, a naturalness, to the nude, which conflicts with conventional social notions of the nude as an un-natural state. It questions the construction of identity through the construction of the clothed figure. I have printed them in palladium, again, to reinforce the stylistic referent to the Victorian era studio portrait through the look and feel of the image tone. Granted the vintage originals would have been printed in albumen, but this is certainly close enough.


Human Panoramas
Here’s a couple of shots I did of Justin, a model from New York, with my 5×12 “banquet” camera. I was playing around with the “panoramic” format for photographing the human body as I think it’s an interesting take on the subject. The human body is after all a pretty good fit for a vertical 1:3 proportion image. I also like breaking “the rules” of composition when trying out some of these ideas, like the horizontal portrait where the head is exiting the frame at the top, and approaches the center of the image. I think I can get away with that one in this shot because the lighting on the background expands the area of the eye’s focus beyond just the face and so it isn’t dead center in the frame.


The Tattoo says “AGAPI” in Greek, which means “Love”.

All the above were printed in palladium on Bergger COT320 paper, a specially formulated paper made specifically to cater to alternative photographic process printers. I’ve got a couple more of Justin that I may post at a later date but I’m happiest with these for now. Justin was a great model to work with, and brought his own challenges (he’s 6’4″ for starters). I really liked working with him and would highly recommend him to others. He understood how to move and pose and create dynamic tension in a still image, which many models don’t understand, and he was willing to strike a pose and hold it unlike many would-be fashion divas who can’t sit still for more than 30 seconds.
Dates announced for Platinum/Palladium printing Demo, 11-09-2011 at Photoworks Glen Echo
I will be doing a live demonstration of the platinum/palladium printing process at Photoworks in Glen Echo, Maryland as part of the FotoWeek festival. The date and time has been finalized – Wednesday, November 9, from 7-9 PM. Topics to be covered include: tools, paper, chemistry, coating techniques, processing, contrast control and altering image color. The session fee is $40. The session will be held in the upstairs classroom in the Photoworks facility.
Palladium Printing at Large Sizes
If any of you out there have ever done alternative process printing, you’re probably aware of the increase in technical difficulty that comes along with making bigger prints. Each size up adds a new wrinkle, especially when it comes to getting an even, consistent coat. It certainly helps to have a good paper that facilitates a consistent coating via sizing, baryta, or other pre-treatment. Another very important step is using the right brush. I’ve become very fond of the Richeson 9010 “Magic” brush for a good reason – the Richeson brushes have earned their name “magic” by the way the bristles are designed, they just make it easier to coat evenly and smoothly without disturbing the paper surface. They’re worth the price you pay for them from the savings in coating time, reduced re-prints, and hair not pulled out in frustration.
Especially when getting into platinum/palladium printing, most novice printers are extremely cost-conscious. After all, a basic pt/pd kit to make roughly 30 8×10 prints costs in the range of $200 today. And that’s just for the chemistry. However, you’ll quickly learn that there is such a thing as false economy. While printing at smaller sizes, it’s fine to try and economize on your coating solution to see if you can still coat the entire image area. If you under-coat, it’s painelss enough to toss a bad print and start over. All that goes out the window when you start printing bigger than 8×10. Better to be generous with the chemicals until you KNOW your requirements for your paper and your image size, otherwise you’ll be throwing away blotchy, uneven print after blotchy uneven print until you get one. A couple extra drops of palladium or platinum “wasted” will cost you far less than an entire 14×17’s worth that turned out poorly. I was printing some 14×17 prints this week and I realized at the current prices for materials, I was somewhere in the region of $30-40 per print, my cost. You don’t want to mess that up.
When I coat prints that big, I usually mask the edges of the coating area for several reasons. One: I’m using a 3″ or bigger coating brush. Watercolor wash brushes that big are not precision instruments capable of stopping on a dime and not slopping chemistry around. Two: I like nice clean white borders on my paper unless I’m aiming for that ragged, handmade look. Three: the masking tape helps keep the paper in place while coating so it is easier to brush on an even coat of emulsion. One of the challenges of masking is preventing the paper from adhering to the masking tape and tearing when you lift it off. To that end, I’ve found that the 3M “delicate surface” blue painters tape works best. It’s still not a 100% solution, because even when I’m being what I think is careful, I will have the odd occasion where the tape sticks to the paper a little too much and a layer of the paper surface comes up with the tape. I prefer masking with tape during coating to using rubylith to mask while exposing because the rubylith mask just prevents the emulsion from being exposed. You still have to clear the unexposed chemistry out of the paper and if your paper is particularly binding and/or your clearing bath is insufficient, you’ll end up with a rather embarassing looking stain on the paper around your image area. The 3M tape is cheap enough, don’t skimp and try to go cheap. Throw away your tape and pull new strips with each print – again false economy if you try to re-use it, as you run the possibility of contaminating your new print with old chemistry. At potentially upwards of $40 per print, is it worth it trying to save money on $0.10 worth of tape?
FotoWeek DC events at Photoworks in Glen Echo
Photoworks in Glen Echo, Maryland (just outside Washington DC) will be putting on a slate of events as part of FotoWeek DC from November 5-12, 2011. I will be participating in the alternative process show-and-tell on Sunday, November 6, from 11AM to 4PM. I will be showing selections from my recent body of work of DC at night, all shot on large format film.
I will also be giving a platinum/palladium printing demo later that week (date/time to be determined) – admission is $40 plus a $10 materials fee. Here is the slate of presenters and schedule for November 6. I encourage everyone to come out and see the show, and if you’ve never been out to Photoworks before, please come check it out, it’s a lovely facility in the terrific (and photographically ripe) setting of Glen Echo Park, which is part of the National Park Service!
For more information about the park and its cultural, social and educational activities for people of all ages, here is a link to the park’s website:
Glen Echo Park
11:00 11:30 Barbara Maloney Intro/Temperaprint/Photoetching/Cyanotype
11:30 12:00 Scott McMahon Gum bichromate
12:00 12:30 Scott Davis Platinum/palladium
12:30 13:00 Sheila Galagan Lith Printing
13:00 13:30 Andrew Currie Tintype
13:30 14:00 break
14:00 14:30 Grace Taylor Vandyke brown
14:30 15:00 George Smyth Bromoil
15:00 15:30 Keith Williams Monobath/IR/UV
15:30 16:00 Richard Pippin Lith Printing
Upcoming shows/classes
I’ve gotten some further confirmation, so I can post more information about this now:
I’ll be showing work at PhotoWorks in Glen Echo, Maryland as part of PhotoWeek DC 2011. I’ll be displaying my platinum/palladium prints and talking about the process as part of a show-and-tell event on Sunday, November 6. I’ll update with links when they have a schedule of events published. I’ll also probably be doing a process demo some evening that week or the following weekend, November 12-13, and a full-fledged workshop in the spring of 2012.
Still Life in 14×17, number two

One of my 14×17 still life shots. Printed in palladium. Making a palladium print (or any hand-coated emulsion) this large presents unique challenges – trying to coat something this big is a lot harder to get even because it’s such a large surface. You have to work with a much bigger brush, and make sure you keep the emulsion moving around quickly. Don’t be afraid of getting sloppy outside your margins – it’s more important to be evenly coated than it is to be precise and tidy. I printed this on Bergger COT320, a 320 gsm uncoated paper designed specifically for alternative process photo printing. It’s a beautiful, heavy-weight paper with great wet strength and a bright white base – it gives you easily another full stop of contrast range over a more warm white/eggshell paper.
DC Street Nocturne in the key of Panoramic, part 1.
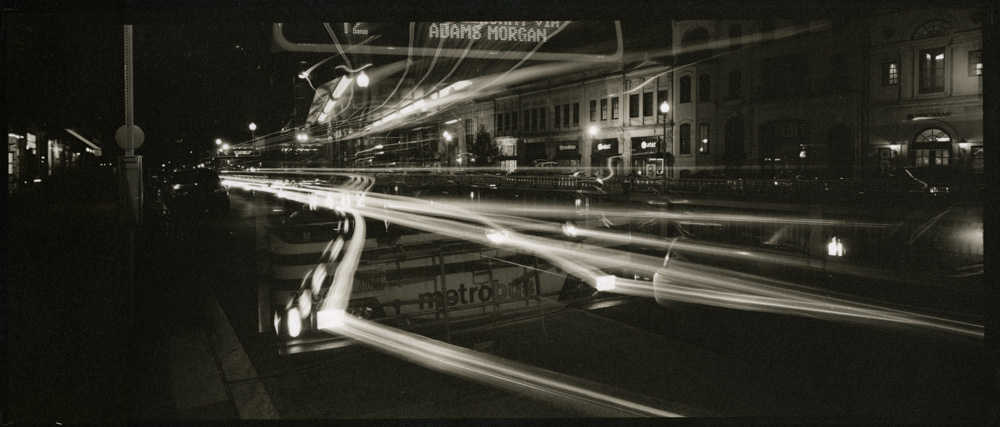

Some of my prints from the shoot on Saturday night. These are all palladium prints. The images were shot with my Canham 5×12. All images were taken around Dupont Circle. You can see from the bus photo that these were obviously long time exposures (the bus was somewhere north of 2 minutes, in multiple snaps of 30+ seconds each). The bus was an experiment that didn’t produce the expected result, but in a bout of serendipity turned out something just as cool as my original concept. I was hoping the bus sitting still as passengers boarded would record as a solid object. Instead, it became something far more abstract in the final image – you can recognize the bus, in pieces. It became an essay on motion, transportation and “transit/ion” by virtue of its self-deconstruction.
