Category Archives: Washington DC

Protests In Washington DC

Given the polarizing nature of the current president’s personality and demeanor, it should be no surprise that he attracts a LOT of protestors. There are always protestors outside the White House – for as long as I can remember, there was a 24/7 anti-nuclear weapons vigil in Lafayette Square, going back to at least the Reagan administration. The woman who spearheaded that protest has since died, so now the round-the-clock vigil encampment is immigration themed, if I recall correctly.

I don’t usually attend protest rallies or photograph them, given that they can be very sensitive events and I don’t want to be associated with anything that might go wrong when two opposing groups confront each other. Fortunately this is a rare thing in DC, but it does happen.

I was out playing tourist/tourguide with some out-of-town friends over the Martin Luther King Birthday holiday. We walked from the Air and Space Museum up Pennsylvania Avenue past the White House, then on to the Washington and Lincoln Memorials before finishing at the MLK Memorial. Outside the Renwick Gallery there was this character:

MeForDictator
Me for Dictator

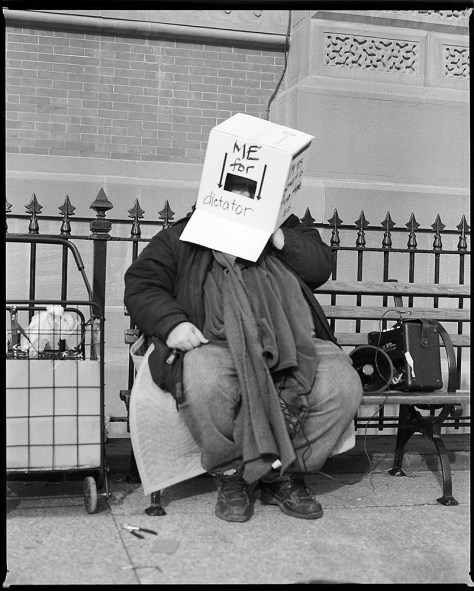
Inside his white box, he was playing the harmonica through a portable amplifier. There was no discernible connection between his song choices and the overall theme of his demonstration, so I don’t know to what extent he was consciously protesting, making social commentary, or just serendipitously expressing the zeitgeist because his meds were wearing off.

Outside the White House was a different matter, and a much more pointed display of discontent. This was right after the president had made his “shithole countries” comment, so much of the signage centered around that.

ShitholePrez
Shithole Prez

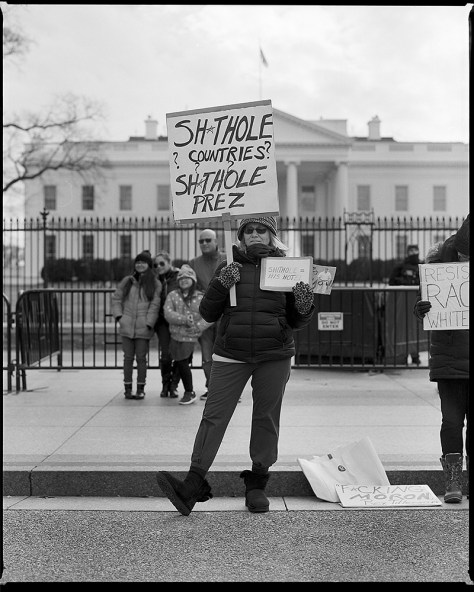
I chose this image because of the profoundly ironic juxtaposition of the happy tourists posing for a family photo in front of the White House with the protesting woman in front. This is something you will experience here in Washington that I don’t think you see many other places – the cognitive dissonance of “oh look, we’re jazzed to be here!” immediately adjacent to “I’m righteously indignant and I’m not going to take it any more!” expressed over the exact same subject.

ResistRacistWH
Resist This Racist White House

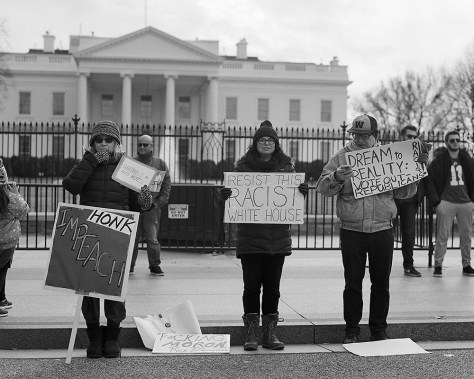
One good thing about photographing protestors is that if you want to get better at “street” photography, they’re a great subject to practice on, because they absolutely want their pictures taken to get their message out to the larger world.


Panoramas around DC – The National Gallery of Art

Last weekend I took an excursion down to the National Gallery of Art to do some book shopping in their bookstore. I brought the Lomo Belair with me to play around a bit.

Waterfall, National Gallery
Waterfall, Cafeteria, National Gallery of Art

The cafeteria and bookstore for the NGA is below ground. There’s a great big window that looks out at a fountain that cascades from the plaza at street level above, and transforms what could otherwise be a dark and oppressively cavern-like space into something almost airy.

Skylight,National Gallery Cafeteria
Skylight, Cafeteria, National Gallery

Also directly above the cafeteria and facing the waterfall are the glass pyramidal skylights. They’re not true pyramids, as they’re actually irregular tetrahedrons (four-faced geometric structures with each face being a triangle).

Stairs, National Gallery
Stairs, West Wing, National Gallery of Art

Contrasting to the brutal modern geometric structures of the cafeteria and the East Wing (itself a wedge-shaped structure designed by I.M. Pei and completed in the 1970s), the original gallery building is supremely neoclassical, designed by one of the late-19th/early 20th century’s greatest American architects, John Russell Pope. The marble staircase shown here has the sweeping grandeur and majesty of a European royal palace.

The images as you see them here are an interim step- my plan is to make platinum prints from all of them. The originals are shot on 2 1/4 inch roll film, so prints directly from the in-camera original film would be quite small – 2 1/4 x 4 1/4 inches. I want to make slightly bigger prints, and I want to try out making digitally enlarged negatives with another technique I recently came across for the digital negative process. I’ve been around and around with making digital negatives for a while and never been especially happy with my results. All the techniques I’ve seen and tried so far are rather labor-intensive and involve making several rounds of test prints just to develop the adjustment curve needed to make the negative print well in pt/pd.

I came across a video from Bostick & Sullivan that explains the process quite simply and clearly, and the website provides you with a downloadable pre-made curve for adjusting your negatives to make them suitable for pt/pd printing. I’ve made the appropriate digital files from these images, and the next step will be to print them over the weekend and try making my prints from them. I’ll post the results of the printing session as soon as I have them.

Here is the video from YouTube:

And the page to download the curves for Pt/Pd, Cyanotype, Kallitype, and Van Dyke:

Digital Negative Adjustment Curves – Bostick & Sullivan

Ghost Man, Columbia Heights

GhostManCoHi

This is a case of where the mechanics of photographing lead to something emotionally resonant in a powerful way – the blurred moving man under other circumstances could be considered a flaw, but here becomes a metaphor.

C&O Canal Monument, Twilight, Georgetown

CanalMonumentNight

The monument is adjacent to where Wisconsin Avenue crosses over the C&O Canal in Georgetown. It is effectively a zero mile marker, although not precisely, as the canal continues a few hundred yards past the marker to empty into Rock Creek. It commemorates the construction of the canal. I caught it right at “magic hour” when the sky is just dark enough that it matches the ambient street light, but is not so dark as to lose all detail and color. Here it has a wonderful indigo glow. And no, no flash was used in the making of this shot- this was purely ambient light from the street lamps and the sky.

Security Bollards, Georgetown

BollardsGeorgetownNight

Washington DC at Twilight

More specifically, the Georgetown neighborhood. Georgetown may be many things (incredibly overpriced, a tourist trap, insanely busy and difficult to navigate because they refused the Metro when the system was being built) but it is very vibrant and there’s always something going on. It still retains much of the late 18th/early 19th century architecture from when Georgetown was actually a separate city from Washington DC, and has a very distinct feel. I like getting out and photographing there, especially at twilight into the sunset hour, because Georgetown’s position on the crest of a hill overlooking the Potomac really captures the light of that hour like no other part of the city.

This is looking east along M Street, one of the main commercial corridors in Georgetown, from the corner of Wisconsin Avenue and M Street. The sun is setting, the light is fading, and the traffic and street lamps are glowing with the first hints of night lights.

EastOnMStreet

The cyclist is moving just fast enough to be blurred as he passes through the scene.

Here is the famous Farmers and Merchants Bank at the corner of Wisconsin and M Streets. This is an absolutely iconic structure in Georgetown, and is instantly recognizable around the world to people who have visited Washington DC.

GeorgetownBankNight3cars

I love the dull gleam of the gilded dome of the bank catching the last rays of the sun.

And here is a glimpse of Georgetown’s industrial waterfront past, where the C&O Canal carves its last yards of waterway through the city before meeting the Potomac River, and where the warehouses for tobacco, wheat, corn, cotton and local products were stored, bought, and sold at the last navigable port on the Potomac.

CanalSunsetGtown

Today, fancy boutiques and high-end condos line the canal, the smokestacks of power plants remaining as decorative follies to remind us of the town’s industrial past.

Time-lapse video – DC Metro from Shaw-Howard U to U Street

Just a little experiment I’ve been wanting to try for a while. I’ve wanted to shoot the tunnel between stations because it’s something most subway riders never see or pay attention to. There’s some interesting architecture in the tunnels, and they’re not the black voids we tend to think of them as. 


Here’s the same concept but in standard frame rate. 

WHO/PAHO HQ, Washington DC

I keep shooting this building and the surrounding intersection because the architecture provides all kinds of graphical possibilities. Here, today, the drum in front of the tower looks almost like polished metal, whereas in reality, it’s coarse concrete. And a 25-second daylight exposure eliminates all but traces of traffic and the most immobile of pedestrians.

WorldHealthPano

The 6×18 pinhole, when kept plumb, level and square, is virtually distortionless. I’m going to try shooting this scene again but from a low angle, pointing up, to see how curved it gets.

Now, with working with the pinhole, Kodak Tri-X has really turned into my go-to film because I really need the extra speed even in daylight. And the grain of Tri-X, in 120, and in contact prints/scans, really is a non-issue.

Cyborg at the bus stop

Well, not really, of course. But that’s what it looks like with the lady in the leg brace.

BusStopCyborg

I wish I’d had a second film back for the RZ that I could have had loaded with Ektar 100, as her hair was pink. This was a test shot for me with the Mamiya RZ 67 and the 180mm f4.5 wide open. It gives a lovely compressed depth-of-field look, and the bokeh of the lens is very smooth and pleasing.

Working with the Vermeer Pinhole – a review

Ok- now I’ve had a chance to put some film through the camera and give it a solid go. Here are some preliminary images from the camera.

GW617Sunset1

This first one worked out amazingly well. I did something like this before with my 4×5 Travelwide pinhole.

Foggy Bottom Metro, Waiting

Different days, different cameras, different feels. I haven’t decided yet which I like better. The 4×5 is a sharper image, but the panoramic has a definite late-afternoon fall rush hour feel to it the other one doesn’t.

GTownFountainDouble617

This was a happy accident – a double-exposure of two scenes in Georgetown, the historic and very scenic neighborhood in Washington DC home to the eponymous university and the Potomac River waterfront. The fountain that dominates the above exposure is a new water feature in the riverfront park built in the last few years to reclaim that space and make it appealing to people. The skyline you can see is the iconic intersection of Wisconsin and M Streets, with the famous bank building in the center.

PumpkinsWholeFoodsGW617

I took this shot to test out how much linear distortion I would get from the pinhole’s curved film plane. As you can see, very little. The nearest pumpkins in the foreground were maybe a foot from the camera, and the ones in the background over a dozen feet away. Yet the shelf they’re sitting on which goes into the background remains sharp and rectilinear.


img_6515GtownWiscMNight617

Here’s the comparison I suspect you’ve all been waiting for. The trial run iPhone panorama shot at top (which I’ve showed before), and the actual exposure from the Vermeer below. The Vermeer has a different aspect ratio ( 6×18 ) and as a result, the vertical field of view is compressed over that of the iPhone. The Vermeer is also using an effective f/300 aperture, so the exposure time for this shot was 25 MINUTES, whereas the iPhone shot was at most three to four seconds.

The iPhone, due to its swinging-lens equivalency, has obvious curvilinear distortion, whereas the Vermeer does not. I was actually honestly surprised at how little distortion it has. I was expecting verticals to remain true, but not the horizontals, because of the curved film plane.

My plan is to re-shoot the night shot with a different tripod. I had a lightweight tripod with me this outing, and it not only did not go high enough to include the entire dome of the Farmer’s Bank building, but it jiggled during the 25 minute exposure such that the non-moving subjects went soft.

As to the camera itself, I have a short list of criticism, both positive and negative.

Likes:

  • The camera is very nicely finished, with an obvious degree of high craftsmanship.
  • I very much like the shutter control on the camera, much better than the rubber lens cap-thing on my Travelwide that can easily get lost.
  • All the controls are easy to grip and operate, even if wearing gloves.
  • The film advance mechanism makes it easy to fully tension the film after advancing, especially if you over-advance a little and need to roll back.
  • It comes with a very nicely made cheat-sheet of instructions on how to load and advance the film, and how to calculate exposure. I used the chart exclusively and my exposures came out spot-on.
  • The camera comes with a 52mm filter adapter ring built in to the front, should you want or need to use contrast-boosting filters for black-and-white, Infrared filters, or neutral density if you enjoy sitting up all night making a single exposure.

Dislikes:

  • The closure mechanism (two thumb-screws to lock down the lid), while very secure when closed, is susceptible to loss- it would be very easy to drop one of the screws while changing film in the wild, and have it disappear in tall grass or down a storm drain. The camera would not be light-tight at that point.
  • There are no levels on the camera (a minor quibble, as they are inexpensive to obtain and install). When dealing with a panoramic camera, getting the horizon level is critical.
  • There are no markings on the camera to indicate the horizontal or vertical fields of view. I can understand how you might not have a horizontal field of view indicator, as the camera design is compact for the format due to the curved film plane, but a vertical field of view indicator would be extremely helpful when guessing compositions and deciding how high to set your tripod, or whether to tilt the camera up.

I’ve got some bubble levels on their way to me from Amazon, and I’ll be attaching them to the top deck when they arrive. That will solve one of my biggest immediate gripes about the camera. Now if I could only find a 6×17 viewfinder that has a similar equivalent focal length…